


<div align="center">BREECH LOADER
Provided By - <a href="http://members.aol.com/sph911/spud/">ht ... 1/spud/</a>
This barrel modification is used primarily in conjunction with the PSR-0. This device allows for easy breech loading of small bore projectiles into the pneumatic launcher, and operates exactly like other breech loading rifles. This unit has an entire barrel as well, it is not an add-on like sound suppressors, as seen on other web pages.
MATERIALS.
16" of 1 1/2" Pipe
40" of 1" Pipe
Small hose clamp for 1" Pipe
Screw and wooden dowel for lock
1 1/2" Bushing x2
1 1/2" Coupling x2
1" to Male thread
Washer (information below)
<img src="http://www.spudfiles.com/official_pics/breech.gif">
ASSEMBLY.
First off, you need a 40" section of 1" pipe, this is for the barrel. Taper one end to a smooth finish at about 45 degrees. This is to make a tight fit with the washer. Find a washer that fits tightly inside the 1 1/2" pipe and will seal correctly with the barrel. This is important to secure an airtight seal. (I and others who have built this gun have incredible difficulty forming a good seal. As a result of my design, the vibration from the air against the washer creates a deafening honking sound, not very sniper-like. Any ideas here would be greatly appreciated.) The washer should go between the first bushing and the coupling towards the end of the barrel that screws into the solenoid valve (see below). For the bushing towards the front, you will have to shave off the pipe stop with a Dremel. Make sure it is a good enough shave so the barrel can slide in and out of it with ease.
<img src="http://www.spudfiles.com/official_pics/breech_assm.gif">
The 1 1/2" pipe is cut as shown with enough room on top to allow access to the barrel. The section is about 1 1/2" from one end, and runs the length of the breech for 8 1/2". Use a Dremel tool to cut the opening, or alternatively, drill a section large enough to fit a small saw blade in and cut the hole with a saw. The notch should be as wide as the piece of wood you use for the handle. See notch and handle in pictures below. Once the couplings and bushings are glued and dried in place slide in the barrel, tapered end first and find where the clamp should be so the barrel fits tight with the washer. Just glue on the remaining threaded piece that screws into the valve to make it modular with your guns.
<img src="http://www.spudfiles.com/official_pics/ ... losed1.jpg">
Breech closed.
<img src="http://www.spudfiles.com/official_pics/breech_open1.jpg">
Breech open.
This barrel allows for creative uses in ammunition including carrots, paper cones, marshmallows, batteries, dowels and more. See the <a href="http://www.spudfiles.com/ammo.php">ammo page</a> for more ideas.
Provided By - <a href="http://members.aol.com/sph911/spud/">ht ... /</a></div>
Bolt Action Breech Loader


-
boilingleadbath

- Staff Sergeant 2

- Posts: 1635
- Joined: Sat Mar 12, 2005 10:35 pm
- Location: Pennsylvania, USA
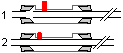
Ah, I see what your problem is... I think. You are complaining about leakage, right?
Your getting leakage at both the washer-barrel interface and where the washer is attached to the air inlet, right? You could use epoxy to secure the washer, but that doesn't fix the washer-barrel inteface. I'm thinking that maybe you could skip the washer - just remove the lip from the second (closer to valve) 1.5-1" bushing, and only glue the inlet pipe most of the way into it.
Like this:
<img src="http://img.photobucket.com/albums/v611/ ... eachL1.gif" alt="Image hosted by Photobucket.com">
I geuss it'd also be possible to have it go all the way through, and then attach a coupler to it.
Edit:
it = inlet pipe
#1 in diagram = bolt open, #2 = bolt closed
-
saladtossser

- Sergeant 3

- Posts: 1234
- Joined: Sat Mar 26, 2005 10:40 am
- Location: Toronto
- Contact:
u can always use o-rings, better flow.
i mean behind the barrel, not around it
i mean behind the barrel, not around it
"whoa... I thought pimpmann was black..."-pyromanic13


I think this design has excellent possiblities, I made a breach loading barrel with a repair fitting, seals well but is time consuming unscrewing, and installing the "cartridge". Let me work on it and I will let everyone know of my findings !!
If you cut your "J" in the outer sleeve of a repair coupling and attach your bolt to the portion with the o ring on the outside, Make sure that you do not cut the hook on the "J" too near to the end and allow a full diameter for it to seal against when you pull the bolt back. Barrel will simply connect to the sliding inner. I think that would work quite well. The only problem is you are relying on the plastic outer sleeve which has bee cut away to hold the weight of the barrel. Maybe something with a metal nipple would be better, less expensive and more robust !!!
If you cut your "J" in the outer sleeve of a repair coupling and attach your bolt to the portion with the o ring on the outside, Make sure that you do not cut the hook on the "J" too near to the end and allow a full diameter for it to seal against when you pull the bolt back. Barrel will simply connect to the sliding inner. I think that would work quite well. The only problem is you are relying on the plastic outer sleeve which has bee cut away to hold the weight of the barrel. Maybe something with a metal nipple would be better, less expensive and more robust !!!


i made this breach loader and i love it because i can shoot my tato's much faster and i used a rubberwasher first and apoxeyed it then i put a normal washer behind that for extra streingth.
mine dont leak any air and the first time me and my friends went to the barn to shoot it the potato was so powetfull it broke a 1" thick plastic window.
so yea its worth it
mine dont leak any air and the first time me and my friends went to the barn to shoot it the potato was so powetfull it broke a 1" thick plastic window.
so yea its worth it
-
LucyInTheSky

- Specialist 2

- Posts: 293
- Joined: Fri Apr 21, 2006 11:46 am
Im currentl making this out of copper but using BLBs design, but with a washer between the two parts of barrel.
-
roderunner
- Private

- Posts: 3
- Joined: Thu Sep 14, 2006 7:22 pm
I've had more luck with using metal exhaust tubing that slides over the PVC. Just use a dremel or a router to make an o-ring channel, and put an o-ring there. No leakage at all. It is a weak point, so I use 1.5" PVC inside of 2" PVC.
Check it out:
Check it out:
- Attachments
-
- The Gun
- full_sm.jpg (5.87 KiB) Viewed 20133 times
-
- Breech Open
- breech_sm.jpg (23.6 KiB) Viewed 20133 times
-
- Breech Closed
- close_sm.jpg (13.02 KiB) Viewed 20133 times
-
vanmaineac
- Private
- Posts: 10
- Joined: Mon Jan 29, 2007 5:31 pm
what I did with this design was when the barrel goes into the reducer I just changed it so the 1" section went all the way through and put a coupling on the end of it. I think it gives a much better seal
Create an account or sign in to join the discussion
You need to be a member in order to post a reply
Create an account
Not a member? register to join our community
Members can start their own topics & subscribe to topics
It’s free and only takes a minute
Sign in
-
- Similar Topics
- Replies
- Views
- Last post
-
- 5 Replies
- 7312 Views
-
Last post by Doodmens
-
- 0 Replies
- 3431 Views
-
Last post by Gun Freak
-
- 16 Replies
- 10653 Views
-
Last post by M3NT4L
-
- 7 Replies
- 2723 Views
-
Last post by Pyro Ninja
-
- 9 Replies
- 10802 Views
-
Last post by jackssmirkingrevenge


