


<div align="center">DART
Provided By - Rex
Starting with wad/sabot construction. What I find to work well is to use 1/32" balsa wood, using a compass draw 8 - 10 circles (2 1/4" dia.) on your wood. Nice thing about this thickness balsa is, it is easy to cut( the act of drawing will usually cut halfway through). Then cut out your circles. Apply a thin coat of white glue to one disk, and glue the 2nd disk to the first, remember to rotate the pieces 90 degrees so the grain runs perpendicular (you're basically making plywood), continue until all the disks are glued in a stack, allow to dry. After the glue has dried, drill a 1/4" hole through the stack. Next run a 1/4" x 4" machine screw through the stack using a 1.5" fender washer on each side, secure this arrangement with a 1/4" nut. Chuck this into your drill, spin the stack, use 60 grit sandpaper on the edge. Stop frequently to see if it will fit in your 2" barrel. When it does stop sanding, and remove from the drill, then remove the bolt. cut two pieces of paper to fit the flat slides (easiest to simply set the stack on the paper and draw around it). glue them onto your stack balsa, apply a thin coat of white glue over the top surface of each piece, allow to dry (takes a few hours). After the glue has dried drill a .5" hole through the center for your index pin. Use a piece of .5" dowel 1" plus the thickness of your chuck of balsa plywood long and glue that into the hole. You want to reduce the diameter of the index pin to about 1/32" less than the inside diameter of your body tube.
Optional
To improve the performance you can use a small plastic cup glued to the underside of the wad. The small cups that they use to pack 'sugar free drink mixes' (Tang, crystal lite) in should work well. to start you need to reduce the overall diameter of these cups by roughly 3/16"(60grit sand paper works nicely). sand or otherwise reduce the dia of the top flange till it will fit inside a 2" pipe. gluing them in place, I found that a 1.5" long piece of 2" pipe helps a great deal as a jig, make sure one end is square, on a flat surface slide the plastic cup into the pipe open end down till it hit the flat surface, next apply a bead of glue across the upper surface(glue gun works) then slide the wad down onto the cup. allow a minute or to for the glue to set and remove from the jig, touch up any spots that look weak. paint the wad a nice bright color (blaze orange is good) and you can reuse it numerous times.
Note: I've been using an older version of these cups, so I don't know how durable the new ones are. I don't think they are quite as strong as the older ones, so they might not last as long.
Body tube
Nothing over fancy here, just 14" of cpvc sdr-11 (1/2" thin wall). A pipe cutter works very nicely, although you will need to use a pipe reamer to remove the ridge around the inside edge. Use some fine grade steel wool (0 - 00) to 'rough up' the surface of the pipe (and remove the markings). Wash the pipe and your vanes in hot soapy water( if you hand wash your dishes that works fine, I would recommend that you do the dishes along with your dart supplies to maintain domestic harmony), I don't know how it would turn out if one were to use the dishwasher, rinse and allow to dry. I've been using 'Bohning Fletch-tite vanes' 5" stealth, 4 each(untested; one may be able to get away with using 3 vanes per dart, I have not tried this, I find it easier to do 4 vanes/fins). Draw 4 lines 90 degrees apart on one end of the tube(or 3 lines 120 degrees apart for 3 vane setup) these lines should be roughly .5" longer than your vanes. These lines are to help you glue the vanes on straight. Run an 1/8" wide bead of fletching cement along the lines (do one line/vane at a time) and attach the vanes, you will need to hold each vane in place for about 15 seconds till the cement starts to set, repeat for each vane. Note: do not let the vanes run past the end of the tube or you may encounter problems with them coming off in flight. set the dart off to side and allow the cement 1 - 2 hours to dry. If you want to get fancy apply a fillet of cement to each side of each vane base. While the glue sets/dries cut two(2) 4" pieces of .062" music wire. after giving the glue time to dry, measure 1" from the forward end of the tube and 45 degree offset from the vanes and drill a 1/16" hole straight through the tube(from one side to the other), rotate the tube 90 degrees and 1 1/8" from the forward end drill another 1/16" set of holes. Insert one piece of music wire through each set of holes (you want approximately 1.75" of wire sticking out from each hole.
<img src="http://www.spudfiles.com/official_pics/pic11.gif">
Nose 'Cone'
There are 2 variations a low drag version, and a sport version. The sport version while not as low drag (or cool looking) is more durable and quicker to make.
Sport nose
Use a 1/2" slip cap drill a 3/16" hole centered in the end, tap for a 1/4" x 20 bolt, glue it on the forward end of the body tube, put 2 1/4 washers on a 1/4" x 1" x 20 roundhead machine screw, thread it into the nose until snug and you're done.
Low drag nose
I've been using 3/4" hardwood dowel as a start (5/8" should require a bit less work) overall length 3 1/4" long, cone 2 1/2", mounting shoulder 3/4".
<img src="http://www.spudfiles.com/official_pics/pic21.gif">
Although the picture shows a cone shaped nose, odds are that after the first landing it will no longer look that way. Most likely a rounded nose will work almost as well and last longer, shape the nose by your tools of choice ( a lathe would be my 1st choice, however I'm not so blessed) I have been using a table saw to rough out the shape followed by a sanding block with 60 grit sandpaper. sand, carve, whatever till the tip is about 1/4" in dia and the base of the cone is 5/8" in dia. round off the tip. the shoulder should fit snugly into the body tube. Place/insert the nose into the body tube DO NOT GLUE find out where the dart balances, if the center of mass is at or forward of the pipe (7" or more from the rear of the dart) everything should be ok. if not add weight to the nose, keep in mind that it needs to stay in place while traveling down the barrel at 250 g's. assuming that the dart balances ok, glue the nose on the dart (hot glue, epoxy, fletching cement).
Painting
Paint the dart a nice high visibility color, neon blue, fluorescent orange, screaming red, exact color should provide a good contrast with the local ground cover.
Final adjustments
adjust the guide wires to where a) the dart is centered in the barrel, and b) just touching the inside of the barrel(likely need to adjust them before each flight)
Optional (Untested)
It should improve separation of wad and dart if a hole is drilled through the index pin so that the dart is pressurized upon firing the gun.
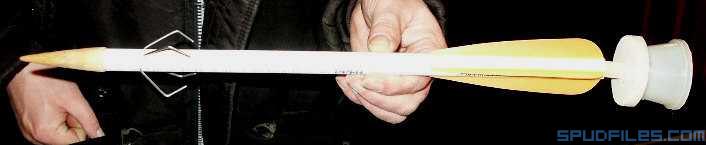
Here is my final one. It just needs paint.
<img src="http://www.spudfiles.com/official_pics/RexDart1.jpg">
Provided By - Rex </div>
Dart
-
chopperdan88
- Recruit

- Posts: 2
- Joined: Mon Apr 25, 2005 9:41 pm
what about making a sabot rond with styofoam and a weighted model rocket? i tried this on my friends cannon and it workend tremendously. email me for more info. the rocket flew about 450 yards.

-
bubblebathman
- Private 3

- Posts: 50
- Joined: Thu Sep 22, 2005 12:45 pm
- Location: USA
well by the look of it not hard to brek 
Create an account or sign in to join the discussion
You need to be a member in order to post a reply
Create an account
Not a member? register to join our community
Members can start their own topics & subscribe to topics
It’s free and only takes a minute
Sign in
-
- Similar Topics
- Replies
- Views
- Last post
-
- 1 Replies
- 1381 Views
-
Last post by clide
-
- 4 Replies
- 3784 Views
-
Last post by PVC Arsenal 17
-
- 17 Replies
- 7087 Views
-
Last post by Deko
-
- 5 Replies
- 2733 Views
-
Last post by falcone
-
- 22 Replies
- 10599 Views
-
Last post by THUNDERLORD


