| Author |
Message
|
| boilingleadbath |
Posted: 08/05/2005 1:16 AM Post subject: Interchangable barrels... on a CO-AXIAL |
|
|
 Moderator

Joined: 12 Mar 2005 Posts: 1647 5491.22 Spud Bux
|
First, let me say it's unique for a reason - it's a pain compared to the normal way.
Second, let me say that as far as I know, my cannon is the only one as of 5-august-2005 that uses this system. Only the second co-axial that I know of that has any meathod of changing barrels.
Thirdly, if you have a removable barrel of the origional diameter and length with a threaded adapter on the end, you can use these barrels in that launcher. So don't use "I don't want to use my 15$ riffled barrel on a single launcher" as an excuse.
Ok, so you built an awsome co-axial launcher. You now want more barrels. Let's hope you have a threaded adapter on the end or a place to put one, or you'r stuck with one barrel.
"Old barrel" will hensforth be used to talk about the barrel you origionaly used in the construction of the launcher.
"New barrel" will hensforth be used to talk about the barrel you'r making to use in that launcher.
Materials:
New barrel sized pipe.
Old barrel sized Male adapter.
Old barrel sized Female adapter.
New barrel sized x old barrel sized reducer bushing.
New barrel sized fitting(s) that are too big, or just the right size, to fit in the old barrel.
New barrel sized Female adapter. *optional*
Directions:
First, solvent weld a threaded adapter to the end of the barrel. I prefer female - you'r less likly to hit the threads on something and screw them up.
Next, get a fitting for the new barrel size that is too big (or exactly the right size) to put in the origional barrel. For example; to make a new 1.5" barrel for a 2" barreled launcher, you would take 1.5" fitting (couplers work awsome - I'd buy the PW ones for the added length, but you could get away with 1 or 2 DWV ones).
Once you have that, cut it into short rings if it's a coupler; a 1" (or 1/2 the fitting, your choise) long one, and as many about 1cm ones as you want. Otherwise, leave it as it is. These will, post modification, support the new barrel in the old one, and form a primative gas seal.
Once you have your future suports, reduce their outside diameter untill they fit (fairly snugly... remember what their being used for. AND NO CHEATING - DOING THE REMOVAL HERE INSTEAD OF AT THE END RESULTS IN SHODDY WORK! (you won't get this yet, but you will when we get to the end)) in the old barrel. You'r done with them, for now.
Now, take your (old barrel sized * new barrel sized) reducer bushing, and remove the stop just as if you where making a co-axial launcher.
Once you have that prepared, solvent weld it to your (old barrel sized) male adapter. (assuming you have a female adapter on your old barrel)
After that assembly has set up, solvent weld BACKWARDS onto your new barrel, leaving about 1.5"-2" of new barrel sticking out behind it, if you got the optional new barrel sized female adapter. Otherwise, have the end of your assembly flush with the end of the new barrel pipe.
Solvent weld the optional female adapter, after removeing part of the stop, (or male, if you prefer) onto this 1.5-2" of pipe sticking out.
Nearing compleation, cut your new barrel pipe so that when you thread the thing on, it will come up .5" short of the end of your old barrel pipe. Remember that these fittings don't screw all the way in! I recomend that, previous to constructing this, you'v measured the distance they do go in!
Now, take your support rings and place them an equal distance apart on your new barrel pipe. The wide one I had you make goes on the end farthest away from the fitting. The ones that go in the middle should be relitivly loose fitting.
Solvent weld these in place. The ones in the middle hold no pressure, so you can use just cement on just the pipe. However, use proper technique on the wide one at the end - it does hold pressure (that's why it's wider)
Wait a day or so, and... You might be done! However, if your ammo gets stuck in muzzle of the new barrel, or your you can't put the new barrel in the old barrel, your pipe and rings may have swelled up with the solvent. Get out that dremmle and enlarge/reduce their size.
Now, your done.
Have I convinced you not to do it? Oops!
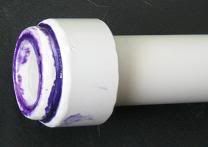
Pictures of What the @$%^ I'v been talking about:
(more to come in the morning) |
|
| Back to top |
|
 |
|
|
 |
| saladtossser |
Posted: 08/05/2005 9:10 AM Post subject: |
|
|
 SpudZilla

Joined: 26 Mar 2005 Posts: 1237 98.19 Spud Bux
|
| i had the same thought once, but u make it sound harder |
|
| Back to top |
|
 |
| PVC Arsenal 17 |
Posted: 04/16/2006 12:46 PM Post subject: |
|
|
 WITTY PHRASE

Joined: 27 Mar 2006 Posts: 1232 748.69 Spud Bux
|
I am new to all this stuff so I don't what a coaxial is. My cannons are made with a barrel inside the chamber and use a fixed diaphragm. Is that coaxial? Here is how my removable system works.
The chamber has a female adapter glued to it. The barrel is glued into a bushing that is glued into a male adapter which then screws into the female side.
 |
|
| Back to top |
|
 |
| tarmann_90 |
Posted: 04/02/2007 23:07 PM Post subject: |
|
|
Private

Joined: 31 Mar 2007 Posts: 14 38.12 Spud Bux
|
| yeah pvc arsenels version is easier |
|
| Back to top |
|
 |
| pyrogeek |
Posted: 04/02/2007 23:45 PM Post subject: |
|
|
Lieutenant Colonel

Joined: 13 May 2006 Posts: 455 1142.31 Spud Bux
|
| But, PVC Arsenals gun isn't a coaxial. Although, that idea would work just fine for a barrel. Just different size pipe and bushings glued to the same size adapter to fit in the adapter on the cannon. Thats how mine are done. Except, I don't have a coaxial (yet). |
|
| Back to top |
|
 |
| tarmann_90 |
Posted: 04/02/2007 23:49 PM Post subject: |
|
|
Private

Joined: 31 Mar 2007 Posts: 14 38.12 Spud Bux
|
| thats how mine works too, just soo expensive to keep buying new 4" adapters |
|
| Back to top |
|
 |
| chaos |
Posted: 04/03/2007 1:42 AM Post subject: |
|
|
 Brigadier General

Joined: 17 Jan 2007 Posts: 1222 913.08 Spud Bux
|
| i made and "interchangeable" barrel for my gun, i just sleeved a aluminum arrow shaft inside mi old barrel wit some rubber disks |
|
| Back to top |
|
 |
| schmanman |
Posted: 04/03/2007 5:24 AM Post subject: |
|
|
 blabbering idiot

Joined: 25 Mar 2006 Posts: 1667 1006.17 Spud Bux
|
I Did it a little differently, but on my valve, which is a coaxal-like setup, with interchangable porting.
like this: (look at the front of the valve)
 |
|
| Back to top |
|
 |
| pyrogeek |
Posted: 04/03/2007 14:31 PM Post subject: |
|
|
Lieutenant Colonel

Joined: 13 May 2006 Posts: 455 1142.31 Spud Bux
|
Chaos, on my big 4inch cannon, I put a reducer and 3inch fitting on the end. It's a little hard to fit my hand through, but the fittings are a little cheaper. The biggest barrel I was going to have was 3inch, so I couldn't see any point it going with 4inch fittings.
Although, with propane injection, fans, quick connect Banjo fittings and such, I don't think a couple extra 4inch fittings are going to break the bank. |
|
| Back to top |
|
 |
| PVC Arsenal 17 |
Posted: 04/03/2007 14:49 PM Post subject: |
|
|
 WITTY PHRASE

Joined: 27 Mar 2006 Posts: 1232 748.69 Spud Bux
|
| pyrogeek wrote: | | But, PVC Arsenals gun isn't a coaxial. Although, that idea would work just fine for a barrel. Just different size pipe and bushings glued to the same size adapter to fit in the adapter on the cannon. Thats how mine are done. Except, I don't have a coaxial (yet). |
Yes it is.
Man this thread is old....... |
|
| Back to top |
|
 |
| schismatized |
Posted: 06/23/2007 0:33 AM Post subject: |
|
|
 Staff Sergeant

Joined: 10 Jun 2007 Posts: 101 210.39 Spud Bux
|
| anyone got a pic or better explanation of this? lead baths is a little hard to understand. |
|
| Back to top |
|
 |
| boilingleadbath |
Posted: 06/23/2007 8:32 AM Post subject: |
|
|
 Moderator

Joined: 12 Mar 2005 Posts: 1647 5491.22 Spud Bux
|
Here we have a look at the muzzle of a 1" barrel insert for use in my 2" barreled pneumatic, when it is in the pneumatic.
Note the bushing, the male NPT adapter, and the female NPT adapter on the normal barrel of the launcher.
I have more I might post, but I have to leave now.
Last edited by boilingleadbath on 06/23/2007 20:02 PM; edited 1 time in total |
|
| Back to top |
|
 |
| schismatized |
Posted: 06/23/2007 18:36 PM Post subject: |
|
|
 Staff Sergeant

Joined: 10 Jun 2007 Posts: 101 210.39 Spud Bux
|
if you could post more, that would be great.  |
|
| Back to top |
|
 |
| boilingleadbath |
Posted: 06/23/2007 20:21 PM Post subject: |
|
|
 Moderator

Joined: 12 Mar 2005 Posts: 1647 5491.22 Spud Bux
|
Here we have another view of the fittings that allow one to attach the new barrel to the old one.
And here we have the 'seal' of sorts at the breach of the barrel. |
|
| Back to top |
|
 |
| VH_man |
Posted: 06/23/2007 20:37 PM Post subject: |
|
|
 Major General

Joined: 09 Dec 2006 Posts: 1338 1962.81 Spud Bux
|
| hmm, thats pretty cool. i always thought making interchangable barrels for coaxials meant taking out the whole barrel assembely and installing a whole new barrel assembely.......... |
|
| Back to top |
|
 |
|
|