“NO DRILL” Sprinkler Valve Pneumatic Modification
Parts Required:
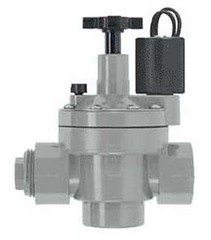
1. Orbit Watermaster Model 57020
2. 1/4" NPTM X 1/4" NPTM Brass Fitting (National Pipe Thread Male)
Tools Required:
1. JB Weld (recommended) or other Epoxy
2. 9/16” Socket and Ratchet (recommended) or 9/16” Wrench
3. Teflon Tape
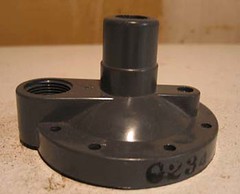
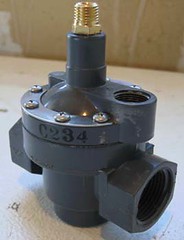
Step 1
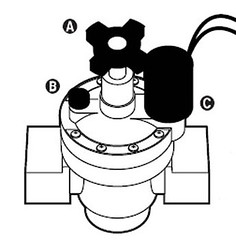
Remove the “Flow Control Handle” (Part A), “Bleed Screw” (Part B) and the “Solenoid” (Part C)
<a href="" title="Photo Sharing"><img src="http://static.flickr.com/78/177538686_99c0cb6781_m.jpg" width="211" height="240" alt="basevalve"></a> <a href="" title="Photo Sharing"><img src="http://static.flickr.com/71/177538721_e4c7a0c4f8_m.jpg" width="237" height="240" alt="valvedig1"></a>
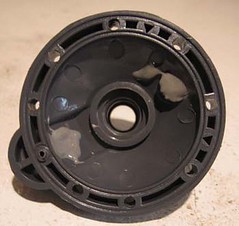
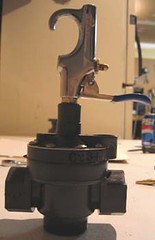
Step 2
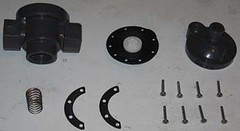
Remove the 8 Screws that hold the “Cover Assembly” (Part A) to the “Valve Body” (Part B)
<a href="" title="Photo Sharing"><img src="http://static.flickr.com/76/177538731_4c0fc27b9f_m.jpg" width="143" height="240" alt="valvedig2"></a> <a href="" title="Photo Sharing"><img src="http://static.flickr.com/55/177538745_2f756f14d9_m.jpg" width="240" height="131" alt="valvedis"></a>
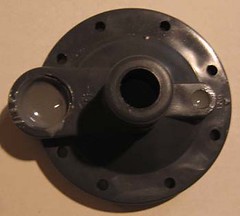
Step 3
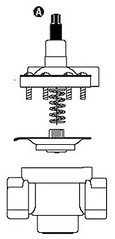
Remove the “Flow Control Stem” and the “Wire Rod” by Twisting the “Flow Control Stem” Clockwise until the stem comes loose.
<a href="" title="Photo Sharing"><img src="http://static.flickr.com/67/177538763_8c78e45a34_m.jpg" width="115" height="240" alt="valvedig3"></a> <a href="" title="Photo Sharing"><img src="http://static.flickr.com/68/177538790_dee1fb2735_m.jpg" width="240" height="194" alt="valvetop"></a>
Step 4
Mix JB Weld and fill the holes left in the “Cover Assembly” after removing the “Bleed Screw” and “Solenoid” and wait of the JB Weld to set.
<a href="" title="Photo Sharing"><img src="http://static.flickr.com/73/177538822_96dfbb3a2a_m.jpg" width="240" height="226" alt="valvebottomepoxy"></a> <a href="" title="Photo Sharing"><img src="http://static.flickr.com/65/177538855_18ecf57a6a_m.jpg" width="240" height="216" alt="valvetopepoxy"></a>
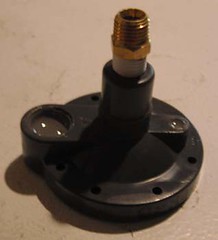
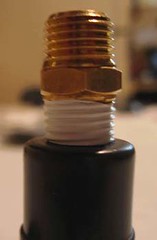
Step 5
Wrap one side of the 1/4” fitting with Teflon tape then thread the 1/4" Fitting into the hole left by the “Flow Control Stem” with the 9/16” socket. Be careful to thread the fitting as straight as possible.
<a href="" title="Photo Sharing"><img src="http://static.flickr.com/54/177538882_476e4020a7_m.jpg" width="218" height="240" alt="valvefitting"></a> <a href="" title="Photo Sharing"><img src="http://static.flickr.com/73/177538905_d8522aa946_m.jpg" width="157" height="240" alt="fittingclose"></a> <a href="" title="Photo Sharing"><img src="http://static.flickr.com/46/177538934_b251767723_m.jpg" width="240" height="232" alt="valvetopfitting"></a>
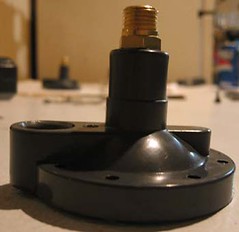
Step 6
Reassemble the valve. Mount a Blow Gun or 1/4” Ball Valve to the open end of the 1/4" fitting using Teflon tape.
<a href="" title="Photo Sharing"><img src="http://static.flickr.com/51/177538958_1f920233cb_m.jpg" width="155" height="240" alt="valvedoneblowgun"></a> <a href="" title="Photo Sharing"><img src="http://static.flickr.com/55/177538985_3373a07970_m.jpg" width="204" height="240" alt="valvedoneside"></a> <a href="" title="Photo Sharing"><img src="http://static.flickr.com/58/177539009_59bad22a14_m.jpg" width="184" height="240" alt="valvedonean"></a>
The valve is now ready to use. It can be mounted in an inline or right angle configuration, simply use the included plug and some Teflon tape to seal the unused port.
“NO DRILL” Sprinkler Valve Pneumatic Modification


Nice tutorial! I think I can honestly "dub" that the most user freindly tutorial. Looks good, and beyond that I only have two things to say. That no tap method is just trouble waiting to happen, as we have noticed in another thread, someone jacked there threads beyond repair. Secondly if you so desire to use this method, the taping should be done without the tape, backed out, wrapped with teflon tape, then re-inserted.
-
carlbelcher

- Corporal

- Posts: 532
- Joined: Mon Jun 12, 2006 6:54 pm
First of all thanks for the kudos. Second I agree with you, I think that you should probably thread the fitting twice first without tape then again with tape. I think using a pipe tap is overkill, especially with this mod. Because of the size of the hole the fitting threads perfectly every time unless you cross thread it really bad somehow.


I'll stick with the Orbit Watermaster 57101 because the flat top's and smaller profiles... great tutorial A++... I think pipe taps are overkill, but in that case, so are Supahs, but they both are great and help a lot... 
-FrOgY-
I wish people would stop needing a better signature!
I wish people would stop needing a better signature!


-
singularity

- Corporal 5

- Posts: 982
- Joined: Mon Jun 26, 2006 10:53 pm
- Location: someplace
- Contact:
most of the pictures arent working on my computer, and the ones that are are really skinny.
-
carlbelcher
- Corporal
- Posts: 532
- Joined: Mon Jun 12, 2006 6:54 pm
It's not a matter of whether you have a drill of not, it's if you want to drilling a hole in a sprinkler valve or just thread in a fitting.
Is your Google.com Broken?!
-
DriftingRz
- Private 3

- Posts: 58
- Joined: Sun Sep 25, 2005 9:28 pm
i aint got a drill, used to but it died, so i have the ghettoest set of tools to make a holw i usually stab a pair of scissors or something into what im working on and twist them till hole is size desired, jsut got to check alot and not go bigger then u need, yea im asking for tools this christmas when i get my car im going anti ghetto on the mods
-
Vb_happiness

- Private 2

- Posts: 23
- Joined: Thu Jul 20, 2006 6:26 am
I tried this method it worked but on a version of this preasure adjustable valve the neck has a 3mm lip and i found that this was not enough to hold the brass fitting on but i found a 3/4" male to a 1/2" fem conecter and it is the same size as the inner of the adjustable neck. If you want more detailed answers just ask me.


-
Vb_happiness
- Private 2
- Posts: 23
- Joined: Thu Jul 20, 2006 6:26 am
There is equivalent products everywhere, like in Australia I havent been able to find any Watermaster products. I just looked for valves that looked similar.
-
carlbelcher
- Corporal
- Posts: 532
- Joined: Mon Jun 12, 2006 6:54 pm
Might this be why you had trouble with my tutorial?I just looked for valves that looked similar.
Is your Google.com Broken?!


is it cheeper to just go any buy a valve and modify it urself or better to just get one from spudtech.com ?
-
carlbelcher
- Corporal
- Posts: 532
- Joined: Mon Jun 12, 2006 6:54 pm
It's cheaper to buy a valve and modify it yourself.
spudtech.com unmodified valve $17.00 plus shipping.
Home Depot same valve $12.00 with no shipping.
spudtech.com unmodified valve $17.00 plus shipping.
Home Depot same valve $12.00 with no shipping.
Is your Google.com Broken?!
Create an account or sign in to join the discussion
You need to be a member in order to post a reply
Create an account
Not a member? register to join our community
Members can start their own topics & subscribe to topics
It’s free and only takes a minute
Sign in
-
- Similar Topics
- Replies
- Views
- Last post


