Page 1 of 2
Water Balloon Mortar
Posted: Fri Feb 29, 2008 4:56 pm
by Rokmonkey
Okay, well I've been perusing the forums for a long time now, so I decided to show off what I've been working on lately. This is the third of my cannons. I was begged by my parents and friends to make a cannon that will launch water balloons at a family friends campsite, do to some playful water war. Anyway, enough backstory, here is what you want.
3" diameter, 26" long barrel (I think)
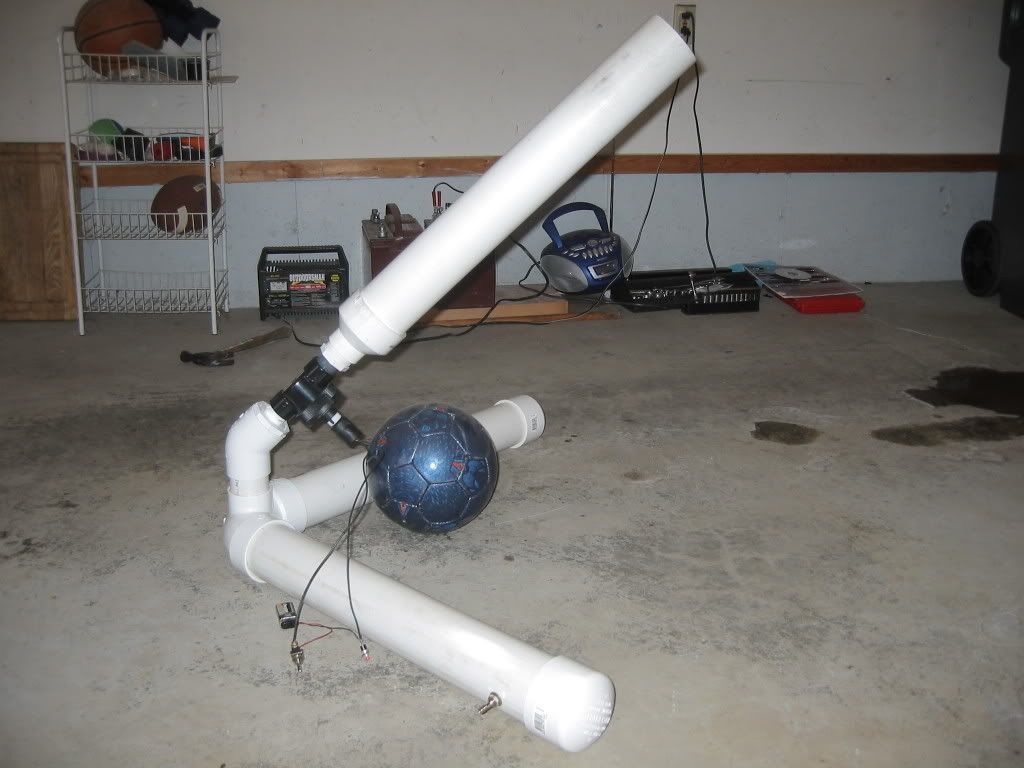
Two 3" diameter, 26" long chamber formed at a 90 degree angel.
I set it up to be stationary when we fire it. We put it up to 80 PSI, there is a leak on the left hand side at the T section, I guess I should use primer from now on, maybe that would help. We can get max maybe 50 yards, not impressive at all I know, but it does shoot an intact waterballoon on target, had to jerry-rig a carrier for the balloon. It is fairly inefficient cannon I realize now, really was hoping for more range on it...Any tips or things to do on my next cannon?
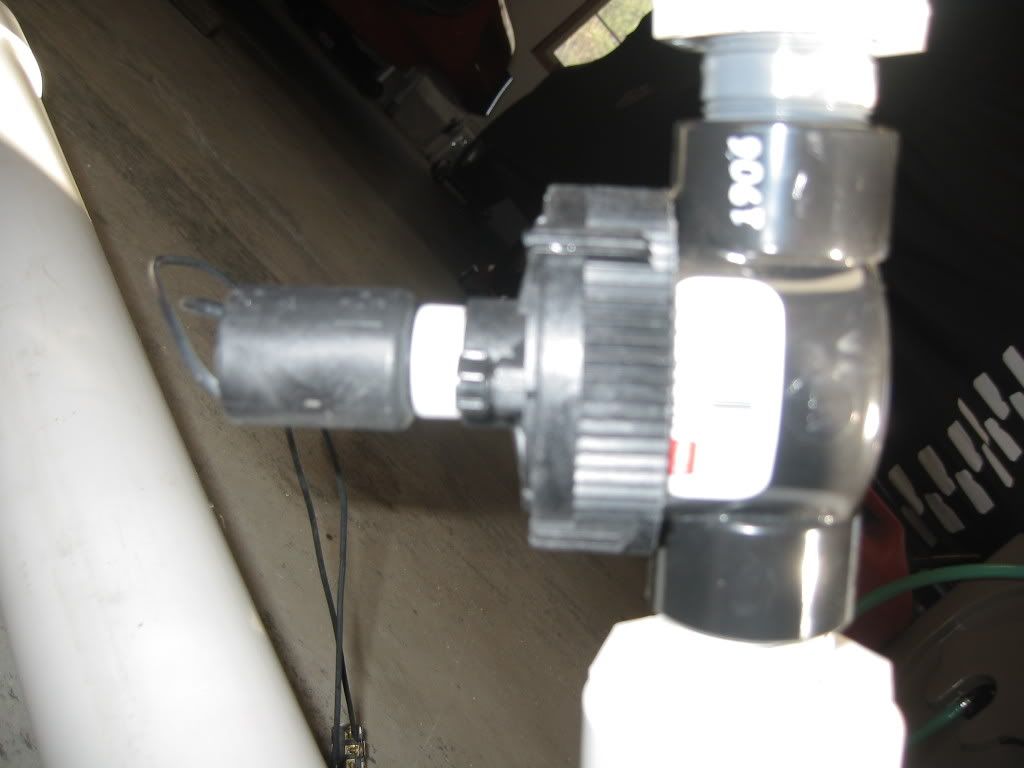
This is my first cannon with a sprinkler valve, I was weary on trying to mod this sprinkler valve so I took extra pictures of it, see if anyone could tell me how to mod this valve, I have two, so I can test it out on one.
Here are some pics:
Here it is in some of it's glory...
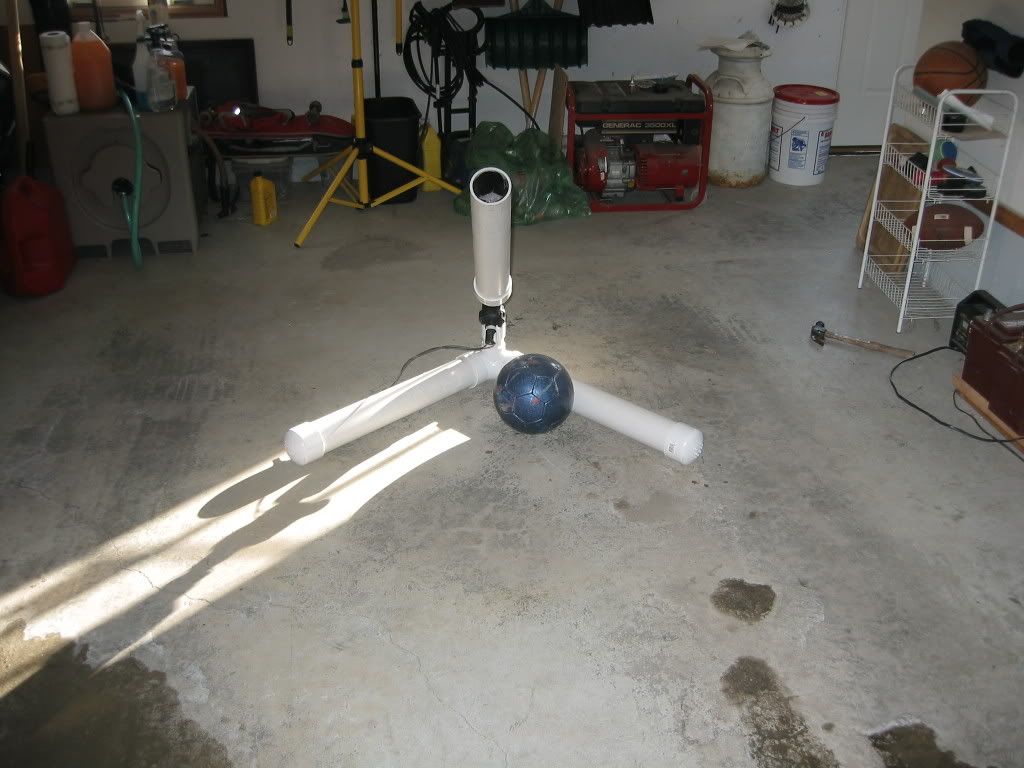
A side view of the cannon, soccer ball for referance in size, filler valve on the right, trying to find the right part so I can stick a guage on there as well. Meant to have the valve stick straight up, but obviously wasn't paying a ttention when I was gluing it together and got damn lucky it wasn't facing straight down.
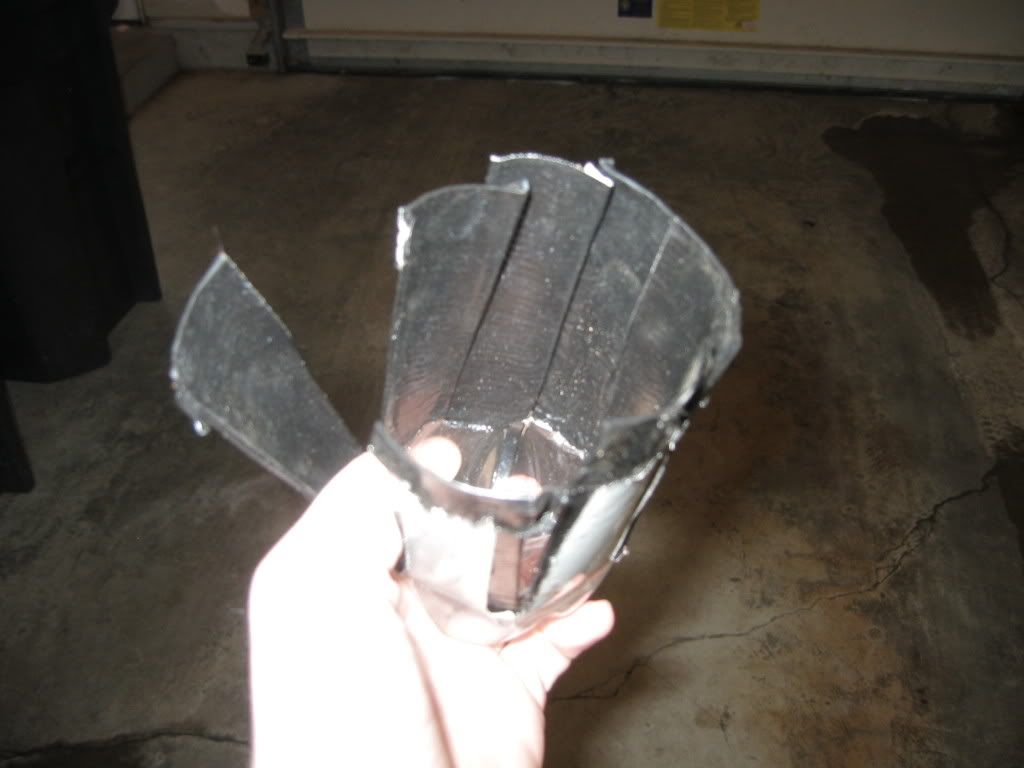
This is the balloon carrier I made out of a a water bottle, using duct tape and a leatherman...
Here is a picture of the valve, from a head on angel, I know there is glare...
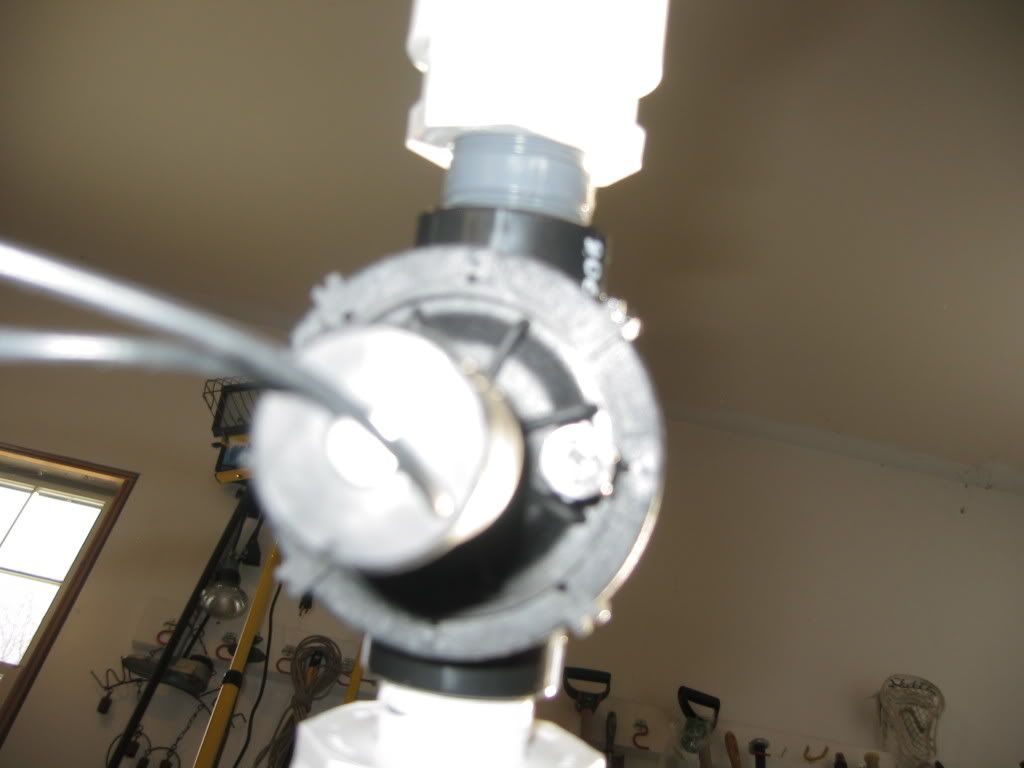
And another picture, from the side..
And a picture of my firing button, yep I know, pretty gheto, too lazy to go get a project box from Radio Shack...

Posted: Fri Feb 29, 2008 5:02 pm
by MrCrowley
Woah, don't take this over 60psi, especially not around family and friends.
Not only you didn't use primer, you also have DWV non-pressure rated fittings on there.
DWV has been taken up to 80psi before, but it's not safe at all. And without primer it's even worse, and the leak doesn't help either.
The reason you have bad performance is because the valve is so small, but I wouldn't use this cannon again sorry. Just cut your losses and run, take the sprinkler valve and ditch the rest.
If you're not sure how to identify pressure rated pipe, over DWV (non-pressure rated) look at <A HREF="
http://www.spudfiles.com/spud_wiki/inde ... ">this.</a>
Edit: Other than that, the cannon isn't too bad. For your next build, make a topic about your design and we will help you out so you can get the performance you want. The sprinkler valve could also do with a <A HREF="
http://www.spudfiles.com/forums/modding ... ml">mod</a> to increase the performance.
Posted: Fri Feb 29, 2008 5:08 pm
by jrrdw
I like it, but the valve looks like a weak point, thin compaired to the rest of the cannons diameter, what are you gonna do, rite. Think you can get a video of it in action? It troubles me you didn't use primer, proper solvent welding is a must for pnuematics. A longer barrel will get you more distance. Make a support to protect the skinny parts. I still like it.

EDIT: Nice catch MrCrowley, I didn't notice the bell reducers.
Posted: Fri Feb 29, 2008 5:11 pm
by STHORNE
That thing is ridiculously dangerous and unsafe, if you take that anywhere past 50psi, your pretty much asking the grim reaper himself to come and kill you. nice design though

Posted: Fri Feb 29, 2008 5:26 pm
by Rokmonkey
Damnit, I double checked with the guy at Lowes if everything was pressure rated...My other cannons are pressure rated, bad slip up on my part I guess, thanks for catching my mistake.
Question though, If I wanted to have a 3inch barrel, how would I use my 1 inch sprinkler valve to get better performance.
And considering I have to rebuild it anyway, going with this design, better way to build it?
And, I checked that link out earlier, but the solonoid on this valve is dead center, not off center like the rainbird, where ought I drill the hole if such is the case, tried searching it failed.
Posted: Fri Feb 29, 2008 5:28 pm
by STHORNE
yup, bigger ports on the sprinkler valve, the better performance.
and the way you have it built now is fine, as long as you make sure you use pressure rated parts and pvc cement.
Posted: Fri Feb 29, 2008 6:16 pm
by MrCrowley
jrrdw wrote:EDIT: Nice catch MrCrowley, I didn't notice the bell reducers.
And there's a wye that connects the two chambers together.
Rokmonkey wrote:Damnit, I double checked with the guy at Lowes if everything was pressure rated...My other cannons are pressure rated, bad slip up on my part I guess, thanks for catching my mistake.
Question though, If I wanted to have a 3inch barrel, how would I use my 1 inch sprinkler valve to get better performance.
And considering I have to rebuild it anyway, going with this design, better way to build it?
And, I checked that link out earlier, but the solonoid on this valve is dead center, not off center like the rainbird, where ought I drill the hole if such is the case, tried searching it failed.
Personally I would think a 2" ball valve would be better for a 3" barrel even though it opens slower. If you add another foot onto the barrel, i'm certain it would be far better then a modded 1" sprinkler valve.
You can still mod that valve, i'm sure people just tap a blow gun to the side instead, or take out the solenoid and drill a bigger hole and thread the blow gun into that.
If you can afford it, a 1.5" or 2" modded sprinkler valve would be good. But if not, I would say a 2" ball valve (maybe spring loaded) and a longer barrel with pressure rated parts and primer would be good.
Do you know about spring loading a ball valve to make it open faster> If not check the wiki or browse the forums.
Make sure to read that page in the wiki I linked you to about identifying pressure rated PVC, it took me awhile to write up, may as well read it.

Posted: Sat Mar 01, 2008 3:56 am
by Cosmic Muffin
Nice design but yer i agree with the guys, having your ankle blown off wouldnt be very fun.
Posted: Sat Mar 01, 2008 4:42 am
by Carlman
in between your valve and your solenoid you have a white plastic thing, this should unscrew from your solenoid and your valve. The way i modded this type was to epoxy a blowgun in the place of the solenoid like pictured below. I then filled the hollow guide rod with epoxy cut away at the plastic below where the white threaded plastic bit goes into (again look at pics).
Screw it all back together and voila
ps: my valve was 30$ from a irrigation specialist and it has about an 80 L/min flow rate which is quite high
Posted: Sat Mar 01, 2008 5:24 am
by Rokmonkey
Well thanks guys, helps alot. Don't worry MrCrowley, I've already re-read it twice
And thanks Carlman, I'll give that modding a shot for my other cannon that I had in the works, Now I have to make a decision to fix this one or start the other one. Using a black iron chamber to get higher PSI.
Posted: Sat Mar 01, 2008 5:37 am
by Carlman
just dont take the valve over 150psi if its a sprinkler
Posted: Sat Mar 01, 2008 7:18 am
by jrrdw
You need to make a bunch more of those sabets. I like this cannon/morter so much because of the fun factor. So often, well now and then members are dicussing shooting water ballons. I think this is the first solid design i've seen thats just for water baloons. I like it! I'm impressed and I don't say that often.
Posted: Sat Mar 01, 2008 10:25 am
by Rokmonkey
Well that sabot has worked wonderfully for me, had to duct tape the edges as to not pop the balloon, but It delivers the balloon without bursting it in the barrel. I say others should give it a shot, see how far they can launch them, I'd like to see it, Thats my main ammo, more fun, easy to see where it hit, and that's our main ammo when we play airsoft for mortars.
Posted: Sat Mar 01, 2008 10:49 am
by bigbob12345
Well this is the most dangerous launcher iveever seen but if you ignore the lack of primer and pressure rated fittings it is actually a pretty nice looking gun.
and one more thing try to mount the filler valve through 2 layers of pvc next time it can weaken the pipe or something like that if you dont.
Posted: Sat Mar 01, 2008 11:30 am
by Jared Haehnel
....I couldn't tell if he used primer or not in the picture... they do make clear primer... may be I missed it in the reading....
I like the design. that looks to be lots of fun... just make her saef up it up and you'll be golden