Page 1 of 3
Anarchy- semi auto QEV M16
Posted: Sun Sep 04, 2011 7:34 am
by anarchy08
Hello All,
new to posting on the forums here, but have been skulking around in the background for a while now.
I'm an Aussie,from down under here showing off my first pneumatic.
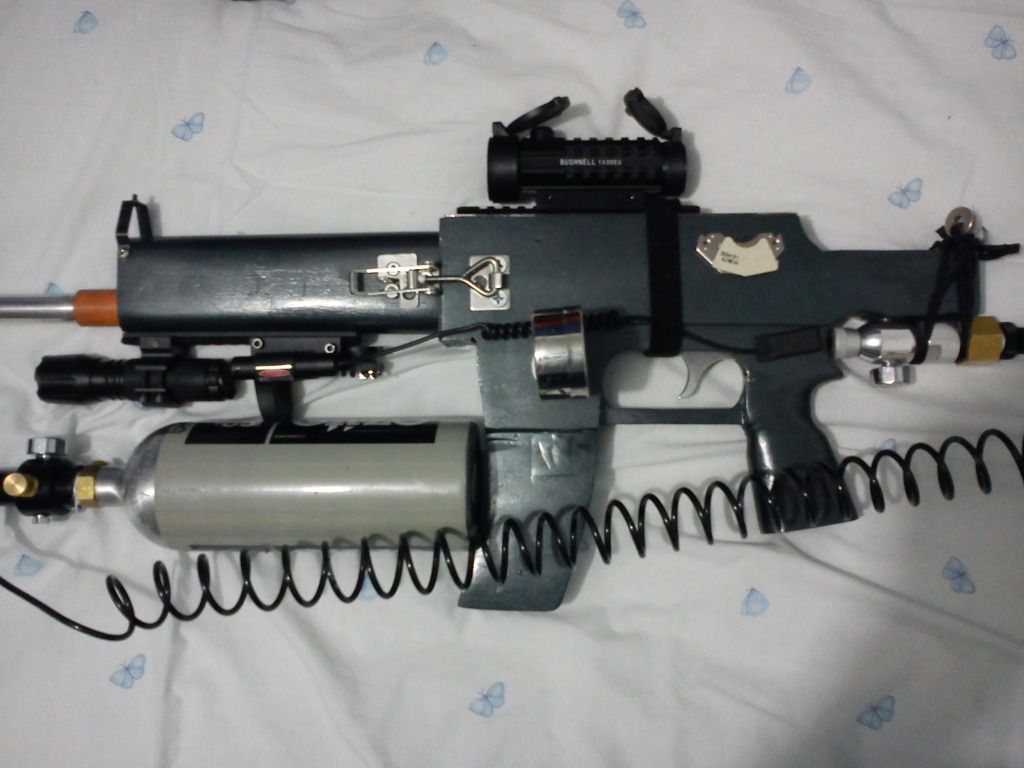
Anarchy- the 6mm semi Auto particle accelerator.
QEV powered, Co2 regulated piloted by a 3port 2 way valve.
It is currently running on compressed air , my compressor can only go as high as 120 so my plastic ball bearings will only just go through paint cans.
will be run off CO2 eventually when i build a fill station for my many empty soda stream canisters. the breech is a machined block of Al with spring detente and is hopper fed. i have found so far the hopper method works quite well, the air flow agitates the balls.
not quite finished but is functioning really well, firing as fast as you can pull the trigger, i don't understand the need for full auto.
not sure how to upload here so my photbucket account
http://s1211.photobucket.com/albums/cc4 ... 040346.jpg
only cosmetic work will need to be done, iron sights(maybe reddot) and the barrel of the m16 needs to be made which i will incorporate a laser pointer and silencer.(bit loud for the wascally wabbits:P)
Any comments suggestions welcomed this is only my first gun and not finished yet, still needs a coat of gun metal grey:)
<a href="
http://s1211.photobucket.com/user/mang_ ... 0.jpg.html" target="_blank"><img src="
http://i1211.photobucket.com/albums/cc4 ... 215440.jpg" border="0" alt=" photo IMG_20120502_215440.jpg"></a>
Posted: Sun Sep 04, 2011 7:42 am
by Alster370
Welcome to spud files. Nice, much better than my first, Id suggest to try and hide the fittings in the stock , and a nice coat of paint.

Also I wouldn't talk about hunting on this forum. If thats what you were implying in your post.

Posted: Sun Sep 04, 2011 7:50 am
by anarchy08
thanks for the welcome and the heads up, different forums, different mods. more a joke then anything really.
um yeah in dire need of cosmetic surgery but just getting the thing functioning flawlessly now, so happy with the result.
i was going to hide the regulator but just kinda hard to machine a block of timber thats going to be easily accessible to the knob in front. should have bought a different reg. got a can of gun metal grey ready to go, couple more days work i think.. not sure how to add more pics to the first post to show the internals.
Posted: Sun Sep 04, 2011 8:48 am
by jackssmirkingrevenge

POLAND_SPUD will be proud
looking very good, welcome to the forum
So the magazine is simply a cloud chamber like in a BBMG?
Posted: Sun Sep 04, 2011 10:00 am
by LovableAirGuns
Ahh so this is what the gun looks like.
Good job it looks way better than mine, by the way have you gotten those bbs yet?
You should buy a peice of alu tube as a shroud for your barrel but other than that its a sexy beast

Posted: Sun Sep 04, 2011 11:22 am
by mattyzip77
Great job fitting everything inside of the wood, that must have taken alot of time and patience!! Welcome to Spudfiles!!
Posted: Sun Sep 04, 2011 11:27 am
by warhead052
Wow, nice job! I would love to see a diagram of how it works if at all possible. Especially the bb magazine.
Posted: Sun Sep 04, 2011 3:01 pm
by POLAND_SPUD
POLAND_SPUD will be proud
POLAND_SPUD is very proud
is the 3 way valve piloted ?? (i.e. is there a small valve on it that triggers the main spool on the valve?)
If it is you might consider testing the gun with the QEV removed, so that the 3 way becomes the MAIN VALVE itself
the performance will suffer (not sure by how much) but you'll get a much simpler gun, save space and reduce air consumption (let's face it - there is too much dead space between the 3 way valve and the QEV... and yeah I know it won't be easy to fix that)
Posted: Sun Sep 04, 2011 5:57 pm
by Zeus
Very nice, the barrel is a bit low and the sodastream bottle too high to allow a reasonable scope mounting, but that's my oft wrong opinion.
Considering the size (and correlating strength) of the barrel, a full shroud silencer would be the way to go, it'll protect the barrel from damage too.
Wewt, inb4 JSR
And might I enquire which state you reside in?
Posted: Sun Sep 04, 2011 9:21 pm
by anarchy08
@ lovable Airguns, the airsoft place was closed there at the royal show apparently, ill sus that out today.
yes the magazine is just a cloud chamber, distace between the walls allows for 4/5 shots in the tube, figured the hopper design was just easier that i dont have to deal with springs and loading problems, only gravity. i will be covering the barrel with a wooden dowel to support the thin walled tube.
i designed the entire pneumatic assembly on Autodesk inventor CAD so all i had to do was print it off glue on a plank of wood and route out the shell, took about half a day to get it all fitting in snug.
um as for diagrams im not the best at drawing , but the 2way valve is set in the off/pilot position so it actually discharges when the trigger is released rather then pulled. got it off ebay so didnt get a good look at the pneumatic symbol on the valve.the valve itself actually has 3 ports the pilot port is hidden behind the hopper with just a small gap to vent internally, i didnt port through the case itself didnt figure that the internal of the gun would reach high enough pressure.
@POLAND_SPUD why would i need to remove the QEV? i thought that the valve would function faster then the 2 way would? and you are right about the pilot volume, there are 2 extenders between the valves wasted air.
@ zeus, completly agree but that comes down to the co2 regulator design i needed to keep the tank parallel and out of the way of trigger.oh and PMed
thanks for all the advice guys didnt think id get hammered with replys so soon:)
Posted: Mon Sep 05, 2011 6:29 am
by POLAND_SPUD
why would i need to remove the QEV? i thought that the valve would function faster
yes, it probably functions faster with the qev than without it
What I am saying is that you can build a functional gun without a QEV if you use a 3 way valve as the main valve. In some cases it might make sense to sacrifice performance for space and mass savings.
I found that a 1/4" solenoid DCV is more than enough for shooting 6mm bbs.
Posted: Mon Sep 05, 2011 9:02 am
by anarchy08
Ah so thats what you meant, i saw that pic around the place somewhere. that actually looks quite cool i plan to make a small co2 gun that runs of the 12g canisters so i might go with that design, unsure what pressure the DCV could handle as i would go un regged co2.
Posted: Mon Sep 05, 2011 9:55 am
by POLAND_SPUD
unsure what pressure the DCV could handle as I would go unregged co2
in both designs (the one you use now and the one I mentioned) it wouldn't be safe to use unregged CO2
Most valves are rated to 10 bar (150 psi), they can usually handle twice that quite well (so 300psi)...
some still work at 35 bar (~500psi)
However, unregged CO2 generates pressures higher than 850 psi and that's just way too much...
You need a regulator - probably you can get one with a CO2 paintball tank
Besides there is no need to use such high pressures with airsoft bbs. if you get 250 m/s with 250 psi that doesn't mean you'll get 500 m/s at 1000 psi
That's due to:
A) internal ballistics - so how much a bb can accelerate in the barrel - the speed of sound is the limiting factor...
the sos is the max speed at which a given gas can move. As your projectile gets closer to that speed the gas in the barrel has hard time to keep up with it. As a result the propelant gas can't push the projectile as effectively as it does at lower velocities. Increasing velocity requires higher pressures and/or lighter gases
For air the SOS is at ~340m/s (at normal conditions). For Co2 it's even lower than that
B) external ballistics - even if the bb leaves the barrel at 300 m/s it loses that velocity at a very rapid rate... this effect can be reduced if you use heavier ammo
All in all it isn't very practical to use higher pressures with bbs. I guess you'd be more than satisfied with 300 psi.
Posted: Sun Sep 11, 2011 8:14 am
by anarchy08
http://i1211.photobucket.com/albums/cc4 ... ro/001.jpg
+++Update++++
So iv been working in the shed quite a bit and this is what i have come up with so far, still more cosmetics to come but i thought i would stick this up for all my followers lying in wait.
took a circular saw to the thing and squared it up nicley to add the sight rail. sanded smoothed the body, added a rail to square the reg support that was poorly machined.
drilled out the 2 blocks of wood barrel as a support and housing for the Al hopper plug and will continue the dowel barrel another section.
they are that long because i dont have an extended drillbit and lathe restrictions. the iron sights i picked up for a huge bargain , 5 bucks from a guy selling crossbows at my local market.
the front block above the barrel has a laser mounted inside, more needs to be done to that for adjustments but its functional now. the rifle scope is X8 too strong for bb's unfortunately.
not sure what else to say really, happy with it so far but kinda want it done so i can have my life back, think i have spud fever :S(have a combustion too)
The idea of dismantlement has appealed to me to keep it in 3 pieces the barrel body and stock/bottle. I am currently looking to obtain a class E Co2 canister to act as a fill station, with the intention of running around 150 psi or so i dont think ill want to push the valves too much and im worrying about anti syphon for a tank lying on its side that has no anti valve.
whats left to finish? barrel, laser adjustment, reduce dead pilot space by adding Al rod drilled out and push-fit silencer then ill glue it all together sand undercoat and gun metal grey:)
any suggestions for detailing, rifling or on building a fillstation welcomed and encouraged. @poland spud, sorry meant that i intended to use a bicycle co2 inflater(12g) that is actually flow regulated, thanks heaps for the info i do have 1k steel bbs but waiting on co2 for damage pics.
Posted: Tue Sep 13, 2011 6:59 am
by Cosmic Muffin
awesome gun man
im building something similar, nice handiwork good to see another one of us on here