Page 1 of 2
First Piston airgun and first airgun in a while.
Posted: Tue Oct 01, 2013 5:04 am
by turkeypig666
Hey guys, I haven't been here in a while, but anyways. Here is my first piston airgun. I made on before, but it never worked, so I got pissed off at it after multiple fixes and never made another since yesterday.
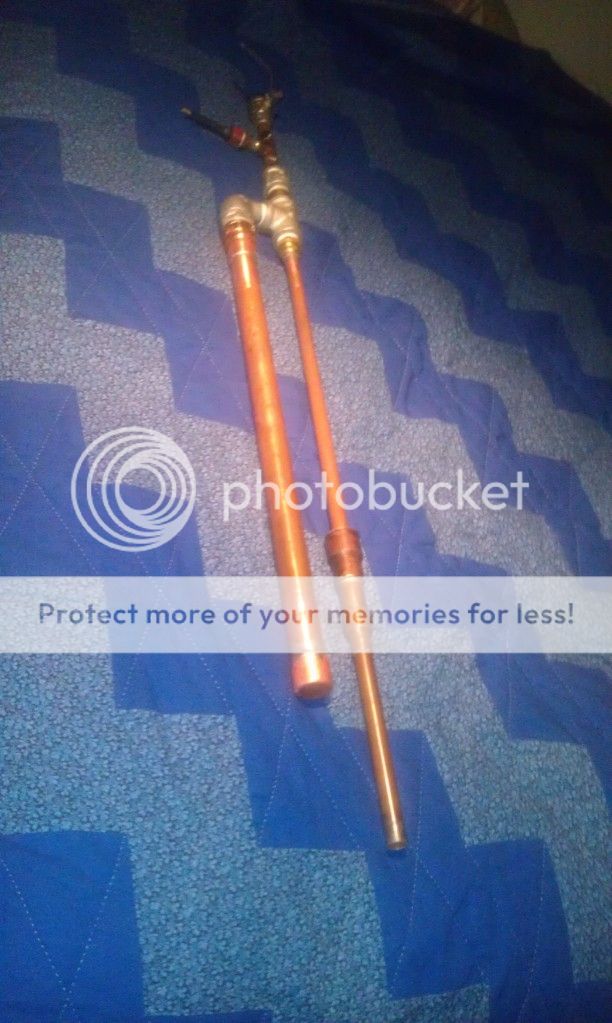
A picture of my piston valve components.

Had to get another one of these and had to shave the threads because of it being tappered, and had soldered it together. ( not the prettiest thing, haha )

Now don't mind the messy work bench. A major cleanup is coming soon.

A 1" pipe as a chamber.


My piston. This is temporary, I will get a piston stop and a rubber for the front piston surface tonight.

I still need to get a longer barrel.

Posted: Tue Oct 01, 2013 2:51 pm
by dart guy
nice gun, it could have a stock... any power tests or muzzle flash hider or scilencers built for it?
Posted: Tue Oct 01, 2013 8:42 pm
by turkeypig666
I am fine tuning it for now, but a stock is in the near future. No power tests yet, and I want to leave the barrel like it is for now, since it's a muzzle loader for now. ( I removed the 1/2-3/4 and 3/4-1" fitting though.)
The gun worked perfect yesterday, but today the barrel was leaking. I opened it up to check my piston and there is dents and groves where the barrel seats. So I will either have to put a rubber in front of the piston or use a rubber sanding drum. I wish I could machine one from some aluminium, but I don't have a lathe right now. Hopefully going to get a small one soon, so I can do some better stuff.
Posted: Wed Oct 02, 2013 6:59 am
by jackssmirkingrevenge
Nicely done

for the purposes of smoothing out your barrel seat, a power drill clamped in a vice makes a good extempore substitute for a lathe - bit of sandpaper and you're good to go.
Posted: Wed Oct 02, 2013 8:08 pm
by mark.f
Nice job. For the piston, use some stock that is long enough to grip from the back of the valve, cut your seating end flush with a miter saw, and attach some stick-on sandpaper, and go to town on the sealing face in the valve. It's how I got my piston valve to seal at higher pressures. A piece of rubber bolted to the end of the piston will help too.
Posted: Wed Oct 02, 2013 8:43 pm
by turkeypig666
I have this 7/8 x 1" square stock of some kind of hard plastic, but I have nothing to turn it with now, so I might look for some 3/4" round stock, and try to sand it to fit inside. One question. When people cut a notch in the piston and then put an o-ring. I thought you needed a notch in the piston for the air to transfer to the air chamber. So how does that work if the is an o-ring?
I might use this.
http://www.ebay.com/itm/3-4-750-Delrin- ... 27c0f14a67
I'm actually in college for Machinist now, and doing CNC next year, so hopefully in about a month I could turn a piston, since we are going to do some welding until then.

You can see after 10 shots, the piston surface is already caved in. so a better piston or rubber front is required.


I was thinking that once I get more knowledgeable on the subject and get better with my machining skills, that I would maybe an piston valve airgun with some higher PSI rated components that I would pump up to 600-1000+ PSI. Would these be required? Expensive for sure.
http://www.grainger.com/Grainger/DYNAQU ... Pid=search
http://www.buyfittingsonline.com/34thre ... 0b181.aspx
Posted: Wed Oct 02, 2013 10:01 pm
by Gippeto
With knowledge and machining skills...MAKE the pieces you need for a pittance.
Notched piston with o-ring?
This?
Posted: Thu Oct 03, 2013 4:35 am
by turkeypig666
Yes, does a small hole need to be driled in the piston?
Posted: Thu Oct 03, 2013 5:45 am
by dart guy
i never realy did understand why people notch their oring slots pistons can you explain that.
Posted: Thu Oct 03, 2013 8:07 am
by Gippeto
The drilled hole lets air bypass around the o-ring for filling.
During piloting, the o-ring is against the un interrupted rear portion of the groove and seals...preventing any bleed air from the chamber from adding to the pilot volume.
Posted: Sat Oct 05, 2013 11:33 pm
by turkeypig666
Posted: Sun Oct 06, 2013 9:38 am
by Gippeto
Sliding breech?:) or pulling the actual barrel with it?
Sliding breech cover is used on some of the Korean big bores and works very well.
Hard to do this sort of thing neatly without machine tools, you're doing well.
If it's too tight, you might consider cutting through along the length of the bore, and then adding a few screws such as to close the slit...will make the fit adjustable.
Like this;
Re: First Piston airgun and first airgun in a while.
Posted: Wed Oct 09, 2013 4:19 am
by Zeus
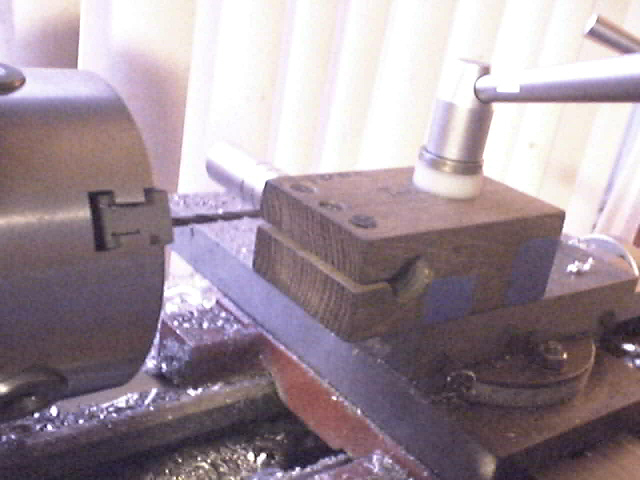
Gippeto, I like your tool holder
Re: First Piston airgun and first airgun in a while.
Posted: Wed Oct 09, 2013 8:15 pm
by Gippeto
Not mine, but I did make one similar from a 2" thick piece of red oak...works great, and just the ticket when I need to mill a slot in a piece of bar and then drill/ream perpendicular to the slot. With the Smithy 3in1, it's one setup and done.
Mine is indexed in the same manner as the actual tool post, so setup is easy too.

Re: First Piston airgun and first airgun in a while.
Posted: Thu Oct 10, 2013 7:05 pm
by turkeypig666
So bassicly your drill bit is in your chuck and where your cutting bit usually is, is your piece?


