Page 1 of 2
P. 5 Homemade valves
Posted: Thu Jan 03, 2008 7:53 am
by Antonio
Different kinds of valves I made and that work:
1 Poppet valve with ballpoint spring, 90 degrees bend flow
2 Tippmann type of valve, two poppet valves on two sides, can be used for blowback designs
3 Drozd sliding valve, slides forward and takes a bb then gives a burst of air
Posted: Sat Jan 05, 2008 12:23 am
by jackssmirkingrevenge
again, very impressed with what you manage to accomplish using only basic parts and facilities, kudos for thinking out of the box

Posted: Sat Jan 05, 2008 1:02 am
by jon_89
Could you please explain how these work. Did I over look something because I have no idea how these are suppose to work. Though they do look very simple.
Posted: Sat Jan 05, 2008 2:53 pm
by jean
very impressed! the best is you use parts are all aviable in homedepot
nice nice nice

jean
Posted: Sat Jan 05, 2008 2:57 pm
by ALIHISGREAT
wow nice valves although i don't quite understand what stops all the air being released on the stacked tube valve design?
Posted: Sat Jan 05, 2008 3:48 pm
by Antonio
ALIHISGREAT wrote:wow nice valves although i don't quite understand what stops all the air being released on the stacked tube valve design?
On the animation of the green part is a screw it has a spring at the back which keeps it closed. The o ring is colored red. When the hammer (brown) hits back the poppet valve gives a short burst of air. Bc of the air pressure and the spring behind the valve it closes again.

Posted: Sat Jan 05, 2008 4:29 pm
by iknowmy3tables
very nice, these popet valves are just like the ones on blow guns but usually when you make them much larger they become too hard to operate so it requires the force of a nice hammer blow I've recently noticed that moded pizeos can be used to made hammers to strike the valve instead of the piezo crystal
oh and the holes on valve 3 are way too small if your afraid of making it too long (but so for its fine) you can make a slot probably with a saw
the rod on valve 1 is not quite clean enough looks like you ghetto drill press lathed it, do you have some tap and dies you could thread the tip of a rod and add nuts and a washer or sleeve it in some tubing
Posted: Sat Jan 05, 2008 4:35 pm
by Antonio
iknowmy3tables wrote:
oh and the holes on valve 3 are way too small if your afraid of making it too long (but so for its fine) you can make a slot probably with a saw
Yeah you are kinda right. The problem is that the holes are not supposed to rip open the orings lol. So yeah its kinda hard. But my main problem on the sliding valve is that it moves really ...viscid. Too slow for fast operation due to the orings.
Posted: Sun Jan 06, 2008 3:08 pm
by iknowmy3tables
I see well I made you a diagram for the possible fabrication improvements you can try
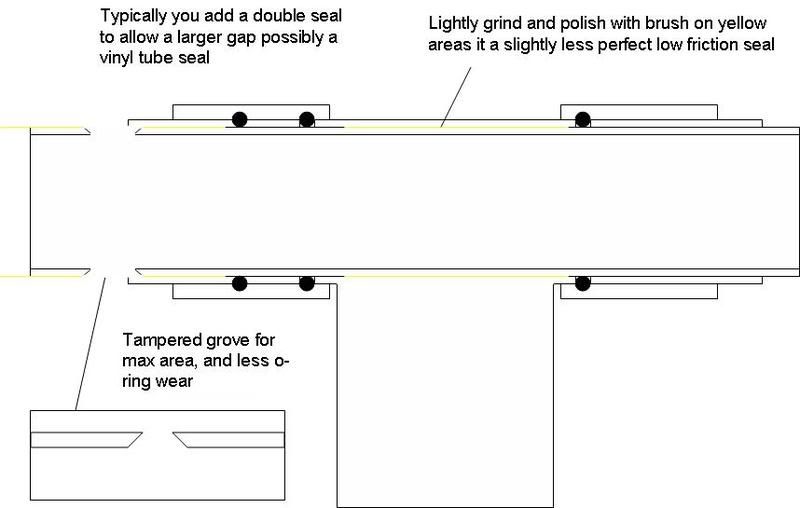
don't forget to add lots of good lube
hey while making that picture I got an idea It might have been thought of before or it is just the similar to mentioned designs, but this looks like it might have more success
edit: now I remember those special blow forward designs, its a twist of those but I still like I think it will be easier to build
Posted: Sun Jan 06, 2008 4:08 pm
by ALIHISGREAT
ant wrote:ALIHISGREAT wrote:wow nice valves although i don't quite understand what stops all the air being released on the stacked tube valve design?
On the animation of the green part is a screw it has a spring at the back which keeps it closed. The o ring is colored red. When the hammer (brown) hits back the poppet valve gives a short burst of air. Bc of the air pressure and the spring behind the valve it closes again.
ahh yes i must have missed that

Posted: Sun Jan 20, 2008 3:15 pm
by Antonio
iknowmy3tables wrote:I see well I made you a diagram for the possible fabrication improvements you can try
don't forget to add lots of good lube
hey while making that picture I got an idea It might have been thought of before or it is just the similar to mentioned designs, but this looks like it might have more success
edit: now I remember those special blow forward designs, its a twist of those but I still like I think it will be easier to build
Thanks allot for ur ideas! Ill try and implement them into my new designs and creations.
Posted: Sun Jan 20, 2008 3:16 pm
by Antonio
ALIHISGREAT wrote:ant wrote:ALIHISGREAT wrote:wow nice valves although i don't quite understand what stops all the air being released on the stacked tube valve design?
On the animation of the green part is a screw it has a spring at the back which keeps it closed. The o ring is colored red. When the hammer (brown) hits back the poppet valve gives a short burst of air. Bc of the air pressure and the spring behind the valve it closes again.
ahh yes i must have missed that
I know my animations arent that good, its was my first try making this gif. Its sometimes hard to oversee designs on this forum, I think I am ganna use flash in the future.
Posted: Sun Jan 20, 2008 3:41 pm
by judgment_arms
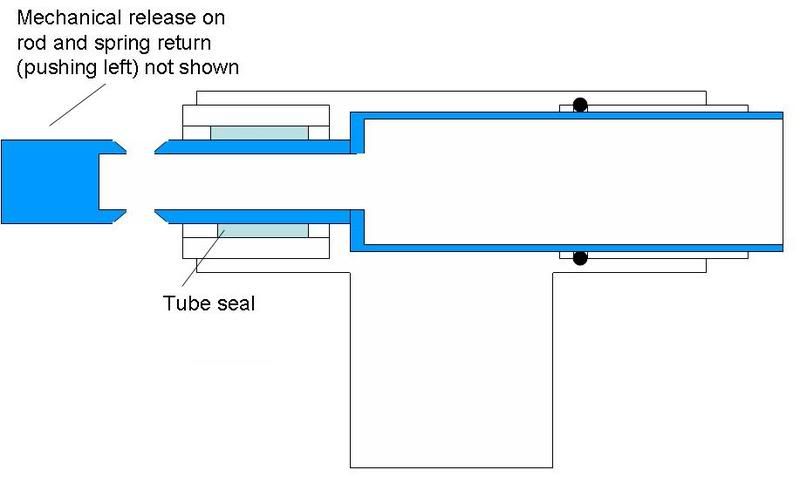
Ant, between you and jack I’m really beginning to fell like a slacker, ‘cause I’ve bean working on the same type thing as you two, and I still ain’t got nothin’ to show…
Oh, well.
I got a question about the trigger group on your second animation, the one entitled “stacked tube airgun smaller.gif”, they way that spring is positioned it’ll keep the sear designated, is this intentional, and if so why?
But anyway, nice work.
Now in order to get rid of my feeling of sackerdom, I think I’m going to go work on finishing my rifler…
Posted: Tue Jan 22, 2008 8:46 am
by Antonio
[quote="judgment_arms"]Ant, between you and jack I’m really beginning to fell like a slacker, ‘cause I’ve bean working on the same type thing as you two, and I still ain’t got nothin’ to show…
Oh, well.
I got a question about the trigger group on your second animation, the one entitled “stacked tube airgun smaller.gif”, they way that spring is positioned it’ll keep the sear designated, is this intentional, and if so why?
quote]
Hey nice to hear from ya! Its nice that lots of ppl are feeling boosted by all these projects here. To be honest though I have been working on these airguns for some years already. So not that it seems like that my project pop out of the ground like mushrooms.
The trigger, yeah the animation is actually wrong. As in this gif program I used I coudnt rotate objects so I wasnt able to make a good animation. Now that I look closer.. the spring should be at the backside of the sear and not at the front close to the triggers pad. Ill change this, thnx for telling me. Shows atleast some ppl are looking closely to my postings. Btw the spring doesnt have to be a pressure spring, it could also be a tension spring, so ill leave it to that for now
Posted: Wed Jan 23, 2008 3:06 pm
by iknowmy3tables
I'm surprised you actully took the time to make those animation nice job I thought you found them on the internet nice,
also for some seals your may want to try the threaded rod and sheet rubber between washers thing you need washers that practically touch the walls of the pipe, in my case I had to grind down larger washers, for sheet rubber I used a tire tube the great thing about this is that you can ajust the seal by tightening the nuts that squezes the rubber out ward