“NO DRILL” Sprinkler Valve Pneumatic Modification
Posted: Thu Jun 29, 2006 3:14 am
“NO DRILL” Sprinkler Valve Pneumatic Modification
Parts Required:
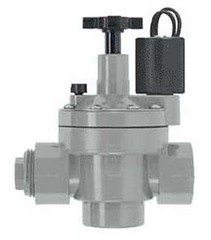
1. Orbit Watermaster Model 57020
2. 1/4" NPTM X 1/4" NPTM Brass Fitting (National Pipe Thread Male)
Tools Required:
1. JB Weld (recommended) or other Epoxy
2. 9/16” Socket and Ratchet (recommended) or 9/16” Wrench
3. Teflon Tape
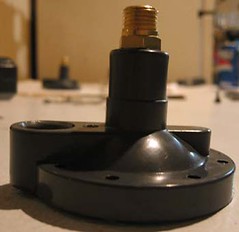
Step 1
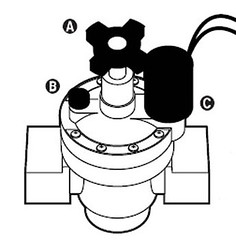
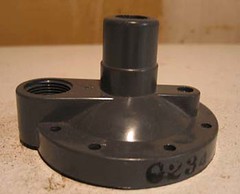
Remove the “Flow Control Handle” (Part A), “Bleed Screw” (Part B) and the “Solenoid” (Part C)
<a href="" title="Photo Sharing"><img src="http://static.flickr.com/78/177538686_99c0cb6781_m.jpg" width="211" height="240" alt="basevalve"></a> <a href="" title="Photo Sharing"><img src="http://static.flickr.com/71/177538721_e4c7a0c4f8_m.jpg" width="237" height="240" alt="valvedig1"></a>
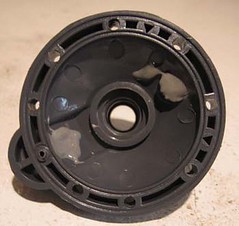
Step 2
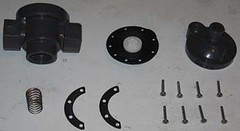
Remove the 8 Screws that hold the “Cover Assembly” (Part A) to the “Valve Body” (Part B)
<a href="" title="Photo Sharing"><img src="http://static.flickr.com/76/177538731_4c0fc27b9f_m.jpg" width="143" height="240" alt="valvedig2"></a> <a href="" title="Photo Sharing"><img src="http://static.flickr.com/55/177538745_2f756f14d9_m.jpg" width="240" height="131" alt="valvedis"></a>
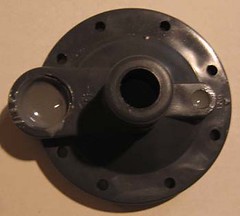
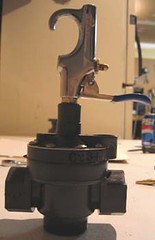
Step 3
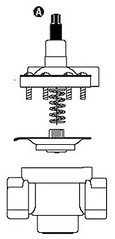
Remove the “Flow Control Stem” and the “Wire Rod” by Twisting the “Flow Control Stem” Clockwise until the stem comes loose.
<a href="" title="Photo Sharing"><img src="http://static.flickr.com/67/177538763_8c78e45a34_m.jpg" width="115" height="240" alt="valvedig3"></a> <a href="" title="Photo Sharing"><img src="http://static.flickr.com/68/177538790_dee1fb2735_m.jpg" width="240" height="194" alt="valvetop"></a>
Step 4
Mix JB Weld and fill the holes left in the “Cover Assembly” after removing the “Bleed Screw” and “Solenoid” and wait of the JB Weld to set.
<a href="" title="Photo Sharing"><img src="http://static.flickr.com/73/177538822_96dfbb3a2a_m.jpg" width="240" height="226" alt="valvebottomepoxy"></a> <a href="" title="Photo Sharing"><img src="http://static.flickr.com/65/177538855_18ecf57a6a_m.jpg" width="240" height="216" alt="valvetopepoxy"></a>
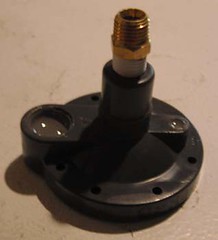
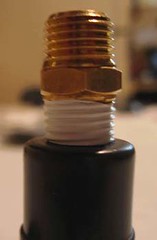
Step 5
Wrap one side of the 1/4” fitting with Teflon tape then thread the 1/4" Fitting into the hole left by the “Flow Control Stem” with the 9/16” socket. Be careful to thread the fitting as straight as possible.
<a href="" title="Photo Sharing"><img src="http://static.flickr.com/54/177538882_476e4020a7_m.jpg" width="218" height="240" alt="valvefitting"></a> <a href="" title="Photo Sharing"><img src="http://static.flickr.com/73/177538905_d8522aa946_m.jpg" width="157" height="240" alt="fittingclose"></a> <a href="" title="Photo Sharing"><img src="http://static.flickr.com/46/177538934_b251767723_m.jpg" width="240" height="232" alt="valvetopfitting"></a>
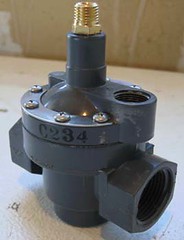
Step 6
Reassemble the valve. Mount a Blow Gun or 1/4” Ball Valve to the open end of the 1/4" fitting using Teflon tape.
<a href="" title="Photo Sharing"><img src="http://static.flickr.com/51/177538958_1f920233cb_m.jpg" width="155" height="240" alt="valvedoneblowgun"></a> <a href="" title="Photo Sharing"><img src="http://static.flickr.com/55/177538985_3373a07970_m.jpg" width="204" height="240" alt="valvedoneside"></a> <a href="" title="Photo Sharing"><img src="http://static.flickr.com/58/177539009_59bad22a14_m.jpg" width="184" height="240" alt="valvedonean"></a>
The valve is now ready to use. It can be mounted in an inline or right angle configuration, simply use the included plug and some Teflon tape to seal the unused port.
Parts Required:
1. Orbit Watermaster Model 57020
2. 1/4" NPTM X 1/4" NPTM Brass Fitting (National Pipe Thread Male)
Tools Required:
1. JB Weld (recommended) or other Epoxy
2. 9/16” Socket and Ratchet (recommended) or 9/16” Wrench
3. Teflon Tape
Step 1
Remove the “Flow Control Handle” (Part A), “Bleed Screw” (Part B) and the “Solenoid” (Part C)
<a href="" title="Photo Sharing"><img src="http://static.flickr.com/78/177538686_99c0cb6781_m.jpg" width="211" height="240" alt="basevalve"></a> <a href="" title="Photo Sharing"><img src="http://static.flickr.com/71/177538721_e4c7a0c4f8_m.jpg" width="237" height="240" alt="valvedig1"></a>
Step 2
Remove the 8 Screws that hold the “Cover Assembly” (Part A) to the “Valve Body” (Part B)
<a href="" title="Photo Sharing"><img src="http://static.flickr.com/76/177538731_4c0fc27b9f_m.jpg" width="143" height="240" alt="valvedig2"></a> <a href="" title="Photo Sharing"><img src="http://static.flickr.com/55/177538745_2f756f14d9_m.jpg" width="240" height="131" alt="valvedis"></a>
Step 3
Remove the “Flow Control Stem” and the “Wire Rod” by Twisting the “Flow Control Stem” Clockwise until the stem comes loose.
<a href="" title="Photo Sharing"><img src="http://static.flickr.com/67/177538763_8c78e45a34_m.jpg" width="115" height="240" alt="valvedig3"></a> <a href="" title="Photo Sharing"><img src="http://static.flickr.com/68/177538790_dee1fb2735_m.jpg" width="240" height="194" alt="valvetop"></a>
Step 4
Mix JB Weld and fill the holes left in the “Cover Assembly” after removing the “Bleed Screw” and “Solenoid” and wait of the JB Weld to set.
<a href="" title="Photo Sharing"><img src="http://static.flickr.com/73/177538822_96dfbb3a2a_m.jpg" width="240" height="226" alt="valvebottomepoxy"></a> <a href="" title="Photo Sharing"><img src="http://static.flickr.com/65/177538855_18ecf57a6a_m.jpg" width="240" height="216" alt="valvetopepoxy"></a>
Step 5
Wrap one side of the 1/4” fitting with Teflon tape then thread the 1/4" Fitting into the hole left by the “Flow Control Stem” with the 9/16” socket. Be careful to thread the fitting as straight as possible.
<a href="" title="Photo Sharing"><img src="http://static.flickr.com/54/177538882_476e4020a7_m.jpg" width="218" height="240" alt="valvefitting"></a> <a href="" title="Photo Sharing"><img src="http://static.flickr.com/73/177538905_d8522aa946_m.jpg" width="157" height="240" alt="fittingclose"></a> <a href="" title="Photo Sharing"><img src="http://static.flickr.com/46/177538934_b251767723_m.jpg" width="240" height="232" alt="valvetopfitting"></a>
Step 6
Reassemble the valve. Mount a Blow Gun or 1/4” Ball Valve to the open end of the 1/4" fitting using Teflon tape.
<a href="" title="Photo Sharing"><img src="http://static.flickr.com/51/177538958_1f920233cb_m.jpg" width="155" height="240" alt="valvedoneblowgun"></a> <a href="" title="Photo Sharing"><img src="http://static.flickr.com/55/177538985_3373a07970_m.jpg" width="204" height="240" alt="valvedoneside"></a> <a href="" title="Photo Sharing"><img src="http://static.flickr.com/58/177539009_59bad22a14_m.jpg" width="184" height="240" alt="valvedonean"></a>
The valve is now ready to use. It can be mounted in an inline or right angle configuration, simply use the included plug and some Teflon tape to seal the unused port.