Rear Grip
Posted: Sat Feb 26, 2005 11:00 pm
<div align="center">REAR GRIP
Provided By - <a href="http://www.vochraye.com/spud/">http://w ... m/spud/</a>
This is a guide to building the rear portion of the "Minigun" style grips, like those on the PG 255 Locutus.
It isn't very detailed, but if you're smart enough to build a spud gun, you're smart enough to figure it out
And don't be limited by what you see in these plans. Modify them! Make your own! Go nuts!
Materials and tools:
3/4" plywood
1/4;" x 2" hardwood (like red oak or poplar - you can get this at your home improvement store)
Wood glue
Paint (if you want)
Aluminum strip
Fiberglass resin (Bondo) if you want to get really creative.
Drill
Band saw / Jigsaw or keyhole saw (if you have a lot of time on your hands)
Some screws (eyeball your project to figure out what size)
Sand paper
One: Cutting
Print out the templates contained on the <A href="http://www.vochraye.com/spud/images/han_plan.pdf">plan sheet.</A> (and yes, I know I did not label all of the measurements. You don't need them. Just print it out so that one of the items that I DID give you the measurements on is to scale)
Trace the template for the center piece onto your 3/4" plywood.
Trace each one of the facing pieces onto your 1/4" hardwood twice (since you will need a copy of each for each side.
Now cut them out. I used a band saw, but you could use a jigsaw or a key hole saw, if you like.
Step Two: Assembly
Before you assemble, you may want to drill the hole for the lead wires (see <A href="http://www.vochraye.com/spud/images/han ... ">plans</A>). Basically, you are creating a wood sandwich. By sticking the facing pieces onto the outside of the center piece, the large 3/4" x 2 1/2" cavity in the center section becomes the hole for the BBQ igniter to fit into. Ok, I know what you're thinking "But the hole will be square!". Yes, I know, but the little black "skirt" around the base of the button on the igniter covers it up.
Glue the pieces together as shown in the pictures. Let dry. Then paint, if so desired.
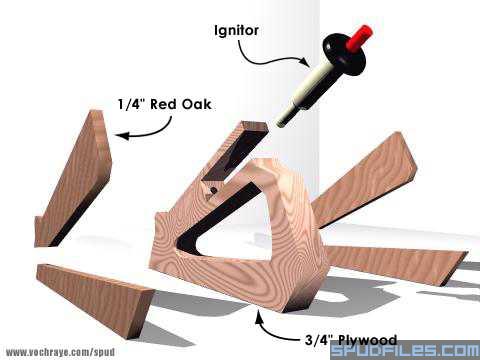
<img src="http://www.spudfiles.com/official_pics/han_tut01.jpg">
Showing all the pieces before assembly.
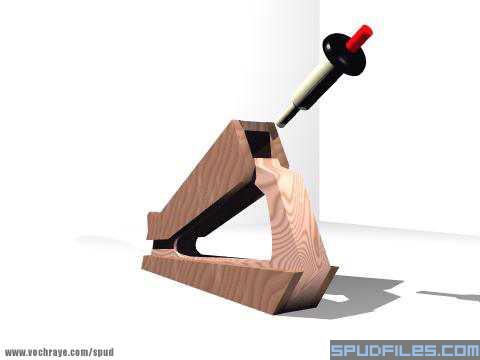
<img src="http://www.spudfiles.com/official_pics/han_tut02.jpg">
...about to insert the igniter...
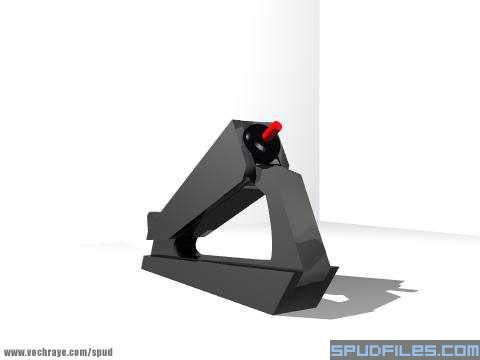
<img src="http://www.spudfiles.com/official_pics/han_tut03.jpg">
After a black paint job.
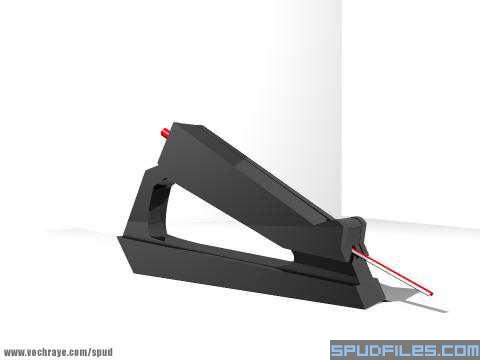
<img src="http://www.spudfiles.com/official_pics/han_tut04.jpg">
Showing the leads coming out of the back.
Step Three: Mounting
No pictures for this step, because really you don't need any. All you have to do is drill a couple of holes in your aluminum strip, and use the screws to screw it into the bottom of your newly made grip (it is a REALLY good idea to drill some pilot holes for these screws, as plywood has a tendency to split - remember to use a smaller size drill bit than the screw you are using) . Then affix the whole assembly to your launcher with hose clamps.
Voila! Now go chuck some spuds.
Provided By - <a href="http://www.vochraye.com/spud/">http://w ... /</a></div>
Provided By - <a href="http://www.vochraye.com/spud/">http://w ... m/spud/</a>
This is a guide to building the rear portion of the "Minigun" style grips, like those on the PG 255 Locutus.
It isn't very detailed, but if you're smart enough to build a spud gun, you're smart enough to figure it out
And don't be limited by what you see in these plans. Modify them! Make your own! Go nuts!
Materials and tools:
3/4" plywood
1/4;" x 2" hardwood (like red oak or poplar - you can get this at your home improvement store)
Wood glue
Paint (if you want)
Aluminum strip
Fiberglass resin (Bondo) if you want to get really creative.
Drill
Band saw / Jigsaw or keyhole saw (if you have a lot of time on your hands)
Some screws (eyeball your project to figure out what size)
Sand paper
One: Cutting
Print out the templates contained on the <A href="http://www.vochraye.com/spud/images/han_plan.pdf">plan sheet.</A> (and yes, I know I did not label all of the measurements. You don't need them. Just print it out so that one of the items that I DID give you the measurements on is to scale)
Trace the template for the center piece onto your 3/4" plywood.
Trace each one of the facing pieces onto your 1/4" hardwood twice (since you will need a copy of each for each side.
Now cut them out. I used a band saw, but you could use a jigsaw or a key hole saw, if you like.
Step Two: Assembly
Before you assemble, you may want to drill the hole for the lead wires (see <A href="http://www.vochraye.com/spud/images/han ... ">plans</A>). Basically, you are creating a wood sandwich. By sticking the facing pieces onto the outside of the center piece, the large 3/4" x 2 1/2" cavity in the center section becomes the hole for the BBQ igniter to fit into. Ok, I know what you're thinking "But the hole will be square!". Yes, I know, but the little black "skirt" around the base of the button on the igniter covers it up.
Glue the pieces together as shown in the pictures. Let dry. Then paint, if so desired.
<img src="http://www.spudfiles.com/official_pics/han_tut01.jpg">
Showing all the pieces before assembly.
<img src="http://www.spudfiles.com/official_pics/han_tut02.jpg">
...about to insert the igniter...
<img src="http://www.spudfiles.com/official_pics/han_tut03.jpg">
After a black paint job.
<img src="http://www.spudfiles.com/official_pics/han_tut04.jpg">
Showing the leads coming out of the back.
Step Three: Mounting
No pictures for this step, because really you don't need any. All you have to do is drill a couple of holes in your aluminum strip, and use the screws to screw it into the bottom of your newly made grip (it is a REALLY good idea to drill some pilot holes for these screws, as plywood has a tendency to split - remember to use a smaller size drill bit than the screw you are using) . Then affix the whole assembly to your launcher with hose clamps.
Voila! Now go chuck some spuds.
Provided By - <a href="http://www.vochraye.com/spud/">http://w ... /</a></div>