My Latest Project

Show us your pneumatic spud gun! Discuss pneumatic (compressed gas) powered potato guns and related accessories. Valve types, actuation, pipe, materials, fittings, compressors, safety, gas choices, and more.
cornflake_81
Private 2
Private 2
Posts: 23
Joined: Tue May 22, 2007 3:12 pm

Wed Apr 23, 2008 10:43 pm

So, with a few successful designs/executions under my belt here recently, I garnered the confidence to tackle a more advanced valve.
I wanted something sleek and professional looking. I started designig and building one, but it was a mish-mash of threaded adapters and parts and, well, it just didn't look sleek or professional. I did quite a bit of research and came up with this design.

Image

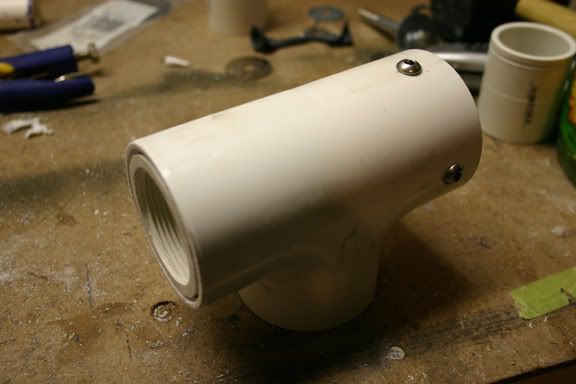
This is my 1.5" porting piston in a 2" tee. Though this might seem like a pretty simple valve to some of you, this was probably the most involved component I've built yet. The piston itself is another 2" sanding drum (they just work so damn well) with a couple neoprene washers as a sealing face.

Image

Image

The barrel/chamber ports are fitted with 2" x 1.5" threaded hex bushing that have had the "hex" ground away. I also trimmed down the bottom to make them flush.

Image

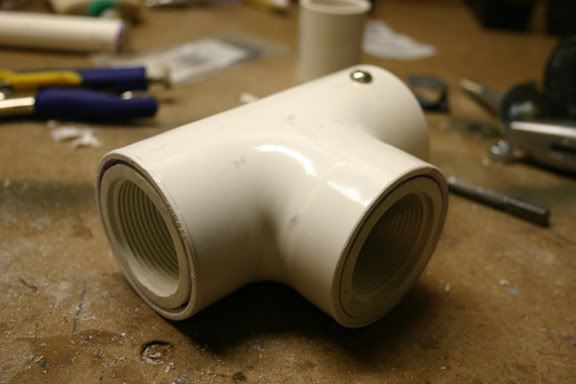
The barrel port was difficult. I wanted the threads to be completely concealed. However, connecting a small length of 1.5" pvc (for the piston to seal against) was proving problematic. I discovered (by accident) that a 1.5" male thread adapter fits nicely inside the lip that prevents the pipe from passing through the tee. I chopped the threaded portion off, popped in a short length of 1.5", and epoxied it in place directly behind the barrel port bushing.

Image

Image

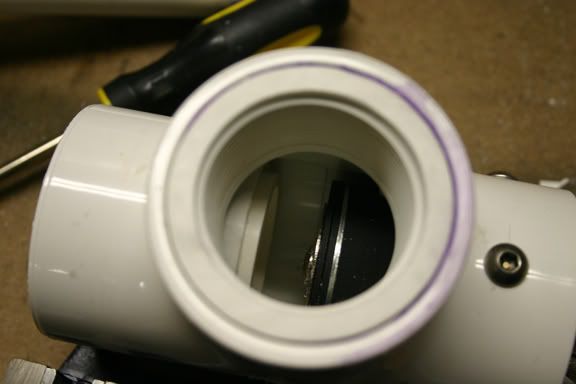
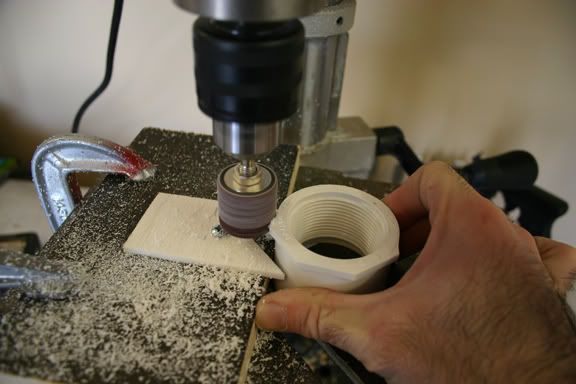
The back end required a little extra work as well. I made a sort of jig for my drill press and used a sanding drum (handy little things) to sand about an inch of the lip out of the pilot side of the tee. This let me insert a short length of 2" pvc into the housing followed by a plug (again, trimmed to fit flush) to give the piston about an extra inch of forward travel. This allows me to position the sealing face further forward in the barrel, which, admittedly, may or may not be beneficial. The extra "sleeve" actually protruded forward past the chamber port, so I trimmed it down as to not obscure it. A handful of 1/4" screws and a 1/2" threaded port on the back to round it out.

Image

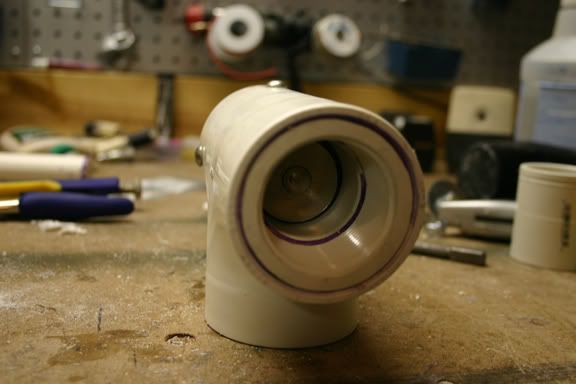
Its not finished yet, I still have to seal up the back end. I'm guessing an o-ring would be the easiest route, but I'm having a hard time finding one thats the right size. I'm also not sure of my bumper which is a rubber gasket intended for a flapper valve. Its has an outer diameter of 2" and is about 1/4" thick and sits perfectly in the back of the pilot area. There is also currently a spring behind the piston. Any thoughts on that set-up will be greatly appreciated.

So, why did I post an unfinished piston? Well, I'm proud of it. If nothing else, I feel that it looks the part. But, also, I'm looking for creative criticism. If this one works as well as I'd like it to, I'd like to build another one just like it for a dual chambered golf ball cannon. So, whataya think so far?
User avatar
SpudUke5
Sergeant
Sergeant
Posts: 1099
Joined: Tue Sep 04, 2007 10:16 pm

Wed Apr 23, 2008 10:50 pm

Ah very nice. Wat did you have to do to get those fittings into the tee all the way.

So this is what unismond (sp?) meant.
4SPC, My 4" piston 3" porting cannon
Memo:
Fix up copper cannon
Fix up 4SPC
Start Stirrup pump
Start Toolies piston bazooka
User avatar
elitesniper
Sergeant
Sergeant
Posts: 1090
Joined: Sat Oct 13, 2007 8:40 pm

Wed Apr 23, 2008 10:54 pm

beautiful! , but I think MrC had a problem with the bolts for servicing because they add allot of stress to the tee when the piston constantly hits, make sure you have a good bumper.
cornflake_81
Private 2
Private 2
Posts: 23
Joined: Tue May 22, 2007 3:12 pm

Wed Apr 23, 2008 10:59 pm

LikimysCrotchus5 wrote:Ah very nice. Wat did you have to do to get those fittings into the tee all the way.
I made a jig for my drill press that allowed me to sand off the hexagonal part of the bushing (the part that won't fit in the tee).

Image

After that, I just measured the depth of the socket, subtracted the length of the bushing and cut off the difference from the back.
So this is what unismond (sp?) meant.
Hmm?
elitesniper wrote:beautiful! , but I think MrC had a problem with the bolts for servicing because they add allot of stress to the tee when the piston constantly hits, make sure you have a good bumper.
Thanks! I was leary about the bolts, too. I'll keep searching...
User avatar
SpudUke5
Sergeant
Sergeant
Posts: 1099
Joined: Tue Sep 04, 2007 10:16 pm

Wed Apr 23, 2008 11:01 pm

Thats how i thought you did it. Only if i had a drill press.....:cry:

Unismond is a member here at spudfiles that was trying to explain this to me, but after seeing a visual description, such as your picture, i understand now what he was explaining.
4SPC, My 4" piston 3" porting cannon
Memo:
Fix up copper cannon
Fix up 4SPC
Start Stirrup pump
Start Toolies piston bazooka
clide
Corporal 3
Corporal 3
Posts: 784
Joined: Sun Mar 06, 2005 3:06 am
Location: Oklahoma, USA

Donating Members

Wed Apr 23, 2008 11:18 pm

Looks great. I can certainly tell you did your homework and took the time to do things right.

I've also never really been a fan of bolt-on piston plugs just from a safety standpoint. However many people have used them without problems, so they probably can't be that bad. One thing you may consider for future valves is trying to bolt on the threaded seat bushing rather than the rear plug. It experiences the same force due to pressure, but it doesn't have the impact of the piston on every shot.
<a href="http://gbcannon.com" target="_blank"><img src="http://gbcannon.com/pics/misc/pixel.png" border="0"></a>latest update - debut of the cardapult
User avatar
bigbob12345
Staff Sergeant
Staff Sergeant
Posts: 1516
Joined: Sat Dec 01, 2007 9:13 am
Location: Mercer Island,Washington

Wed Apr 23, 2008 11:22 pm

It looks like you accomplished your goal
It really does look very clean and proffesional
User avatar
Lentamentalisk
Sergeant 3
Sergeant 3
Posts: 1202
Joined: Tue Aug 07, 2007 5:27 pm
Location: Berkeley C.A.

Wed Apr 23, 2008 11:27 pm

That is an absolutely beautiful work of art you have there. I second the bumper, go for a nice spring and some rubber, you can never have to much bumper. Once again, absolutely beautiful!
Do not look back, and grieve over the past, for it is gone;
Do not be troubled about the future, for it has not yet come;
Live life in the present, and make it so beautiful that it will be worth remembering.
cornflake_81
Private 2
Private 2
Posts: 23
Joined: Tue May 22, 2007 3:12 pm

Wed Apr 23, 2008 11:32 pm

clide wrote:Looks great. I can certainly tell you did your homework and took the time to do things right.

I've also never really been a fan of bolt-on piston plugs just from a safety standpoint. However many people have used them without problems, so they probably can't be that bad. One thing you may consider for future valves is trying to bolt on the threaded seat bushing rather than the rear plug. It experiences the same force due to pressure, but it doesn't have the impact of the piston on every shot.

Thanks, clide. The idea of bolting in the barrel bushing actually crossed my mind...I think I'll implement that.
bigbob12345 wrote:It looks like you accomplished your goal
It really does look very clean and proffesional
Thanks, bigbob.
Lentamentalisk wrote:That is an absolutely beautiful work of art you have there. I second the bumper, go for a nice spring and some rubber, you can never have to much bumper. Once again, absolutely beautiful!
Appreciated! I was curious about what kind of effect the spring would have on operation.
User avatar
Gippeto
First Sergeant 3
First Sergeant 3
Venezuela
Posts: 2503
Joined: Sat Jan 19, 2008 10:14 am
Location: Soon to be socialist shit hole.
Has thanked: 2 times
Been thanked: 17 times

Donating Members

Wed Apr 23, 2008 11:40 pm

Very nice job on the valve. :)
"It could be that the purpose of your life is to serve as a warning to others" – unknown

Liberalism is a mental disorder, reality is it's cure.
User avatar
Velocity
Sergeant
Sergeant
Posts: 1039
Joined: Tue Feb 07, 2006 5:42 pm

Thu Apr 24, 2008 12:02 am

clide wrote:Looks great. I can certainly tell you did your homework and took the time to do things right.

I've also never really been a fan of bolt-on piston plugs just from a safety standpoint. However many people have used them without problems, so they probably can't be that bad. One thing you may consider for future valves is trying to bolt on the threaded seat bushing rather than the rear plug. It experiences the same force due to pressure, but it doesn't have the impact of the piston on every shot.
How clutch is this <a href="http://www.spudfiles.com/forums/mega-bu ... >memory</a> ? It came to my head as soon as clide started talking about the position of the bolts.

Nice build...I love the flush pieces.
cornflake_81
Private 2
Private 2
Posts: 23
Joined: Tue May 22, 2007 3:12 pm

Thu Apr 24, 2008 12:37 am

Thanks for the compliments, Gippeto & Velocity. I'll try to finish this up in the coming days. Once I get it on a cannon, I'll post it up.
User avatar
MrCrowley
Moderator
Moderator
Posts: 10078
Joined: Fri Jun 23, 2006 10:42 pm
Location: Auckland, New Zealand
Been thanked: 3 times

Thu Apr 24, 2008 12:53 am

Very nice, very clean. Good idea with the flush fittings :)
User avatar
psycix
Sergeant Major 4
Sergeant Major 4
Posts: 3684
Joined: Mon Jun 25, 2007 7:12 am
Location: The Netherlands

Donating Members

Thu Apr 24, 2008 10:04 am

Clean indeed!
Looks sweet :D

I understand your proudness.
Good job so far.

When will we see "results"?
Till the day I'm dieing, I'll keep them spuddies flying, 'cause I can!

Spudfiles steam group, join!
cornflake_81
Private 2
Private 2
Posts: 23
Joined: Tue May 22, 2007 3:12 pm

Thu Apr 24, 2008 2:23 pm

psycix wrote:Clean indeed!
Looks sweet :D

I understand your proudness.
Good job so far.

When will we see "results"?
Thanks. I hope to at least be able to test the valve by this weekend. As far as the actual gun that this is intended for, it'll probably be a couple more weeks. As usual, it started out as a plan for a simple little golf ball chucker, and has morphed into "big plans".
Post Reply