My First Pneumatic Cannon
Posted: Mon Jun 30, 2008 10:33 am
Howdy,
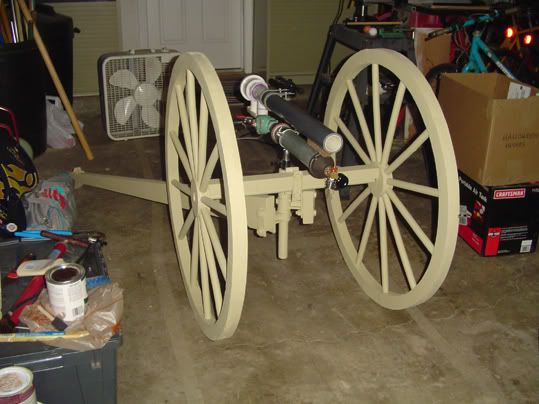
I am a new member here and have just finished my first pneumatic gun. I am showing it to the folks here at the forum and see what you think. Here it is:
My cannon is a replica of the M1916 37mm Infantry Cannon. Here are a couple of photos of the real thing:
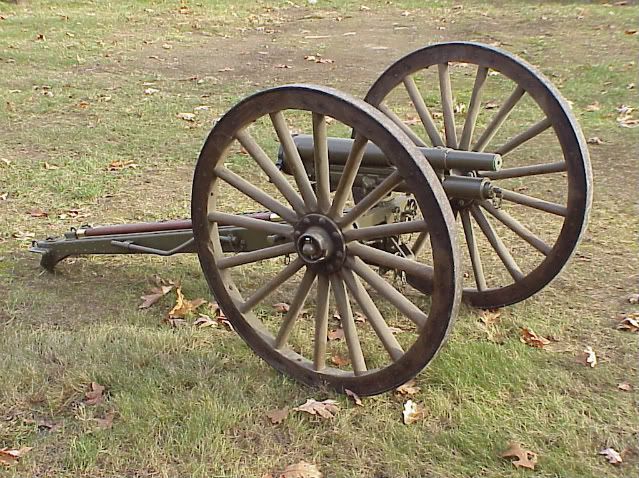
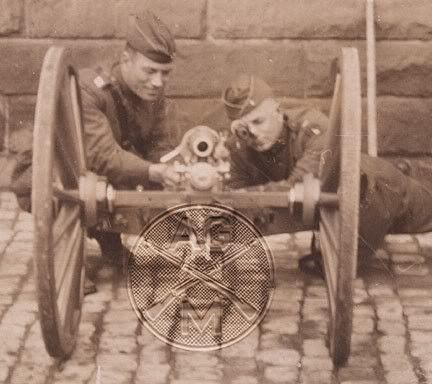
For those who aren’t familiar with the M1916 37mm Infantry Cannon, it was developed by the French during WWI as an infantry support gun. It was basically a simplified ½ scale copy of their famous French 75mm cannon. It was quite successful in providing direct fire support in front line use and was adopted by the US Army upon America’s entry into WWI. Its success, along with its small size led to its use in the Renault FT-17 tank and many other similar tanks and armored cars built during and immediately after WWI. Its last recorded use in combat by the United States though, was in its original configuration as an infantry support field piece. They were used in May of 1942 by the US Marines to combat invading Japanese forces at Corregidor in the Philippines.
I took a number of liberties with it to keep the price down by using off-the-shelf components and things I had laying around the garage.
Here are the basic specs:
NOTE: All of the PVC is schedule 40 pressure rated or better – with the exception of the SDR-21 barrel which is sleeved inside of a schedule 80 outer barrel.
ALSO NOTE: These are NOT instructions for making one of these guns. There are many critical construction techniques/details that are not covered in this description. I learned how to make it by reading everything I could come across on the spudfiles.com forum. I am posting this only to promote discussion and for entertainment purposes. If you want to build one, I suggest you read everything at spudfiles.com to figure out exactly how. CHECK YOUR LOCAL LAWS TO MAKE SURE IT IS LEGAL FIRST AND DO NOT BLAME ME IF YOU SCREW UP!
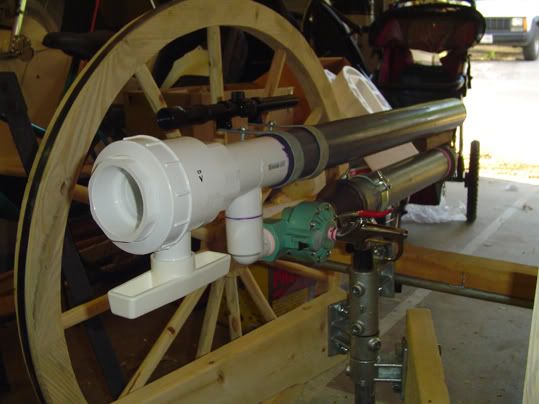
Barrel - 2" schedule 80 PVC outer barrel with 1.5" SDR-21 inner barrel sleeved inside. It has the bore needed to fire golf balls (which, coincidentally, are close to the actual gun’s bore size) combined with the strength of the heavy-duty schedule 80 outer barrel.
Valve/Trigger - 1" sprinkler valve. I modified the valve and installed the trigger as per the instructions I found here on this forum
Breech - The breech is a 2" schedule 40 ball valve - pressure rated.
Air chamber - The air chamber is 2" steel pipe with a 2" to 1" reducer at the back end which fits to the valve via a 1" steel nipple. At the front end there is a 2" to 1/2" reducer into which there is inserted a brass manifold complete with pressure gauge, pop-off safety valve (set for 135 psi), standard tire/schrader valve, and an air line quick connect. This handy little assembly allows me to pressurize the gun from either a compressor or a hand pump, provides a gauge that allows me to set consistent pressures for better accuracy, and has a relief valve to prevent over filling.
Carriage - Like in the real gun, the carriage is made in two pieces that can be separated into a tripod and the wheels/axel assembly. The two main legs of the tripod are cut from a 2x6. The front leg is a piece of 1" pipe with a rubber chair-foot on it. The pipe-hinge where the legs all come together was made by cutting down three "Kwik Key" type pipe fittings. The wagon wheels are "landscape decor". They are really too weak for normal use but are a lot less costly than real wheels and are OK as long as you are careful with them. I made the axel from some scraps that I had in the garage - as result, the wheel track is about 5" narrower than on the real thing. Hopefully it isn't too noticeable. Someday I might pony-up for real wheels and a correct axel assembly.
Also like the original, my gun has a fully functional scope on it. The gun is mounted to the carriage via a swivel that allows it to be aimed up-down and left-right without having to move the carriage itself.
I have test fired the gun up to 50 psi in my garage with either balled-up paper towels or ping-pong balls as rounds and it appears to work fine. At 50 PSI it makes a loud POP/THUD sound that is very gun-like. The paper towel ball flies out faster that can be seen until it unwraps itself and quickly decelerates about 20 feet down the range (a.k.a. my driveway). Ping-pong balls are noticeably smaller in diameter than the barrel’s bore, which is sized for golf balls, so there is bound to be quite a bit of blow-by in the barrel. Ping-pong balls travel out horizontally for about 10 yards before they slow down. I have fired one golf ball at about 20 psi and it traveled about 5 yards before hitting the ground, bouncing several times, and ending up in the neighbor’s front yard across the street. So far I have been reluctant to fire an actual golf ball at anything like a decent psi due to the close confines of my neighborhood – I need a real test range!
I think I might wheel the cannon out into the street on the Fourth of July and shoot a few confetti canister rounds to impress the neighbors. These can be made using colored paper, a paper shredder, and the cardboard cylinder from old toilet paper or paper towel rolls - which coincidentally measure about the same as the bore. It might be a fun way to get around the burn-bans and anti-fireworks rules this year.
What do you think?
PS - One technical question: After I got it all together, test fired it several times up to 50 PSI, and painted it, I noticed that I didn't reinstall the sprinkler valve's, spring when I took it apart to modify it. There are no signs of any leaks, internal or external, and the operation of the trigger/valve seems to be fine. I'd rather not take it apart again as it seems to be working. Do I need the spring?
MarkV
I am a new member here and have just finished my first pneumatic gun. I am showing it to the folks here at the forum and see what you think. Here it is:
My cannon is a replica of the M1916 37mm Infantry Cannon. Here are a couple of photos of the real thing:
For those who aren’t familiar with the M1916 37mm Infantry Cannon, it was developed by the French during WWI as an infantry support gun. It was basically a simplified ½ scale copy of their famous French 75mm cannon. It was quite successful in providing direct fire support in front line use and was adopted by the US Army upon America’s entry into WWI. Its success, along with its small size led to its use in the Renault FT-17 tank and many other similar tanks and armored cars built during and immediately after WWI. Its last recorded use in combat by the United States though, was in its original configuration as an infantry support field piece. They were used in May of 1942 by the US Marines to combat invading Japanese forces at Corregidor in the Philippines.
I took a number of liberties with it to keep the price down by using off-the-shelf components and things I had laying around the garage.
Here are the basic specs:
NOTE: All of the PVC is schedule 40 pressure rated or better – with the exception of the SDR-21 barrel which is sleeved inside of a schedule 80 outer barrel.
ALSO NOTE: These are NOT instructions for making one of these guns. There are many critical construction techniques/details that are not covered in this description. I learned how to make it by reading everything I could come across on the spudfiles.com forum. I am posting this only to promote discussion and for entertainment purposes. If you want to build one, I suggest you read everything at spudfiles.com to figure out exactly how. CHECK YOUR LOCAL LAWS TO MAKE SURE IT IS LEGAL FIRST AND DO NOT BLAME ME IF YOU SCREW UP!
Barrel - 2" schedule 80 PVC outer barrel with 1.5" SDR-21 inner barrel sleeved inside. It has the bore needed to fire golf balls (which, coincidentally, are close to the actual gun’s bore size) combined with the strength of the heavy-duty schedule 80 outer barrel.
Valve/Trigger - 1" sprinkler valve. I modified the valve and installed the trigger as per the instructions I found here on this forum
Breech - The breech is a 2" schedule 40 ball valve - pressure rated.
Air chamber - The air chamber is 2" steel pipe with a 2" to 1" reducer at the back end which fits to the valve via a 1" steel nipple. At the front end there is a 2" to 1/2" reducer into which there is inserted a brass manifold complete with pressure gauge, pop-off safety valve (set for 135 psi), standard tire/schrader valve, and an air line quick connect. This handy little assembly allows me to pressurize the gun from either a compressor or a hand pump, provides a gauge that allows me to set consistent pressures for better accuracy, and has a relief valve to prevent over filling.
Carriage - Like in the real gun, the carriage is made in two pieces that can be separated into a tripod and the wheels/axel assembly. The two main legs of the tripod are cut from a 2x6. The front leg is a piece of 1" pipe with a rubber chair-foot on it. The pipe-hinge where the legs all come together was made by cutting down three "Kwik Key" type pipe fittings. The wagon wheels are "landscape decor". They are really too weak for normal use but are a lot less costly than real wheels and are OK as long as you are careful with them. I made the axel from some scraps that I had in the garage - as result, the wheel track is about 5" narrower than on the real thing. Hopefully it isn't too noticeable. Someday I might pony-up for real wheels and a correct axel assembly.
Also like the original, my gun has a fully functional scope on it. The gun is mounted to the carriage via a swivel that allows it to be aimed up-down and left-right without having to move the carriage itself.
I have test fired the gun up to 50 psi in my garage with either balled-up paper towels or ping-pong balls as rounds and it appears to work fine. At 50 PSI it makes a loud POP/THUD sound that is very gun-like. The paper towel ball flies out faster that can be seen until it unwraps itself and quickly decelerates about 20 feet down the range (a.k.a. my driveway). Ping-pong balls are noticeably smaller in diameter than the barrel’s bore, which is sized for golf balls, so there is bound to be quite a bit of blow-by in the barrel. Ping-pong balls travel out horizontally for about 10 yards before they slow down. I have fired one golf ball at about 20 psi and it traveled about 5 yards before hitting the ground, bouncing several times, and ending up in the neighbor’s front yard across the street. So far I have been reluctant to fire an actual golf ball at anything like a decent psi due to the close confines of my neighborhood – I need a real test range!
I think I might wheel the cannon out into the street on the Fourth of July and shoot a few confetti canister rounds to impress the neighbors. These can be made using colored paper, a paper shredder, and the cardboard cylinder from old toilet paper or paper towel rolls - which coincidentally measure about the same as the bore. It might be a fun way to get around the burn-bans and anti-fireworks rules this year.
What do you think?
PS - One technical question: After I got it all together, test fired it several times up to 50 PSI, and painted it, I noticed that I didn't reinstall the sprinkler valve's, spring when I took it apart to modify it. There are no signs of any leaks, internal or external, and the operation of the trigger/valve seems to be fine. I'd rather not take it apart again as it seems to be working. Do I need the spring?
MarkV