First Build

Boom! The classic potato gun harnesses the combustion of flammable vapor. Show us your combustion spud gun and discuss fuels, ratios, safety, ignition systems, tools, and more.
User avatar
sprayandplay08
Private 3
Private 3
Posts: 59
Joined: Mon Jun 09, 2008 12:00 pm

Tue Jun 10, 2008 8:34 am

Hello all I am building my first SPRAY N' PRAY cannon today.

It is a basic Combustion Cannon
My specs are an 1.5 " X 23" barrel
3.0 " X 08" C.C
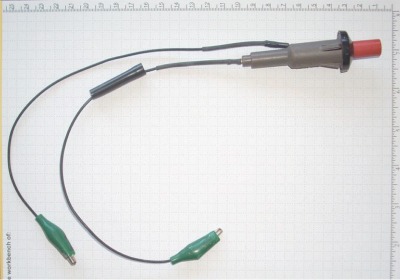
with a grill ignitor

will have pics later :lol:
I used the wiki formula for the C:B ratio and it is approx. a .7:1 Ratio

oh yea and i'm new to the site
User avatar
starman
Sergeant Major
Sergeant Major
United States of America
Posts: 3027
Joined: Wed Dec 12, 2007 12:45 am
Location: Simpsonville, SC

Donating Members

Tue Jun 10, 2008 8:42 am

Welcome aboard! Sounds like a medium sized gun there. Are you just trying to keep it "rifle" size?
User avatar
sprayandplay08
Private 3
Private 3
Posts: 59
Joined: Mon Jun 09, 2008 12:00 pm

Tue Jun 10, 2008 8:45 am

Actually i'm trying to keep it transportable size my father and his friends take their guns to different places to shoot and i want it to fit in my car.

Well i'm off to the hardware store later people :)
User avatar
sprayandplay08
Private 3
Private 3
Posts: 59
Joined: Mon Jun 09, 2008 12:00 pm

Tue Jun 10, 2008 11:18 am

Ok now i need help. I have the BBQ ignitor and it has 2 leads and electrodes on the ends i need to make a box for the ignitor its self how do i do that ? links or pictures would help
User avatar
MaxuS the 2nd
Corporal 2
Corporal 2
Posts: 674
Joined: Sat Jan 19, 2008 3:59 pm

Tue Jun 10, 2008 11:21 am

No, you don't have to make a box for it, drill a hole and stick it in.
Badman
User avatar
sprayandplay08
Private 3
Private 3
Posts: 59
Joined: Mon Jun 09, 2008 12:00 pm

Tue Jun 10, 2008 11:28 am

yeah but it is set up weird. it has the ignitor housing then 2 wired plug in to the 2metal pieces on the housing one on the bottom and one on the side giving me 2 8 inch wires with steel electrodes on them
Attachments
0610081225.jpg
User avatar
starman
Sergeant Major
Sergeant Major
United States of America
Posts: 3027
Joined: Wed Dec 12, 2007 12:45 am
Location: Simpsonville, SC

Donating Members

Tue Jun 10, 2008 11:33 am

sprayandplay08 wrote:Ok now i need help. I have the BBQ ignitor and it has 2 leads and electrodes on the ends i need to make a box for the ignitor its self how do i do that ? links or pictures would help
Slow down a bit, do some more research on this. Figure out your spark gap design (usually screws pointed at each other) and a way to wire it. There are many ways to mount the ignitor...scanning the cannon showcase should give you plenty of ideas.
User avatar
sprayandplay08
Private 3
Private 3
Posts: 59
Joined: Mon Jun 09, 2008 12:00 pm

Tue Jun 10, 2008 11:37 am

*DEEP BREATH* ok i know how i want to set the gap inside but i need a
housing for the button. :study: i'll go look around
User avatar
Spuddin
Specialist 2
Specialist 2
Posts: 262
Joined: Wed May 16, 2007 1:28 pm
Location: Oklahoma
Contact:

Donating Members

Tue Jun 10, 2008 12:05 pm

u can cut the ceramic electrodes off and throw them away and use the screws like starman described, should do fine. welcome aboard.
User avatar
sprayandplay08
Private 3
Private 3
Posts: 59
Joined: Mon Jun 09, 2008 12:00 pm

Tue Jun 10, 2008 12:12 pm

the shiny part u see at the ends is a threaded shaft with 2 nuts for each one
Attachments
0610081316.jpg
User avatar
mopherman
Corporal 3
Corporal 3
Posts: 788
Joined: Sat Feb 03, 2007 8:20 pm
Been thanked: 1 time

Tue Jun 10, 2008 12:22 pm

Just chop off the thingies on the end. Make your own electrodes from screws or bolts. As for the ingitor housing, lots of people put them inside peices of pipe and make handles out of them.
searching for a modern day savior from another place,inclined toward charity,everyone's begging for an answer,without regard to validity,the searching never ends,it goes on and on for eternity
-Bad religion
User avatar
sprayandplay08
Private 3
Private 3
Posts: 59
Joined: Mon Jun 09, 2008 12:00 pm

Tue Jun 10, 2008 12:25 pm

ok i'll see what i come up with
Attachments
First Dry fit
First Dry fit
User avatar
psycix
Sergeant Major 4
Sergeant Major 4
Posts: 3684
Joined: Mon Jun 25, 2007 7:12 am
Location: The Netherlands

Donating Members

Tue Jun 10, 2008 3:20 pm

*gasp* Bell reducer.
DWV, Non-pressure rated.


Sorry, Back on topic:
Screw in two bolts trough your chamber walls (trough a double layer, where a fitting is on the pipe)
Then cut of those two weird electrodes and connect em to the two bolts.
Bend the bolts a little if nessescairy so they are as close as possible to eachother while not touching eachother. An 1/4" gap or less is preferred.
Till the day I'm dieing, I'll keep them spuddies flying, 'cause I can!

Spudfiles steam group, join!
User avatar
sprayandplay08
Private 3
Private 3
Posts: 59
Joined: Mon Jun 09, 2008 12:00 pm

Tue Jun 10, 2008 3:31 pm

ok will do dad has pvc glue w/him so i am at a stand still maby i'll make a mini while i wait
jimmy101
Sergeant Major
Sergeant Major
United States of America
Posts: 3197
Joined: Wed Mar 28, 2007 9:48 am
Location: Greenwood, Indiana
Has thanked: 5 times
Been thanked: 15 times
Contact:

Tue Jun 10, 2008 6:36 pm

psycix wrote:*gasp* Bell reducer.
DWV, Non-pressure rated.
So? The cleanout plug isn't pressure rated either. Want to guess which is more likely to fail? :D

Back to the OP

Chop the metal parts off the end of the wires on your piezo and replace with alligator clips like this;
Image
Some heat shrink tubing makes things look nice and gives you some insulation. This design lets you move the piezo from gun to gun.

Screw a pair of fine thread drywall screws into the chamber so that their tips end up within ~1/8" of each other. The drywall screws work well, the fine thread means you have several threads actually in contact with the pvc, the sharp points make it spark more consistently.

Need a simple handle design?
Image
This type of BBQ piezo is a snug fit inside 3/4" PVC pipe. So, a T, an end cap, a coupler, a couple short lengths of 3/4" pipe, two big-ol pipe clamps.

You can just drill a hole in the chamber and install pretty much all of the piezo in the chamber. Add a short piece of wire to one of the electrodes of the piezo to bring it closer to the other to act as the spark gap. Personnaly, I don't think its a good approach. The hole for the piezo is pretty large. The piezo itself is not air tight and will vent hot gases. The ergonomics aren't all that great, and ergonomics are important on something that is going to recoil hard enough to hurt you. Might as well make a real handle, or pistol grip, or "guano grip" or whatever works best for you.
Image
Post Reply