Ok i basically got my first potato gun model built together with abs piping, just a simple combustion chamber with a barrel attached to the end
and i was basically wondering the following...
is the cap suppose to be easy to spin on but hard to take out? there both 3 inches the female thread and cap
what type of igniter should i get, i have read the post sticky on forum on sparker guide but really i dunno which one, my plan to is either get lantern or piezoelectric igniter, which the probably the two cheapest i found on guide
and btw... i acidently bought a long nose lighter, those that was the one i was suppose to get but was for minis, will those still work? ROFL
and exactly how would i install the following igniters
its kinda late and i gotta wake up at 9 tomorrow so tomorrow as soon as i come home, i'll take a picture of my gun so you guys get an idea of how big and stuff it is or if you even need it and about the cap too tight thing
THANKS =]
New Potato Gun User, Please Help


They are usually hard to open, Get a Piezo, A long nose lighter one will probably have too small of a spark, you could also use a stun gun. You should screw in some screws into the chamber, and connect the sparker wires to the screws, DO NOT DRILL A HOLE IN THE CHAMBER, AND INSTALL THE SPARKER DIRECTLY. About the cap, get a hacksaw and cut the threaded part of the cleanout cap in half, so there arent as many threads. All this stuff could be found by searching, And BTW, welcome to SPUDFILES! For further reference, click the link in my signature, or search SPUDWIKI. Just look through the showcase section, and look at the WIKI(top of the page)
<a href="http://www.danasoft.com"><img src="http://www.danasoft.com/citysign.jpg" border="0"></a><div>
THIS STATES WHERE YOU LIVE, NOT ME, IT SAYS WHERE YOU LIVE BASED ON YOUR IP ADRESS.
THIS STATES WHERE YOU LIVE, NOT ME, IT SAYS WHERE YOU LIVE BASED ON YOUR IP ADRESS.
-
nosebleedXD
- Specialist 2

- Posts: 246
- Joined: Mon Jul 21, 2008 10:23 pm
hmm exactly how big and far apart should the screws be and the reason not to shove the sparker inside is because it ll damage it when it explodes? oh and what should i expect the sparker to be like? do i have to assemble the wires in some way and is it similar to the mini sparker
-
iisthemuffin

- Specialist 4

- Posts: 497
- Joined: Sun May 11, 2008 2:38 pm
I believe he was telling you not to place the sparker inside of the chamber. It is bad but ok as long as it not in the clean out cap. And if you do choose to place its inside the gun go through a double layer. Like through a fitting.The sparker is a small plastic thing with a button. Also you just have two wires and when placed close enough they create a spark when the button is pressed.


A sparker from a long nose lighter WILL work, but it probably won't last very long. A bbq style sparker is generally built out of stronger plastic and are more reliable. The reason for not mounting the sparker directly into the gun is because there is a chance that the explosion could make it fly out, either hurting your finger or giving you a nasty burn. With long-nose style sparkers, they usually have one wire coming off, and a bit of metal on one end. These are your two contacts. Attach a wire to each one, and attach those to the screws in the chamber. Before you put the screws into the chamber, test the sparker to see how long it's spark is. Then just place the scres accordingly.
The BBQ sparker I have has a metal base (1st contact) and a bit of wire in a groove in the plastic (2nd contact).
The BBQ sparker I have has a metal base (1st contact) and a bit of wire in a groove in the plastic (2nd contact).
I wonder how much deeper the ocean would be without sponges.
Right now I'm having amnesia and deja vu at the same time. I think I've forgotten this before.
Add me on msn!!! insomniac-55@hotmail.com
Right now I'm having amnesia and deja vu at the same time. I think I've forgotten this before.
Add me on msn!!! insomniac-55@hotmail.com
-
jimmy101
- Sergeant Major


- Posts: 3197
- Joined: Wed Mar 28, 2007 9:48 am
- Location: Greenwood, Indiana
- Has thanked: 5 times
- Been thanked: 15 times
- Contact:
Since you've already bought the long-neck lighter you might as well start with it as your ignition system. When (if) it craps out you can replace it with a BBQ piezo.
The flint based lantern lighters are cheaper (~3$) and work well for ignition. They do have the problem that it takes all of one hand to operate. Piezos can usually be built into a handle so the firing hand can still help support the gun. Perhaps something like this;
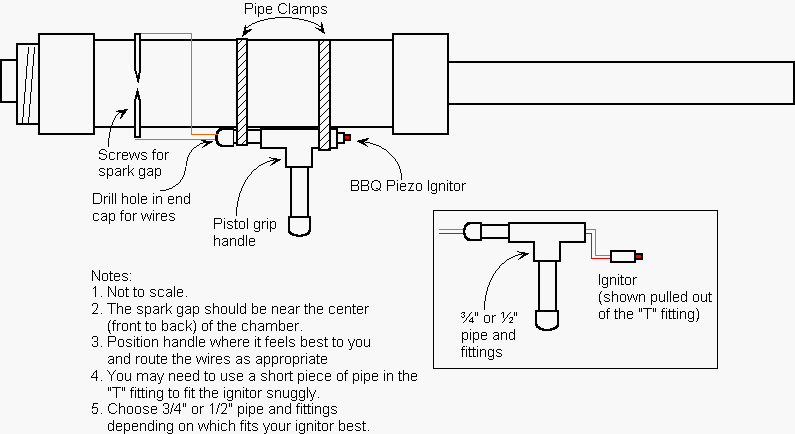
Use pointy screws for the spark gap, I prefer fine-thread drywall screws. The sharp point helps the spark and the fine threads mean you have several threads actually in contact with the PVC. The spark gap should be pretty small, of hand I would suggest ~1/8" at most. Keep the wires from the lighter well seperated, otherwise the spark will just jump through the wires' insulation instead of across the spark gap.
The spark is generally placed near the front to back center of the gun. Some folks put the screws 180 degrees apart, others put'm nearly side by side. It doesn't really matter too much but I find it easier to adjust the spark gap if the screws are 180 degrees apart.
I would suggest getting some wires with aligator clips (from radioshack for example). Cut the clip off the ends of two wires and connect to the lighter. Connect the aligator clip ends to the screws. This makes it easy to move the ignitor from gun to gun and the aligator clips give pretty good electrical contact with the screws. Here is how I do it with a BBQ piezo
Now all you need is a fan and a syringe ...
The flint based lantern lighters are cheaper (~3$) and work well for ignition. They do have the problem that it takes all of one hand to operate. Piezos can usually be built into a handle so the firing hand can still help support the gun. Perhaps something like this;
Use pointy screws for the spark gap, I prefer fine-thread drywall screws. The sharp point helps the spark and the fine threads mean you have several threads actually in contact with the PVC. The spark gap should be pretty small, of hand I would suggest ~1/8" at most. Keep the wires from the lighter well seperated, otherwise the spark will just jump through the wires' insulation instead of across the spark gap.
The spark is generally placed near the front to back center of the gun. Some folks put the screws 180 degrees apart, others put'm nearly side by side. It doesn't really matter too much but I find it easier to adjust the spark gap if the screws are 180 degrees apart.
I would suggest getting some wires with aligator clips (from radioshack for example). Cut the clip off the ends of two wires and connect to the lighter. Connect the aligator clip ends to the screws. This makes it easy to move the ignitor from gun to gun and the aligator clips give pretty good electrical contact with the screws. Here is how I do it with a BBQ piezo
Now all you need is a fan and a syringe ...

-
nosebleedXD
- Specialist 2
- Posts: 246
- Joined: Mon Jul 21, 2008 10:23 pm
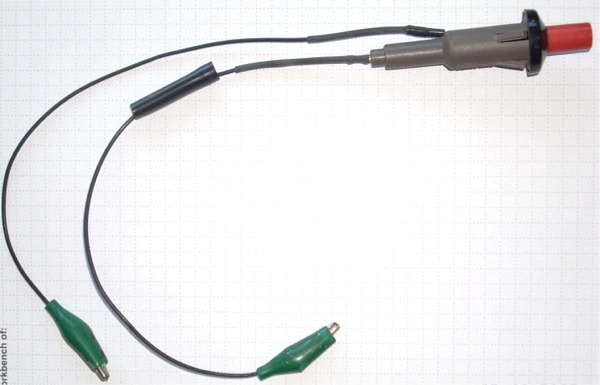
ok today i got my sparker and it came with the following


im scared to press it ROFl, would it work right now without the wires?

im scared to press it ROFl, would it work right now without the wires?

Nice diagram Jimmy101.
nosebleedXD the cap thing is nothing new.
These things are used (in the real world) for very occasional removal, thus the name "Cleanout". PVC is designed to bond well with itself, so the threads are just doing what they are designed to do.
Assuming your using a spray & pray be sure not to spray the threads when loading, don't drop the cap on the ground - So you should try and keep the threads clean - a wire brush and light soapy water (rinse & dry well) Whatever you do NEVER EVER use WD-40 or anything like it to lube the threads.
Not sure cutting cap threads off does anything but leave less threads exposed and you run the risk of loosing that starter thread, which can be a pain to refile.
Assuming you have the more common cap (with a square nub coming out the center, You can also make sort of a helper tool out of 3/4" plywood if you have a jig saw - just cut a three sided open square near the end just big enough to fit over the extruded square on the back of the cap to use like a wrench. Be careful not to over-tighten - it's harder to loosen than tighten.
As far as the igniter I think you are on the right track with the lantern igniter - it provides a great spark, is cheap and easy to find. If you do go Piezo the spark gaps can be bit daunting for new-comer, so I am attaching something I stumbled across recently but haven't tried - basically it has spark gaps built on - you just have to route it into the chamber - again preferably through an area of double layer (like a fitting glue joint).
Just goggle it to find where to get it online or go to manufacturer to find it local - made by Maverick. Amazon has it for 15 bucks - the usual Piezo will cost you 10 and you have to rig the spark gap.
Good luck, hope any of this will help.
For something like this you will want to seal around it too, so maybe some plumbers putty (not thread compound) the stuff that comes in two parts and hardens like metal.
- Attachments
-
- Just google BBQ Safety Igniter
- bbqsafetyigniter.jpg (27.69 KiB) Viewed 7212 times
-
nosebleedXD
- Specialist 2
- Posts: 246
- Joined: Mon Jul 21, 2008 10:23 pm
ROFL accidentally used wd 40 0_0 ROFL
ok and btw how would i stick an aligator clip to this
i current dont have any but would there be a plan b?
and also, how big should the spark be?
ok and btw how would i stick an aligator clip to this
i current dont have any but would there be a plan b?
and also, how big should the spark be?
- Attachments
-
- Picture 003.jpg (11.95 KiB) Viewed 7201 times
Last edited by nosebleedXD on Tue Jul 22, 2008 4:47 pm, edited 2 times in total.
Some acutally advertise 50 or 100 thousand strokes, but at that amount who is going to count it to call them a liar?
Some work forever, some (as you will read in these posts) only last a week, which is why it is important to make it easily replaceable.
Yes you can be shocked if you are touching both contacts - just put some electrical tape over the contacts or shove it in a piece of 3/4 scrap pvc.
Some work forever, some (as you will read in these posts) only last a week, which is why it is important to make it easily replaceable.
Yes you can be shocked if you are touching both contacts - just put some electrical tape over the contacts or shove it in a piece of 3/4 scrap pvc.
Last edited by Deadeye on Tue Jul 22, 2008 5:01 pm, edited 1 time in total.
-
nosebleedXD
- Specialist 2
- Posts: 246
- Joined: Mon Jul 21, 2008 10:23 pm
so how would i connect this thing exactly 0_0


There are two conductors coming out of the piezo crystal, one comes out the bottom of the unit, the other is embedded in the side, but visible. Solder a wire to the embedded one, and you'll now have two wires coming out of it. Attach one wire to one side of your spark gap, and the other wire to the other side. Can't really make it much more simple than thatso how would i connect this thing exactly 0_0
Also, don't worry about shocking yourself with it - unless it's on a sensitive part of your body like a finger, chances are you won't even feel it.
Spudfiles' resident expert on all things that sail through the air at improbable speeds, trailing an incandescent wake of ionized air, dissociated polymers and metal oxides.
-
nosebleedXD
- Specialist 2
- Posts: 246
- Joined: Mon Jul 21, 2008 10:23 pm
rofl alrighty thanks, ima get some thicker wires too, these are too weak
You might try taking a gander at the directions.
I only see 1 wire & 1 terminal on the plunger, so either it was a fluke on your photography or you have bought a single wire variety. This will present a whole new set of problems.
I think there is an "E-Z Igniter" out there that uses this config.
So first your red wire (black rubber end) slides onto the little rounded knob barely sticking out the bottom (furthest away from the button).
Now there should be either a little flat terminal coming out about 1/2 up the thing or you will have to figure out how it is finding ground (it will be something on the plunger that is metal.
If you find such a thing, you should be able to hold the end of the red wire very close to it and push the button and see a spark jump. Try not to touch either contact --- You'll know if you do.
Let me know how this goes.
- Attachments
-
- Example of a normal Igniter
- Piezoelectric_Igniter.jpg (20.26 KiB) Viewed 7165 times
-
nosebleedXD
- Specialist 2
- Posts: 246
- Joined: Mon Jul 21, 2008 10:23 pm
rofl yeah it only came with 1 wire o_O
would attaching another wire to the metal thing embedded on the side work?
would attaching another wire to the metal thing embedded on the side work?