Page 1 of 3
Science Fair and first Combustion Launcher
Posted: Sat Nov 01, 2008 10:39 am
by RabidDuck
Hey there. I love this site. I've been looking at it for a while and am getting the concept. I have found plans for one cannon that looks pretty good.
Lantern Sparker
3" Schedule 40 PVC 7 1/2" in length
1 1/2" Schedule 40 PVC 3" in length
1 1/2" Male Adapter
1 1/2" to 3" Converter
4" to 3" Converter
4" Threaded Cleanout
4" Threaded End Cap
That would be its body. Then i found that it can also take interchangeable barrels.
http://www.advancedspuds.com/interchangable.htm That's where those plans are. We are doing a science fair project. Our design needs to be new or modified some how. We are thinking of using a propane meter for the fuel. I'm not sure how to build the propane meter and how to inject/use it. If there is a tutorial or a list of parts please post that too. Also we need a question or problem. We were thinking that we could do, Which projectile shoots the furthest. Or something like that. How fast do different projectiles shoot? Any ideas for questions or tests. Also for the propane would i need some type of fan? Is that design going to be the best for a simple combustion cannon? Is there a better design? Please let me know.
Thank You!
~RabidDuck
Posted: Sat Nov 01, 2008 11:30 am
by The Engineer
I am doing a science fair project with pneumatic cannons right now as well. My project is stated (at least the first half) as follows.
ps - It would be plagorism to use this, so don't. It's just a guide / collaboration of projects. Besides, they will find out somehow, they always do.
Variables
Purpose:
The purpose of the experiment is to find which length of ammunition is the most accurate when mass remains the same.
Hypothesis:
If accuracy is tested with ammunition of 2 cm, 4 cm, 6 cm, and 8 cm in length, then the ammunition with a length of 6 cm will be the most accurate.
Variables:
Constant – Air pressure, aim of barrel, mass of ammunition, distance to target
Independent – length of ammunition
Dependent – accuracy
Materials
Construction
Schrader valve
3 in. PVC
3 in. cap
3 x 1.5 in. reducer
1.5 x ¾ in. bushing
¾ in. PVC
¾ female slip x ¾ in. male threaded adapter
Rain Bird ¾ in. sprinkler valve
3/8 in. hose barb (x2)
Hose clamp (x2)
3/8 in. pressure rated hose
Blow gun valve
Teflon tape
Epoxy putty
½ in. PVC
¾ male threaded x ½ in. female slip adapter
Tools
Drill
3/8 in. drill bit
¼ in. drill bit
Circular saw
Tape measure
Scissors
Plywood
Nails / screws
Miscellaneous supports
Multiple colors of permanent markers
Pencils, pens, markers, dowels, etc. with different diameters
Air compressor
Clay
Electronic balance
Digital Camera
Camcorder
Long wooden dowel / metal rod
Procedures
Cannon
1. Chamber
a. Cut a piece of 3 in. wide PVC to a length of 15 in.
b. Glue a 3 in. cap to one end of the chamber.
c. Glue a 3 x 1.5 in. reducer to the other end of the chamber.
d. Glue a 1.5 x ¾ in. bushing to the reducer.
e. Cut a piece of ¾ in. wide PVC to a length of 5 in.
f. Glue the ¾ in. PVC to the bushing.
g. Glue a ¾ in. female slip x ¾ in. male threaded adapter to the ¾ in. PVC.
h. Use a ¼ in. drill bit to drill a hole in the side of the chamber.
i. Apply Teflon tape to a Schrader valve and screw it tightly into the hole using a wrench.
2. Valve
a. Buy a ¾ in. Rain Bird sprinkler valve.
b. Remove the solenoid by unscrewing it.
c. Put epoxy putty over the small holes which the solenoid used to cover.
d. Use a 3/8 in. drill bit to drill a hole directly into the top of the valve.
e. Apply Teflon tape to a 3/8 in. hose barb and screw it tightly into the hole using a wrench.
f. Put epoxy putty around where the hose barb screws into the valve.
g. Put a hose clamp loosely on 3/8 in. wide pressure rated hose and firmly push the hose over the hose barb.
h. Tighten the hose clamp as much as possible.
i. Cut the hose to 2 ft. in length.
j. Repeat steps f and g on the other end of the hose.
k. Apply Teflon tape to the hose barb and screw a blow gun valve onto it.
3. Barrel
a. Cut a piece of ½ in. wide PVC to 3 ft. in length.
b. Glue a ¾ in. male threaded x ½ in. slip adapter to one end of the barrel.
4. Assembly
a. Apply Teflon tape to the ¾ in. adapter on the chamber.
b. Tightly screw the chamber into the inlet on the sprinkler valve.
c. Apply Teflon tape to the ¾ in. x ½ in. adapter.
d. Tightly screw the barrel into the outlet on the sprinkler valve.
Target
1. Obtain a large square piece of ½ in. thick plywood.
2. Spread a piece of Tyvek house wrap across the plywood and fasten in place with nails or screws.
3. Measure from the edges of the plywood and draw a well sized dot in the exact middle of the target.
4. Sturdily balance the target on barrels, wood, or any other strong material.
Ammunition
1. Use the electronic balance to make 20 pieces of clay with equal mass.
2. Cut ½ in. PVC into lengths of 2 cm, 4 cm, 6 cm, and 8 cm (make five for each length).
3. Place the pieces of PVC from step 1 vertically on a flat non-stick surface.
4. Push the clay into each piece of PVC.
a. In order to keep mass equal for the different lengths, leave a portion of the clay out of the PVC.
b. Put a pencil, pen, marker, or dowel of some kind in the middle of the PVC when inserting the clay.
c. Pull out the spacer from step b and use the extra clay from step a to fill in the two small holes on either end.
5. Allow the clay to dry until it is hard.
Setting Up
1. Secure the pneumatic cannon’s chamber in clamping table.
2. Adjust the height of a second clamping table and secure the barrel into it.
3. Place the mounted cannon 75 ft. from the target.
4. Line up the barrel so that it is pointing directly at the dot on the target (use a laser pointer or laser balance).
5. Use a long wooden dowel or metal rod at least 3 ft. long and mark it with a permanent marker at 2’ 8”. This will be the ramrod.
Testing
1. Pressurize the chamber to 50 psi.
2. Put one of the clay bullets into the end of the barrel.
3. Use the ramrod to carefully push the bullet into the barrel until the mark on the ramrod is lined up with the tip of the barrel.
a. DO NOT put anything in front of the barrel apart from the clay bullet, the ramrod, and your hands. In case of an accidental firing this will help to prevent injury.
4. Repeat step 3 with the rest of the clay bullets of the same length.
5. Go to the target and mark each shot with one color marker. Do not use the same color marker when marking the accuracy of the other lengths of ammunition.
a. Make sure the cannon is depressurized and unloaded before walking in front of it to reach the target.
6. Measure the distance from each shot to the center of the target.
7. Find the average of the measurements from step 6.
8. Repeat steps 3 – 7 with the rest of the clay bullets.
9. Make sure the cannon is depressurized and unloaded before storing it.
Posted: Sat Nov 01, 2008 12:39 pm
by starman
Check out the
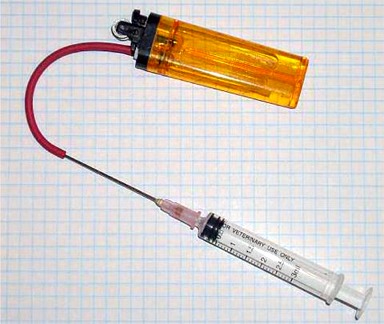
Burnt Latke sitefor all the low-down on advanced combustions. He talks about fuel metering at length. Below is a picture of my external metering system.
For distance, it's hard to beat a golfball. You can easily shoot 2 - 3 times the distance of a potato depending on the design and power of the cannon of course. You will need to find some SDR 21 1.5" PVC for a golfball barrel and I would suggest sleeving it in sched 80 2".
500 - 700 fps isn't unheard-of velocities for a golfball from a well designed cannon.
Welcome to Spudfiles Rabid!

Posted: Sat Nov 01, 2008 12:47 pm
by RabidDuck
Ok thank you both of you. If i were to measure the distance of different projectiles i would need to change the projectile and barrel. Would that work for science fair. Also starman how did you make your propane injection and how do you inject it? Any other ideas of Science Fair ideas? It would be cool to measure the velocity but im not sure how i would do that. Thank you
~RabidDuck
Posted: Sat Nov 01, 2008 12:50 pm
by RabidDuck
Oh yeah and also would i need to install a fan? If so is there a guide on how to do it or suggestions? If its not needed i will not use one.
Posted: Sat Nov 01, 2008 1:18 pm
by Ragnarok
RabidDuck wrote:Oh yeah and also would i need to install a fan?
It's not essential you don't have to have it for it to work, but if you truly want to call it an advanced combustion - and if you want all that extra (FREE!!!) power, then you will have to have a fan, yes.
There's a good guide at Burnt Latke, here:
http://www.burntlatke.com/fan.html
For most things, Burnt Latke should be the first stop for all information regarding combustion cannons - it's an incredibly informative site.
P.S. Correct me if I'm wrong, but I thought only mammals could get rabies?

Posted: Sat Nov 01, 2008 2:03 pm
by EphOph
Also, a note on Burnt Latke's propane meter: instead of cutting threads into the torch head, you can unscrew it with a pipe wrench and use a 1/4" compression(hose) to 1/4"NPTM adapter to connect it to the regulator.
The Engineer - In reading your test plan, I have a suggestion. For safety's sake, you should load the ammo before pressurizing the chamber. That way your hands will not be in danger if you accidentally set it off.
Posted: Sat Nov 01, 2008 4:12 pm
by RabidDuck
I have made the chamber and 2 barrels. I have not made the propane meter yet and i haven't installed the sparker yet. I still need ideas of what we can test. We can only change one thing during the tests though.
Posted: Sat Nov 01, 2008 5:33 pm
by daberno123
To measure velocity you'd need a Shooting Chrony. They usually run around $80 for the most basic model (which has all the features you'll need). Incredibly useful things, I'd highly recommend for everyone in this hobby to pick one up.
Posted: Sat Nov 01, 2008 10:07 pm
by starman
RabidDuck wrote: Also starman how did you make your propane injection and how do you inject it?
It's just 1/2 PVC sprinkler riser pipe, cap, ball valve, brass reducer and male quick-connect. The propane tank has an associated regulator and female quick connect. You also install a female quick connect on your chamber.
Open the ball valve on the propane tank, set the regulator to the pressure you need for your meter, connect your meter, open its ball valve, and fill the meter, close the meter ball valve. Pop the meter out and connect it in the female quick connect on your chamber, open the ball valve to dispense the fuel.
All this should be fairly self evident in the pics. Here's the syringe loading the chamber.

Posted: Sat Nov 01, 2008 11:21 pm
by RabidDuck
Ok thank you. I will look into building the meter tomorrow and maybe even get some firing in.

How do i know how much propane to put in? I have looked at Burnt Latke and looked at there calculator things but their confusing.
Also i don't think i will be installing a fan. I don't want to spend 80 or 90 dollars on a radar gun thing. I still need a question. I've been thinking of doing something with keeping the barrel the same and changing the mass of the projectile.
Thank you all for the help!
~RabidDuck
Posted: Sun Nov 02, 2008 10:44 am
by jimmy101
I would recommend fueling with a
syringe instead of the meter. It'll be a heck of a lot cheaper and more accurate. It will be a lot easier to write it up for the presentation since the math is much simpler.
Butane is cheaper, and works just as well as propane, so you might consider a setup like this;
Muzzle velocity will be a much better measure of the cannon's performance than is range. It is a real PITA to get range data accurately. And, the range will be pretty variable even with consistent ammo and firing procedures. Range also adds a variable to your setup; you have to consistently fire the gun with the same angle.
You can buy a shooting chrony (~$80) or make your own for about $10
like this. With certain types of ammos (generally small stuff) you can just record the sound of the gun firing and the round hitting a target a known distance away. Search the forums for "Soft chrono"(softchrono?). Or, just record the sound of firing with a PC and use audio editing software to extract the time information (which can be used to calculate the velocity).
It is critical that you have consistent ammo. So I would go with BBs (could be say 1/2 diameter ball bearings which can be purchased for about $0.10 each), tennis balls or golf balls. Veggies are just too variable to give consistent results.
To make a killer science fair project you'll need to fire the gun several times for each set of conditions. I would try for at least 5 shots/setup, ten would be even better. Calculate the average and standard deviation for each set of shots. Use a Student's T-Test to determine if the differences between the shooting conditions is statistically significant. Add a nice graph and you'll wow the judges big time.
I would avoid doing a study on ammo. There are too many variables and you will have problems concluding which of the variables is actually affecting performance. Is it ammo mass, friction with the barrel, air drag ...? So, like I said, use consistent ammo to get rid of as many variables as possible.
Personally, I would love to see a study that would be useful to the spud gunning community. For example;
1. Affect of a chamber fan on muzzle velocity. No fan, fan for mixing only, fan for mixing and firing.
2. Affect of fuel ratio. Spudders generally go for stoichiometric mixes. How much does it hurt performance if the mix is off by a bit, for example 3.5% instead of 4% for propane? Internal combustion engines tend to produce a bit more power when run rich. Does this happen with spud guns? A beautiful study would be muzzle velocity as a function of fuel ratio with the ratio in the range of say 2% to 10% in 0.5% steps. Perhaps add a couple extra steps near the stoichiometric ratio, perhaps 3.75% and 4.25%. Five or more shots per fuel ratio, statistical analysis, a nice graph and you'll wow the judges with a good sound research project. With a range of 2% to 10% fuel you'll also determine the combustibility limits of your fuel in air. (For propane it's about 3% to 8%). Having determined the combustibility limits you can address the noobies question of "OMG will it blow up if I put in too much fuels?"
Posted: Sun Nov 02, 2008 11:07 am
by RabidDuck
Hmmm It all sounds so confusing. I think building my own shooting chrony would be hard to do and i don't want to buy one for $80. For firing the gun serveral times for each set of conditions, what are the conditions? and whats the average and standard deviation. Whats a student's T-Test? Sorry this is my first launcher and first science fair project.
i'm only in 8th Grade. Thank you for the help though!
~RabidDuck
Posted: Sun Nov 02, 2008 11:15 am
by psycix
You are not installing a fan?!
Just any pc fan will do, which costs no more then just a few bucks, and it will increase the power of the spudgun with probably 30-50% which is ALOT.
Also if vents out the gun to suck fresh air in. This reduces reloading time, as you now have to wait no more then a few seconds for the air to refresh (in the meanwhile, load your projectile).
Also, the fan will make sure your fuel is mixed out well throughout the chamber, which adds to consistency. (you want consistency for your experiments dont you?)
Install a fan. Just do it.
Posted: Sun Nov 02, 2008 11:16 am
by jimmy101
RabidDuck wrote:How do i know how much propane to put in? I have looked at Burnt Latke and looked at there calculator things but their confusing.
4% of the chamber volume for propane. For your project you'll need to learn why it's 4% since you'll need to be able to explain that to a judge. You might want to read the
spudwiki page on fuels.
RabidDuck wrote:Also i don't think i will be installing a fan.
You are wasting your time without a fan. The gun will not fire consistently. You can do research on something with a lot of variability. You can get a suitable fan for less than $10 at Kmart, Target etc (look for the pesonal battery operated fans) or go online and get a surplus CPU fan for $3 (plus ~7$ shipping, save money on shipping by ordering the phototransitors and battery holder and cable for a homemade shooting chrony.)
http://www.allelectronics.com/make-a-st ... FAN/1.html
RabidDuck wrote:I don't want to spend 80 or 90 dollars on a radar gun thing.
See above. Hit your parrents up for the $20 bucks or so a homemade chrony will cost. This is for a school project.
RabidDuck wrote: I still need a question. I've been thinking of doing something with keeping the barrel the same and ...
See my previous post.