Cobra Striker

Harness the power of precision mixtures of pressurized flammable vapor. Safety first! These are advanced potato guns - not for the beginner.

The Cobra Striker is:

The sickest damn piston hybrid EVER!
39
87%
A decent piston hybrid
4
9%
Just another hybrid
0
No votes
Not at all impressive or special
0
No votes
Take your Striker and shove it! It sucks!
2
4%
 
Total votes: 45
User avatar
Moonbogg
Staff Sergeant 3
Staff Sergeant 3
United States of America
Posts: 1731
Joined: Mon Oct 13, 2008 10:20 pm
Location: SoCal
Has thanked: 153 times
Been thanked: 100 times

Tue Sep 22, 2009 3:12 am

Lets start with the video!


CANNON NAME: THE COBRA STRIKER

SPECS:

VALVE TYPE: BURST PISTON-VENTILATED (1" ID)
FUELING: 5x OXY/MAPP THRU 500PSI CHECK VALVES
C:B RATIO: 1.23:1
CHAMBER: 3 1/2" SCH40 X 10" (98.9cu in)
BARREL: 1 1/2" SCH10 X 36"
IGNITION: MULTI-GAP STUN GUN (150K VOLT)
HGDT ESTIMATED VELOCITY W/ GOLF BALL: 900FPS @3FT BARREL. 1030FPS @4FT BARREL. 1100FPS @5FT BARREL & 1160FPS@ 6FT BARREL.

MATERIALS:

6061-T6 ALUMINUM
B7 STUDS (5/16-24 FULL LENGTH)
GRADE 8 NUTS
POLYPROPYLENE
UHMW
STAINLESS PISTON GUIDE RODS

COST: TIME,SWEAT

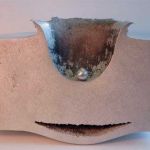
MISC INFO: Cannon is in prototype form. Gaskets will be Copper (current PTFE gaskets stretch). Breech will not leak (solved). O2 will not be purged, but pressurized with gage. Cannon will utilize more robust sparking system, likely spark plugs due to extreme heat/pressure. Striker disagrees with chamber fans. Velocity to be verified and documented with existing 3ft barrel.


DESIGN EVOLUTION TO COMPLETION:


Image
Image
Image
Image
Image
Image
Image
Image

Image
Image
Image
Image
Image
Image
Image
Image
Image
Image
Image
Image
Image
Image
Image
Image
Image
Image
Image
Image
Image
Image
Image
Image
Image
Image
Image
Image
Image
Image
Image
Image
Last edited by Moonbogg on Fri Oct 02, 2009 7:47 am, edited 2 times in total.
GalFisk
Specialist
Specialist
Sweden
Posts: 113
Joined: Mon Feb 28, 2005 4:06 am
Been thanked: 4 times

Tue Sep 22, 2009 4:49 am

Aha, so that's how the valve works. I couldn't figure it out exactly from the description in the contest post. Nifty!
User avatar
jrrdw
Moderator
Moderator
United States of America
Posts: 6571
Joined: Wed Nov 16, 2005 5:11 pm
Location: Maryland
Has thanked: 39 times
Been thanked: 22 times
Contact:

Donating Members

Tue Sep 22, 2009 6:32 am

You should do chrony testing with the leak and then after the leak repair just to see how much power you were losing.

Really nice work! :wink:
User avatar
qwerty
Corporal 2
Corporal 2
Posts: 678
Joined: Sun Apr 12, 2009 2:16 am

Tue Sep 22, 2009 6:41 am

Man... thats a really nice piece of work and it got my vote but i still dont understand the difference between piston hybrids and normal hybrids because i know how normal hybrids work but not piston ones.
Is it a piston piloted by a burst disk when you fire the cannon?
I visit occasionally to make unrelated posts.
User avatar
psycix
Sergeant Major 4
Sergeant Major 4
Posts: 3684
Joined: Mon Jun 25, 2007 7:12 am
Location: The Netherlands

Donating Members

Tue Sep 22, 2009 8:00 am

It is... shiny.


Good job on the breakbarrel, quite a challenge to make it seal and safe on those pressures.
Till the day I'm dieing, I'll keep them spuddies flying, 'cause I can!

Spudfiles steam group, join!
User avatar
chenslee
Specialist
Specialist
Posts: 147
Joined: Thu Jan 29, 2009 2:25 pm

Donating Members

Tue Sep 22, 2009 8:07 am

Oh, Moonbog. Beautiful work. I shat a brick when I saw it was you that made this!!

If you didn't use a mill or lathe on this (IIRC) how did you cut the chamfer on the breech sleeve?

What cad program are you using?

HAHAH. It looks like you did the same thing I did on a project awhile back. I was SURE I could find extra long socket head cap screws. Looks like you had to go with studs. I figured it was nuts and studs that were under the pretty black caps.
User avatar
jackssmirkingrevenge
Five Star General
Five Star General
Posts: 26179
Joined: Thu Mar 15, 2007 11:28 pm
Has thanked: 543 times
Been thanked: 321 times

Donating Members

Tue Sep 22, 2009 1:11 pm

Extremely well made, it certainly was a tough contender against chenslee's launcher.
User avatar
Moonbogg
Staff Sergeant 3
Staff Sergeant 3
United States of America
Posts: 1731
Joined: Mon Oct 13, 2008 10:20 pm
Location: SoCal
Has thanked: 153 times
Been thanked: 100 times

Tue Sep 22, 2009 2:13 pm

Thanks everyone! I am thrilled to have been able to place in this competition. It was great fun.
@Chenslee, the huge chamfer was made by using a bench top sander and holding the tube steady and rotating it to get the chamfer cut. After going through about 2 new sanding discs, I got it shaped and then used progressively finer sand paper by hand to smooth it out, then finally a rag and some compound. I tried a drill press with a buffing attachment, but I couldn't get the force needed to polish well, so I loaded a rag with compound, and started scrubbing.
The piston was the real PITA. I started with 1 1/4" round stock and drilled the thing out using progressively larger drill bits, all the way up to 1".
User avatar
Brian the brain
Moderator
Moderator
Netherlands
Posts: 3496
Joined: Mon Dec 05, 2005 2:06 am
Location: Holland
Been thanked: 3 times

Tue Sep 22, 2009 3:02 pm

Freaking awsome.
Now why didn't I see that breakbarrel picture in the contest?


Oh well...

I guess one vote wouldn't have made a huge difference..

I said his thing lacked creativity...I was dead wrong..
Unbelievable how you pulled this off without a machineshop...
Truely amazing!
Gun Freak wrote:
Oh my friggin god stop being so awesome, that thing is pure kick ass. Most innovative and creative pneumatic that the files have ever come by!

Can't ask for a better compliment!!
User avatar
chenslee
Specialist
Specialist
Posts: 147
Joined: Thu Jan 29, 2009 2:25 pm

Donating Members

Tue Sep 22, 2009 3:38 pm

Wow. You have mad fab skills! I love the threadless pipe fittings. I'm still blown away by your internals.

I have tons of questions like:
What brand of clamp collars did you use? Where did you get them?
Where did you get your aluminum tubes?
Did you buff all this on your drill press or do you have a polishing wheel?
How did you cut the tank holes in what I assume is UHMW plastic?
Where did you get the black nut caps?
User avatar
Hotwired
First Sergeant 3
First Sergeant 3
Posts: 2599
Joined: Fri Oct 13, 2006 5:51 am
Location: UK

Tue Sep 22, 2009 4:56 pm

That breech loading system scares me :P

Seriously, I can see chamber flash coming out from there, how are you sealing it.


Aside from that, shine on 8)
User avatar
Moonbogg
Staff Sergeant 3
Staff Sergeant 3
United States of America
Posts: 1731
Joined: Mon Oct 13, 2008 10:20 pm
Location: SoCal
Has thanked: 153 times
Been thanked: 100 times

Tue Sep 22, 2009 4:57 pm

chenslee wrote:Wow. You have mad fab skills! I love the threadless pipe fittings. I'm still blown away by your internals.

I have tons of questions like:
What brand of clamp collars did you use? Where did you get them?
Where did you get your aluminum tubes?
Did you buff all this on your drill press or do you have a polishing wheel?
How did you cut the tank holes in what I assume is UHMW plastic?
Where did you get the black nut caps?
Thank you.

Clamp collars are from McMaster. They are classified as structural tube/pipe fittings.

I ordered all aluminum parts in the diameters and thicknesses needed from an online small quantities metals store. This eliminates the need for mills and lathes. http://www.onlinemetals.com has all of it besides the 1 1/2"sch10 barrel. That came from mcmaster.

I started out buffing with a polishing wheel attached to a drill press. It didn't cut it because i couldn't press hard enough, so I QUICKLY discovered the best way by far is to do it ALL by hand. I used a rag and a buffing compound. Lots of pressure can be applied by laying the rag flat and rubbing the aluminum on it. Prepare to sweat.

Tank holes were cut by using a single drill press hole cutter from mc master. It has an adjustable blade that allows you to cut any size hole in sheet metal and plastic ranging from like 1 1/2 up to 7" or so. The tank holder material is polypropylene as it is super tough, rigid and very economical.

Black nut caps are from Mcmaster as well.
jaythedogg
Private 2
Private 2
Posts: 32
Joined: Sun Jun 07, 2009 12:33 am

Tue Sep 22, 2009 5:58 pm

WOW!~ That is PURE SEX dude! Nice!
Imitation is not the sincerest form of flattery... STALKING IS!
User avatar
chenslee
Specialist
Specialist
Posts: 147
Joined: Thu Jan 29, 2009 2:25 pm

Donating Members

Tue Sep 22, 2009 7:09 pm

McMaster FTW.

I ordered 8mm and 1/2" collars and got a mix of Ruland and Climax. Some spacers, o-rings, pressure gauge, and the constant force springs on my cannon were all from McMaster too.

I can't believe you HAND polished all of that. It makes me want to strip the paint off my plates and polish them like that.
User avatar
Moonbogg
Staff Sergeant 3
Staff Sergeant 3
United States of America
Posts: 1731
Joined: Mon Oct 13, 2008 10:20 pm
Location: SoCal
Has thanked: 153 times
Been thanked: 100 times

Tue Sep 22, 2009 7:26 pm

chenslee wrote:McMaster FTW.

I ordered 8mm and 1/2" collars and got a mix of Ruland and Climax. Some spacers, o-rings, pressure gauge, and the constant force springs on my cannon were all from McMaster too.

I can't believe you HAND polished all of that. It makes me want to strip the paint off my plates and polish them like that.
I swear dude, you could polish that entire thing and it will look hella pimp. Take a fine grit sand paper to everything, removing any scratches. A good way to do it is to make sure the sanding is done in a uniform direction, this will make it look cleaner and shinier. Then buff away! After buffing with a medium grit paste, go for the polish! Do the tubes also! It will look amazing.

EDIT: to get into the grooves of those tubes you have, you could use a stick and wrap a cloth around it and put the paste on the cloth, then run it along inside the grooves with a nice, firm pressure. Then polish the same way.
Post Reply