
Saturday afternoon update time.
I was stripping some old gear at work for the dumpster and salvaged a 19" rack mount case. Perfect to house the electronics for this project.
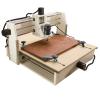
See images below.
I am open to some suggestions for cables between the motors and the controller boards. I want to have them as plugable so i can easily pull out the electronics box for maintenance as needed. The motors are running at 42vDC at about 3A. I need a four conductor cable, preferably shielded. I have read a few posts on using DIN or MIDI cables but wonder if they will handle the current load.
Comments from someone with an electrical background ?
Thanks
3D printers/CNC mills
- Attachments
-
- With the lid on and slid back on it's rails. Note the kill switch mounted on the front.
-
- Look inside, lots of space for lots of cool air to circulate.
-
- From the back, the RJ-45 sockets will connect to the home and limit switch wiring.
Afternoon all
Through a fortuitous circumstance at work I now have a supply of laser pointers.
Comments appreciated on this idea:
I am trying to figure a way to use this setup to home the machine as well rather than a touch plate setup. Mount a laser at precisely 50mm above Z zero and use the Mach three offset feature. When the beam is broken, that is the tool tip.
Any thoughts ?
Through a fortuitous circumstance at work I now have a supply of laser pointers.
Comments appreciated on this idea:
- Strip the laser pointers out of their cases leaving just the laser diode itself
Mount it in a suitable tube (6mm aluminium comes to mind)
Feed some power
Align them on X-Y-Z pointing at a set of light dependent resistors housed behind a shield with say a 0.5mm hole in it.
Use an Arduino board to monitor the LDR
Take the output from the Arduino to the break out board to the limit switch input
I am trying to figure a way to use this setup to home the machine as well rather than a touch plate setup. Mount a laser at precisely 50mm above Z zero and use the Mach three offset feature. When the beam is broken, that is the tool tip.
Any thoughts ?
-
POLAND_SPUD

- Captain

- Posts: 5402
- Joined: Sat Oct 13, 2007 4:43 pm
- Been thanked: 1 time
Get these instead:Comments appreciated on this idea

These are called opto interrupters
no need to waste perfectly functional laser pointers
Children are the future
unless we stop them now
unless we stop them now
JSR & LeMaudit inspired me to get of my arse and do some work on this project.
So
A big thanks to USGF for his kind words, guidance and moderation of my less than practical ideas. The Z Axis is finished as well, it's just that I haven't setup the cable carrier yet so it isn't running in this video.
Still a long way to go but by the time winter is over I should have it up and running.


I posted over on you tube too. Great results. Hope to see it cutting parts soon.evilvet wrote:JSR & LeMaudit inspired me to get of my arse and do some work on this project.
So
A big thanks to USGF for his kind words, guidance and moderation of my less than practical ideas. The Z Axis is finished as well, it's just that I haven't setup the cable carrier yet so it isn't running in this video.
Still a long way to go but by the time winter is over I should have it up and running.
USGF
-
jackssmirkingrevenge

- Five Star General

- Posts: 26179
- Joined: Thu Mar 15, 2007 11:28 pm
- Has thanked: 543 times
- Been thanked: 321 times
it lives! nice work, love the sound of those steppers in action 
hectmarr wrote:You have to make many weapons, because this field is long and short life
-
Gun Freak

- Lieutenant 5

- Posts: 4971
- Joined: Mon Jan 25, 2010 4:38 pm
- Location: Florida
- Been thanked: 7 times
Phenomenal work... I've been waiting for this
OG Anti-Hybrid
One man's trash is a true Spudder's treasure!
Golf Ball Cannon "Superna" ■ M16 BBMG ■ Pengun ■ Hammer Valve Airsoft Sniper ■ High Pressure .22 Coax
Holy Shat!
One man's trash is a true Spudder's treasure!
Golf Ball Cannon "Superna" ■ M16 BBMG ■ Pengun ■ Hammer Valve Airsoft Sniper ■ High Pressure .22 Coax
Holy Shat!
Its alive I tell you, alive !!!
Twelve months of test and re-test plus build, about $1000 over budget compared to what I told SWMBO but what the hell, it works.
Still needs a proper T-Slot clamping system (underway now) a cyclone dust extractor and lots more adjusting and tweaking but it does actually work. Some custom sign engraving will hopefully pay back some of the investment, some photograph etching will be fun and family and then it can make the parts for my long planned BBMG Phalanx for the back yard......
Whoo hoo, yes I am excited.
-
mattyzip77

- Sergeant 3


- Posts: 1249
- Joined: Tue Jun 28, 2011 12:22 pm
- Location: Taxachusetts
Wow that is amazing. very impressive!!! :thumbright: :thumbleft: :thumbright:
Go Bruins!!!!
-
jackssmirkingrevenge
- Five Star General
- Posts: 26179
- Joined: Thu Mar 15, 2007 11:28 pm
- Has thanked: 543 times
- Been thanked: 321 times
hahaha brilliant, well done!!!
Especially loved the *AWOOOOGA* sound before it started hehehe
Especially loved the *AWOOOOGA* sound before it started hehehe
hectmarr wrote:You have to make many weapons, because this field is long and short life
Update:
I got the dust extraction system done, no more dust.
Problem then became no more eardrums due to the noise of the shop vac running three feet from my head.
Plenty of how-to's on silencing the shop vac with a padded box; I added what I think is a unique twist. Taking the theory that one way to reduce noise is to reduce vibration, I took a leaf from the US Navy (specifically the submarine fleet) and added something.
My standard box has the addition of four 100mm bolts protruding up from the bottom, a four finger salute if you will. Onto these I placed 4 loose fitting compression springs, each 200mm in length. I then cut a corresponding plate the size of my vac base and put four more bolts down through it. These engage with the springs giving me a floating platform on which to rest the vac.
Aforesaid vac is now isolated from the box itself on a nice little machinery raft.
With the lid closed my Android phone sound meter says 61dB instead of 82dB.
Much more restful.
Might also be an idea for those mounting big-bore cannon, it would at least dampen vibration coming through to the supporting platform.
As an aside, if there is a member who would like to offer some ideas for some plastic or MDF fabrication then I would be happy to give them a go. Fifteen minutes of coding and fifteen minutes of machining last night gave me the attached result.
Imagine what I could do with plans for a stock or lower receiver for all you mil-sim fans. Right now I need ideas to practice my machining skill on, as long as it can be done as a series of 2D shapes then I can do it. I can also machine quasi 3D, (a ball can be made in two hemispheres) but for now I will stick to simple tasks.
No cost you to, I have the materials, just need the ideas.
- Attachments
-
- To this
-
- From this
-
jackssmirkingrevenge
- Five Star General
- Posts: 26179
- Joined: Thu Mar 15, 2007 11:28 pm
- Has thanked: 543 times
- Been thanked: 321 times
Nice... target? 
Looks like you can afford to make a *lot* more complex shapes.

I'd be making my own large scale MDF Panzerkampfwagen Tiger Ausf. B to be honest...

Looks like you can afford to make a *lot* more complex shapes.
I'd be making my own large scale MDF Panzerkampfwagen Tiger Ausf. B to be honest...
hectmarr wrote:You have to make many weapons, because this field is long and short life
For those with 3D printers
http://www.123dapp.com/catch
1. Take a series of phots from multiple angles of your subject
2. Upload the photos to ACD cloud service
3 Get an email back with the 3D model generated
And its free
Very cute
http://www.123dapp.com/catch
1. Take a series of phots from multiple angles of your subject
2. Upload the photos to ACD cloud service
3 Get an email back with the 3D model generated
And its free
Very cute
-
POLAND_SPUD
- Captain
- Posts: 5402
- Joined: Sat Oct 13, 2007 4:43 pm
- Been thanked: 1 time
OMG have you tested that ?? pure awesomeness
EDIT
it works!!
EDIT
it works!!
Children are the future
unless we stop them now
unless we stop them now
A nice touch would be to rig up a turntable on a stepper motor so that you could increment the object in 1.8 degree snaps with the camera mounted on a tripod. That would give you 200 shots, nice and accurate.
Hey Poland, you you want to post a link to the mesh you got back from ACAD ?
Thanks
Hey Poland, you you want to post a link to the mesh you got back from ACAD ?
Thanks