Page 1 of 2
Dehumidifier Project
Posted: Sun May 15, 2011 1:32 pm
by saefroch
Posted: Sun May 15, 2011 6:00 pm
by Technician1002
The Capacitor is too big to be a run cap for the fan, so I assume it is a run or start run cap for the compressor. The printer circuit board is the cycle timer and logic to defrost it to prevent it from building a layer of ice. It also prevents trying to start against high head pressure by providing a delayed start.
You will need to retain the capacitor. The timer board functions can be replaced with a switch.
If you can get a good macro photo of the cap label, I could tell if it is a start cap or a run/start cap. A start cap would have only one section and the label would list only one MFD value. A run/start cap will have 2 sections with two MFD values. and 3 connections on top. Before disconnecting the cap or compressor, note which wires from the cap connect directly to the compressor. You will want to retain this exact configuration. Drawing it out with the wire colors would be a help.
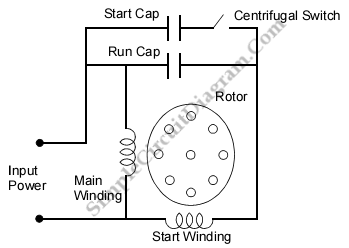
A run/start configuration is like this. A sealed compressor would use a start relay instead of a centrifugal switch.
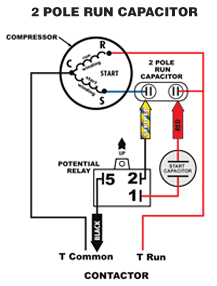
A run cap configuration is like this;
Posted: Sun May 15, 2011 7:35 pm
by saefroch
The only wires going in and out of capacitor are the direct connections to a wall outlet plug, with the white connected and the green grounded. There are then the black and red which connect directly to the compressor, the compressor is grounded to the casing, but there is still the brown wire, whose function is as yet unknown to me...
All that aside, are you suggesting I just find the correct configuration to wire the control panel together in one "master switch" and bypass all the control options, and leave all the other control functions intact?
Pictures added to original post for clarification.
Quite frankly, I know most of this is way over my head, since I'm not used to dealing with circuits this complex, and I've never done anything with some AC circuit elements. I'd appreciate newbie-level explanations in this

.
Posted: Sun May 15, 2011 8:03 pm
by Technician1002
I'll edit up the diagram to show what to keep later. The included diagram is great. The cap is a single section run cap that is next to the Compressor marked COMP on the diagram. It shows the red and black wires. They are abbreviated RD and BK on the diagram.
Posted: Sun May 15, 2011 8:23 pm
by saefroch
Ohhhhhh by "cap" you mean capacitor. I think I can relate that small part of the diagram to the actual device, but I don't know what to actually DO to be able to liberate the compressor and equip it with a simple on/off switch...
Wire diagram
Posted: Mon May 16, 2011 12:04 am
by Technician1002
Here is the modification. The compressor, capacitor, and power cord is removed from the cabinet. You don't need the printed circuit board. A relay on the printed circuit board is replaced by a light switch as shown in the diagram. The diagram shows there is a smaller capacitor used for the fan. If you keep the fan for another project you will need to save the capacitor for the fan. The fan capacitor is the black rectangular one with the yellow and white wires attached.
The capacitor even though shown rectangular in the diagram, it is the round item you took a photo of.
Posted: Mon May 16, 2011 2:56 pm
by saefroch
Any guesses as to what's in the compressor system? Ammonia? Freon?
I'm tempted to say Ammonia, the compressor is only about three years old...
Posted: Mon May 16, 2011 3:17 pm
by dewey-1
Take a good picture of the compressor namplate with it specifications on it.
Had you done that originally, a lot of previous questions would have been easier to answer.
This is a lesson for others follow as well, not just you.

Posted: Mon May 16, 2011 5:15 pm
by Technician1002
Ammonia is not used in domestic units anymore. It is reserved for large commercial ice houses and other places that don't endanger the public.
Home use and supermarket use was discontinued decades ago. Most likely it is a Freon such as R22 or R134a.
Posted: Mon May 16, 2011 8:10 pm
by saefroch
Freon. Dislike.
Like this picture? What does it tell you?

Posted: Mon May 16, 2011 8:47 pm
by mobile chernobyl
That be R22, says so right next to "thermally protected"
Take an axe to the line right over... oh wait, have the freon collected by someone - any good automotive shop may be able to do it - short of that - pay an HVAC guy to do it for you.
Posted: Mon May 16, 2011 9:05 pm
by saefroch
My neighbor's van says "HVAC" in huge letters across it... he might be able to help...
Posted: Mon May 16, 2011 9:07 pm
by mobile chernobyl
Believe it or not, HVAC guys like collecting old coolant. As it get's phased out by the newer slightly less efficient stuff - the old stuff becomes rarer and more expensive by the pound! So if you catch him at the right time he may collect it for free - R22 is a gem in the coolant world now-a-days.
Posted: Mon May 16, 2011 9:20 pm
by Zeus
Should I be worried about releasing R134? I've got a fridgy on it's way, wiring's no trouble, fittings will be however.
Posted: Mon May 16, 2011 9:27 pm
by Technician1002
A 30 lb tank of R22 sells for well over $150.00
Recovering a pound or two is worth your trouble.


