
I didn't have a reference to build off of so I made what I thought was logical. Since I came up with it I'm sure that others have as well. Attached is a drawing of the back of the cylinder to show how it mates with the advance plate and piston. The roller shown on the right inserts into the advance plate.
The plates were made by flattening out pieces of shc40 pvc conduit. I printed out the drawing on peal off mail labels and stuck them on to the flatted pvc and then cut them out.
MGL Stock
-
Solar
- Corporal


- Posts: 545
- Joined: Tue May 17, 2005 11:53 pm
- Has thanked: 1 time
- Been thanked: 17 times
The patents are specific and have nothing to do with anything in this design that I can tell. I made a pvc indexer that used an escapement and piston like this using a rotary saw blade, then I went to a torsion spring system, then another ratchet style before settling on the cam drive which is based from the 1878 Mauser Patents for the Zick-Zak "zig-zag" revolver.
I have a sealed rack and pinion system that is showing promise.
I like the barrel support system. What flow do you have through the spindle and what are you using for bearings? Any? I have found that the eclipse didn't need to have access to the larger air supply through the spindle and have merely 3"x1.5" ballasts off the back of the launchers now. With the right valve you should have plenty of power.
Nice work.
Mind you I'm building this for my own pleasure so I needn't be to particular about the construction other then to serve its purpose, which is to have fun. I'm not sure what you are referring to as flow through the spindle. I take the spindle to be the center of the cylinder. In that case it rides on the air chamber which is sch 80 pvc on a layer of grease which I have not yet installed. Currently there are Teflon bushings sealing both ends with nylon bushings on the faces of the cylinder. The piston is 1" with a 3/4" port. O-rings seal from the port to the muzzle for maximum power. I've been using an RPG mockup that I converted from a rocket launcher to a spud gun a few weeks back as a test bed. Given the results so far this one should pack quite a punch, too much is some cases. While I'm building it for use at 200 psi, I've ordered an adjustable bleed off / pop valve that goes from 25 to 250 to mount on the stock. That along with inserting a foam mandrel into the air chamber should make it safe for paintball. But that is down the road a bit. It's been fun building this gun but it will be the last of its type build by me. The next one will be a pill bottle with a soda straw stuck in it.
- Attachments
-
-
Major Collins

- Specialist 2

- Posts: 264
- Joined: Wed Nov 18, 2009 6:18 am
- Location: Western Australia
sooooooooo its air powered ? (compressed air? ) if so how does that work in it being semi auto?  i must know if it is air powered and semi auto
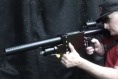
Below is with the stock on. The power air set up is from a post by PCGUY featuring the use of a slider valve for semi operation.
http://www.spudfiles.com/forums/viewtopic.php?t=160
http://www.spudfiles.com/forums/viewtopic.php?t=160
- Attachments
-
Since this thread is already started I thought of using it as a construction log of my gun in order to receive advice from advance builders or as a guide for others.
Before continuing any further with the MGL, I decided to take the power pack for a test ride and check for leaks. We shot about 250 rounds of assorted goodies from paintballs to bolts. I made a couple of adjustments in the process but overall there where impressive results. Shots where made using the 4" stub from the piston port as well as with a 30" piece of 3/4' copper.
Test pressure was 120psi and using a 3/4" barrel with an air chamber sized for 1 1/2" made for some rather large air blasts out of the muzzle. The adjustable piston worked very well and is very much lighter then the last one I built. My chrono only goes to 1000 fps and it was pegging from the air blasts. Moving back 15' I began to get good readings. Even at 10' the blast affected the chrono. Consistency surprised me with shots reading 560 fps +- only 2 fps for all shots. We clocked about 30 rounds.
The gun is modular in construction and has gads of adjustments. Adjustments include:
Chamber pressure from 0-300 psi
Pop valve from 25-300 psi
Trigger travel 5/8-1"
Trigger pull weight light-heavy
Piston equalization size 0-1/8"
Chamber fill port size 0-3/16"
Piston travel 0-1 1/4"
Chamber volume small-unlimited
Barrel length 4"-unlimted
Barrel diameter 1/8"-2"
There is also a pneumatic control circuit to allow for auto or manual chamber advance or whatever else it may be called upon to be used as. It becomes pressurized on chamber fill and empties on trigger pull or can be controlled manually by the small 3-way valve button just above and behind the fore grip.
I made the power pack so adjustable and modular because I really don't know what I'm doing and wanted to be able to make corrections. The revolver portion of the gun only takes a few minutes to remove or install from the power pack. It just threads on to the air chamber. With the tests coming out so well I plan on using the same power pack for the MGL, a submachine gun, stationary connon and a long range sniper. The air chamber is threaded on so I can reduce or enlarge the size to a more appropriate length for the application. Using the same power pack for a variety of guns will cut both construction times and costs.
- Attachments
-
- Piston and cylinder wear plate
-
- Power Pack
-
ALIHISGREAT

- Staff Sergeant 3

- Posts: 1778
- Joined: Sat Aug 25, 2007 6:47 pm
- Location: UK
all i can say is wow! it looks amazing!
I'm not 100% sure how it works though....
What i have guessed is...
Its a piston valve cannon with a slide valve pilot run of a constant air supply such as a paintball tank...
then the slide valve is manually pulled forward by the trigger and reset by the spring to shoot it...
but then what happens with the rotating mechanism?
<a href="http://www.bungie.net/stats/halo3/defau ... player=ALI H IS GREAT"><img src="http://www.bungie.net/card/halo3/ALI H IS GREAT.ashx"></a>

-
spudtyrrant

- Corporal
- Posts: 550
- Joined: Fri Jan 02, 2009 6:10 pm
damn i would usually make a comment about pilot volume but this is so beautiful i can't bring myself to do it. 
kudos nice job!!!
kudos nice job!!!