HAMMER VALVE - Hammer tube, sear, trigger HELP/DISCUSSION
Posted: Fri Jan 29, 2010 10:16 am
Hey all ,
Im in the middle of building a hammer valve setup, and wanted to throw some ideas around i was hoping for all your help ..
First of all i take no credit for any of these ideas or setup's as i have just adopted them for my own Thank you too all who have come up with some great ideas, you will all know who you are..
This discussion should help any one who wants to build a hammer valve setup either to be used for plinkers, up to big bore cannons depending on your taste, i myself am chasing the small cal. plinker
So i know what your all thinking just through something together and glue it on it will work , Well yes and no , thats good for the quick build that you really dont want to repair or tune later. My mission is to build a 'production' based cannon that will be easy enough for most builders out there to build, while still able to dismantle, repair, tune and reconstruct only by a couple screws and fittings while looking appealing and rather realistic. utilising accuracy over power or damage ... repeater over single shot .
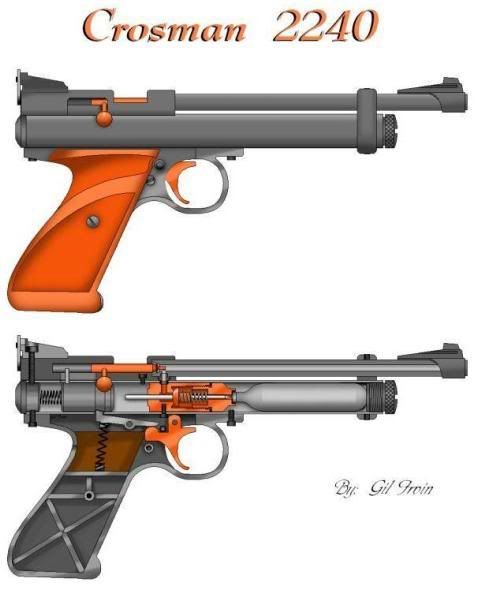
I Want to know if anybody has any solid plans on making the hammer, hammer tube, sear, trigger !?
Just So you all know where im coming from i've made a ruff copy to show you all. The real plans are to make this thing run on co2 or hpa but for now this setup consist of a ABS air chamber (using shop air 120psi max ) a 1/4 tee hammer valve (Valve is a long bolt with filed nuts and o'ring as a sealing face, similar to Btb's & sniper hero's etc )which connects to a parallel 9/32 brass barrel located in the middle of a 12mm ally sleeve (sorry for the unit changes) and shoots 1/4 steel bearings. works fine now being assembled minus the hammer tube and trigger.
Sooo , what i want to do is using brass fittings, tread a hammer tube (Pice of brass or ally etc) straight on to the "T" piece BSP thread. Now the brain storm starts on making a sear/trigger setup which is relatively easy enough to copy.
"how should the sear sit, how should i attach the trigger mechanism to the hammer tube ?" I have a few idea's and will post a few diagrams a bit later , but for now any comments would be great 8)
Sorry for the pic's, i left my camera cord at work so these are from my phone . Im also new to posting so let me know where i've gone wrong.
Thanks
Im in the middle of building a hammer valve setup, and wanted to throw some ideas around i was hoping for all your help ..
First of all i take no credit for any of these ideas or setup's as i have just adopted them for my own
This discussion should help any one who wants to build a hammer valve setup either to be used for plinkers, up to big bore cannons depending on your taste, i myself am chasing the small cal. plinker
So i know what your all thinking just through something together and glue it on it will work , Well yes and no , thats good for the quick build that you really dont want to repair or tune later. My mission is to build a 'production' based cannon that will be easy enough for most builders out there to build, while still able to dismantle, repair, tune and reconstruct only by a couple screws and fittings while looking appealing and rather realistic. utilising accuracy over power or damage ... repeater
I Want to know if anybody has any solid plans on making the hammer, hammer tube, sear, trigger !?
Just So you all know where im coming from i've made a ruff copy to show you all. The real plans are to make this thing run on co2 or hpa but for now this setup consist of a ABS air chamber (using shop air 120psi max ) a 1/4 tee hammer valve (Valve is a long bolt with filed nuts and o'ring as a sealing face, similar to Btb's & sniper hero's etc )which connects to a parallel 9/32 brass barrel located in the middle of a 12mm ally sleeve (sorry for the unit changes) and shoots 1/4 steel bearings. works fine now being assembled minus the hammer tube and trigger.
Sooo , what i want to do is using brass fittings, tread a hammer tube (Pice of brass or ally etc) straight on to the "T" piece BSP thread. Now the brain storm starts on making a sear/trigger setup which is relatively easy enough to copy.
"how should the sear sit, how should i attach the trigger mechanism to the hammer tube ?" I have a few idea's and will post a few diagrams a bit later , but for now any comments would be great 8)
Sorry for the pic's, i left my camera cord at work so these are from my phone . Im also new to posting so let me know where i've gone wrong.
Thanks