

You need at least 3.
the two bolts going through the holes should be about 17mm.
You add a clamp on the other rouned side, with a clamp and a 20 mm bolt.
You have additional screws and clamps with your vise.
Machined pengun - Dimply
-
jackssmirkingrevenge

- Five Star General

- Posts: 26216
- Joined: Thu Mar 15, 2007 11:28 pm
- Has thanked: 576 times
- Been thanked: 347 times
Yep, seen them already.You have additional screws and clamps with your vise
OK, 3 brackets it is.
What goes into the headstock, drill chuck or mill holder?
hectmarr wrote:You have to make many weapons, because this field is long and short life
Wait for the video young grasshopper! 
Working on it right now...
I will use an edge finder, but as you don't have any... you'll need a rod with precise dimensions that you can put on the chuck and use instead.
Then, you will install the mill holder.
Working on it right now...
I will use an edge finder, but as you don't have any... you'll need a rod with precise dimensions that you can put on the chuck and use instead.
Then, you will install the mill holder.
I HAZ A BANG!
-
jackssmirkingrevenge
- Five Star General
- Posts: 26216
- Joined: Thu Mar 15, 2007 11:28 pm
- Has thanked: 576 times
- Been thanked: 347 times
Fine, I'll try to stop bouncing aroundLeMaudit wrote:Wait for the video young grasshopper!
I will use an edge finder, but as you don't have any...
- Attachments
-
hectmarr wrote:You have to make many weapons, because this field is long and short life
ohhhhhhhhhh.... I'm impressed!!!!!!!!!!
Very good then, you'll be able to use the video almost exactly.
You'll still miss a little attachment at the end, but I'm sure you'll manage
The second part is done, I start the upload to YouTube now. If everything goes well, there should be something in a couple of hours... maybe
Very good then, you'll be able to use the video almost exactly.
You'll still miss a little attachment at the end, but I'm sure you'll manage
The second part is done, I start the upload to YouTube now. If everything goes well, there should be something in a couple of hours... maybe
I HAZ A BANG!
-
jackssmirkingrevenge
- Five Star General
- Posts: 26216
- Joined: Thu Mar 15, 2007 11:28 pm
- Has thanked: 576 times
- Been thanked: 347 times
I figured it might be usefulLeMaudit wrote:ohhhhhhhhhh.... I'm impressed!!!!!!!!!!
Still has to go in the chuck though, doesn't fit in the mill holder.
edit: prepare to be dramatically less impressed, it doesn't fit in the chuck either!
hectmarr wrote:You have to make many weapons, because this field is long and short life
-
warhead052
- Staff Sergeant 3

- Posts: 1769
- Joined: Mon Mar 21, 2011 5:41 pm
Nice job! It looks awesome! Whats the next part? Or is the barrel already made?
Edit, Hey jack, I couldn't resist, but if the edge finder does not fit in anything, might I suggest duct tape? I couldn't resist! And here, I will get this finished for you:
Edit, Hey jack, I couldn't resist, but if the edge finder does not fit in anything, might I suggest duct tape?
Last edited by warhead052 on Sun Jul 03, 2011 11:07 am, edited 1 time in total.


Don't try to turn the edgefinder down with your lathe. It's probably hardened, and runout from your (lathe) chuck would be an issue. Try grabbing the small end of the edge finder with the drill chuck.
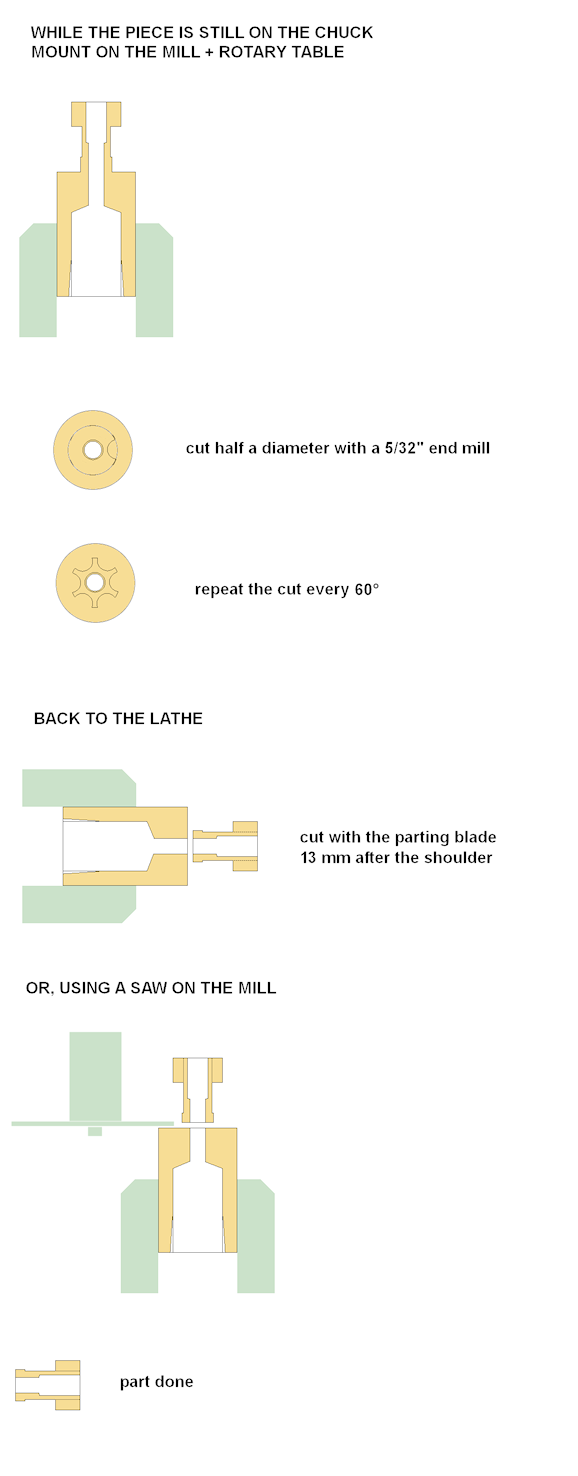
If that doesn't work, Chuck up an endmill (in an EM holder or collet, NOT the drill chuck), and load some oversized stock for the spacer. Spin the mill up to a quiet speed, and slowly bring the work in. Once you hear it cutting, the spindle's center is the tool's radius from the edge. Once you're done milling, put it on the lathe, and take off as much as you need from the OD to make it fit. That will remove any marks you made from centering the part on the mill (not that anyone would see them anyway). If you were ambitious, you could use that mark as part of one of the slots, but you'd have to turn the rotary table to center it on the Y axis. You can set the Z axis with the quill using the same method, but it's not necessary for this part; you're not milling to depth.
That's worked well enough for me; I still don't own an edge finder.
Also, I don't think you need to turn the head. You should be able to line up the centerfinder (or EM) by eye (possibly with the help of a shim) on one of the axis, get contact, with the second, then back off and approach the part with one axis while sweeping past it with the other. Perhaps I should make a video...
EDIT: I'm sure you trammed the mill again after turning the head back to vertical... Especially if you're using a slitting saw.
Last edited by ramses on Sun Jul 03, 2011 12:29 pm, edited 1 time in total.
POLAND_SPUD wrote:even if there was no link I'd know it's a bot because of female name
-
jackssmirkingrevenge
- Five Star General
- Posts: 26216
- Joined: Thu Mar 15, 2007 11:28 pm
- Has thanked: 576 times
- Been thanked: 347 times
That would be of interestramses wrote:Perhaps I should make a video...
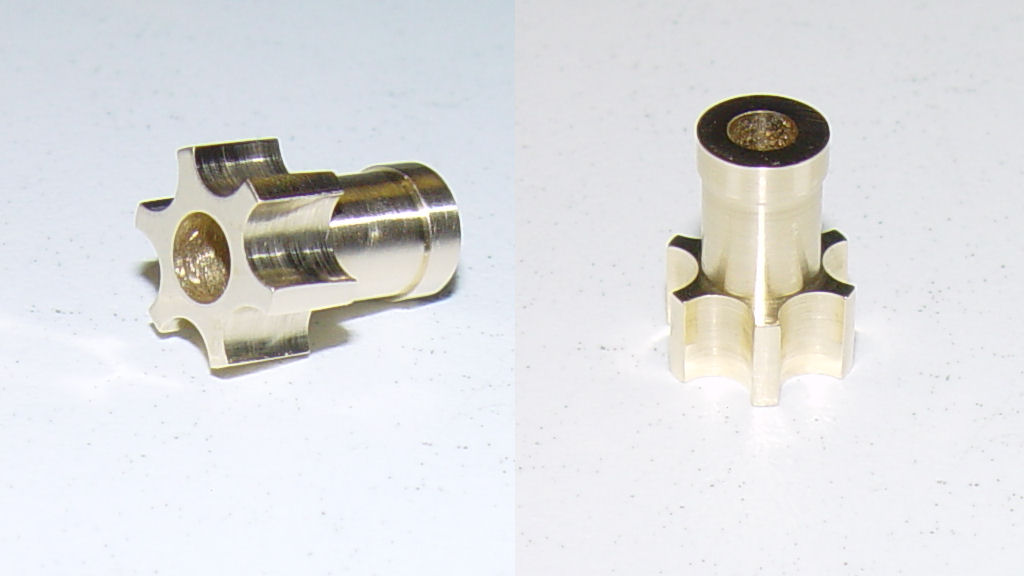
Part done, but I don't seem to have managed the same finish with the mill as LeMaudit, though I'm quite sure I repeated the same cutting operations... any ideas?
Ah well, time to get the Araldite out and make this thing fire
edit: barrel connected and cuting, low pressure testing in a couple of hours
edit II: sneaked a quick 75 psi test, no leaks and it worked great! More testing later
- Attachments
-
-
-
- functionally almost complete :D
hectmarr wrote:You have to make many weapons, because this field is long and short life

-
jackssmirkingrevenge
- Five Star General
- Posts: 26216
- Joined: Thu Mar 15, 2007 11:28 pm
- Has thanked: 576 times
- Been thanked: 347 times

b-b-b-but... but it works!
hectmarr wrote:You have to make many weapons, because this field is long and short life
Hahaha....
Well... let say you just tested successfully the prototype... I'll do the final commercial product!
Very glad it worked! Well... mine better work too now
Well... let say you just tested successfully the prototype... I'll do the final commercial product!
Very glad it worked! Well... mine better work too now
- Attachments
-
- sigh.jpg (3.05 KiB) Viewed 2536 times
I HAZ A BANG!
-
warhead052
- Staff Sergeant 3
- Posts: 1769
- Joined: Mon Mar 21, 2011 5:41 pm
Jack was simply making the knock off brandLeMaudit wrote:Hahaha....
Well... let say you just tested successfully the prototype... I'll do the final commercial product!
Very glad it worked! Well... mine better work too now