

I'd love to make one, but it's only a dream until they make dratted X pieces in copper.DYI wrote:They do pop up every once in a while, I believe that jrrdw may have made one, but I have seen a few of them.
Project: 10 gallon
Does that thing kinda look like a big cat to you?
-
mobile chernobyl

- Corporal 3


- Posts: 760
- Joined: Sun Dec 03, 2006 11:53 am
- Been thanked: 8 times
http://www.pexsupply.com/categories.asp ... 7&brandid=Ragnarok wrote:I'd love to make one, but it's only a dream until they make dratted X pieces in copper.
Your welcome
 (albiet being costly, they do indeed make crosses)
on a different note:
I'm geussing the
To all that said the X-valve has been done before - I sure hope so!
I originally posted my proposed version of this valve back in november of 2006. I never got time to make it with college and all. Now that I've had almost a whole summer to work on projects like this, I thought i'd revisit an old "goal" of mine in this valve haha.
I originally did want to use 6" chambers like Joel's mega launcher, and others on here, but after a while of thinking, the question just became... why bother? With the two 6.5' by 4" chambers on here now, I get just about 10 gallons of volume, and the largest volume of barrel I'll be using will be maybe 800 cu in - or just under 3.5 gallons. That leaves me with a 3:1 C:B ratio in the smallest ratio, with other barrels approaching a 4.5:1 C:B ratio, and from what I've found, this is just overkill unless your goal is something other than mine.
Next, just consider filling 10 gallons of volume to 60-90 psi every time... thats gonna take a hell of a long time. Original designs were to just have a compressor unit attached directly to the spud gun, to use the spud gun's chamber as the compressors chamber, essentially eliminating the whole fill hose step. To control pressure I was going to use a digital pressure switch, and set the stop pressure before filling it every time. This seemed good and all, but a bit over kill for something such as a spud gun. However I may revisit this idea in the future for a fully autonomous design I have.
The single, "X" style 3" porting valve was settled on because of this thought train, The path of least resistance...
Essentially a single 3" porting barrel sealing valve should be more powerful than dual 3" chamber sealing valves when your maximum barrel size is 3" and you will stick to this.
Please correct me if I'm totally out of line in thinking this, but with dual 3" chamber sealing valves, the only benefit is being able to only fire one chamber at a time. The downsides are you are left with alot more dead space, slower actuating (ok, only in the millisecond range) valves, and more resistance, when in the end, if your still only using a 3" barrel, all that air can still only exit the same size hole as if you were using a single 3" barrel sealing valve like I am.
simplified - if your barrel is only 3", it doesnt matter if you have four 3" valves going into it, or one 3" valve on it. As long as the effective port area is (1.5*1.5*3.1415) you will have the same performance from one valve vs four, and possibly better because of the lack of deadspace, less resistance - the air has to flow around fewer valve openings to get to the barrel exit, and the possibility of valves opening up out of syncronization are no longer a possiblity with only one valve.
To the few who wanted to copy the design, go right ahead, its not my idea, just my modification of an existing idea.
noob of noobs - Not sure where you saw DWV fittings, but the drawing of the valve itself is OLD, and does not reflect the actual valve I will be using, other than the fact that it will be housed in a 4" cross, and have 3" of porting dia.
And to the comments on adding barrel bracing:
The drawing is just a simple concept drawing, the tray to hold the gun was drafted up at 2am, I was tireeedddd haha. I left out the bracing because with 3D drafting its not as simple as just drawing it on there, All the angles have to match, and what not or else they won't "Mate" correctly, and thats just a PITA at 2am to deal with lol. I will have under the barrel support, a little different than the standard suspension wire most people use. I will also have 2 supports on each side of the cross valve to hold 'er up under firing of concrete projectiles haha.
Thank's for the comments all, its nice to have admiration for a simple project like this
And thanks biopyro - I'll try to post more often, it's just alot of the design's for valves I have require extensive milling and o-rings since they're for paintball markers.
Yes, very useful - now all I need to do is find them in UK metric size to go with the rest of my metric size pipes.mobile chernobyl wrote:http://www.pexsupply.com/categories.asp ... 7&brandid=Ragnarok wrote:I'd love to make one, but it's only a dream until they make dratted X pieces in copper.
Your welcome(albiet being costly, they do indeed make crosses)
It's not quite as useful to me if I have to order it all my parts across the Atlantic in US copper sizes in order to be able to make use of just one piece.
Does that thing kinda look like a big cat to you?
-
mobile chernobyl
- Corporal 3
- Posts: 760
- Joined: Sun Dec 03, 2006 11:53 am
- Been thanked: 8 times
Ragnarok - Sorry, didn't know you were on the other side of the pond. I would look for metric size now, but I imagine you've already been through that. Not sure if your capable of welding, but with a Tig outfit, you could weld up your own cross out of whatever size steel tubing, then braze it to existing copper peices for adaptability, or just weld on a threaded lug, or even just tap it for threads. I will be working with metal as soon as my tig outfit arrives, I feel much safer with steel and I can make airtight welds in steel, and stainless pretty easily.
::UPDATE:: PARTS HAVE ARRIVED!!! GIGGIDY GIGGIDY
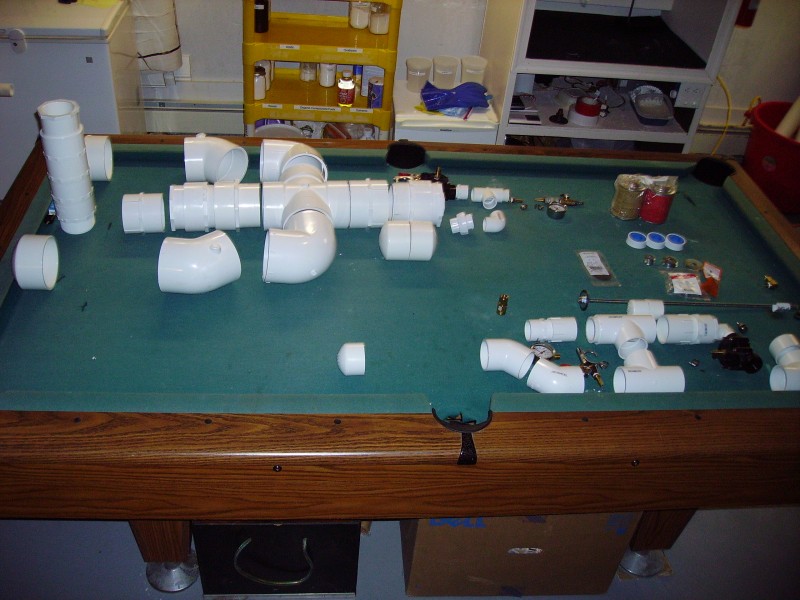

You may notice some extra parts towards the far corner pocket - thats for another gun I'm simultaneously building with a smaller version of the valve I'll be using (not X, just a T, but same sealing design). It should be pretty high power for its size, and fun too boot! I'll call it the 1.50 caliber. since I already have a .50 and .75 caliber copper rifle, this one will be a HVLP design tho. It will use the same style as the copper rifles I posted on the first page, but obviously be made of PVC. It will have a 1" pnuematic sprinkler for the exhaust valve on the piston. Should be saweeeeet.
I'm replacing all my over-under spud guns because they had DWV reducers among other DWV parts. I got through almost 2 years of using them up to 100psi with no incidents and I don't wanna test my luck any longer now that I'm more aware of the pressure ratings! All my parts are Lasco NSF-PW Sch 40.
A goal of almost all my PVC spud guns is to follow the K.I.S.S. method of engineering. Almost all the stuff on any of the guns is unmodified. I may have to sand the stops off of slipXslip bushings to accomadate for piston valves, but that is typically all I do. That is not to say I couldn't get much more extravagant, I certainly can, but I reserve that for more advanced machines. I could post up more projects of mine that I've drafted solid models of and I have definatly utilized the benefits of waterjetting, 3axis CNC, and welding in alot of designs, but I feel that with something like a spud gun, it should maintain the simplicity and be able to be duplicated time and time again from simple parts anyone can obtain. Just my outlook on the plastic launchers 8)
I want to reccoment Savko.com to anyone looking to order parts for their next PVC spud gun, they carry up to 6" in most parts, and up to 8" and 10" in the most common parts. All the parts are priced EXTREMELY fairly, and the shipping is CHEAP! not to mention fast, and the packaging was top notch. They are also all Lasco NSF-PW Sch 40 parts, and you can buy confidently! They are much cheaper than McMaster, and carry some Sch 80 as well, but not quite as extensive of a collection as their Sch 40.
::UPDATE:: PARTS HAVE ARRIVED!!! GIGGIDY GIGGIDY
You may notice some extra parts towards the far corner pocket - thats for another gun I'm simultaneously building with a smaller version of the valve I'll be using (not X, just a T, but same sealing design). It should be pretty high power for its size, and fun too boot! I'll call it the 1.50 caliber. since I already have a .50 and .75 caliber copper rifle, this one will be a HVLP design tho. It will use the same style as the copper rifles I posted on the first page, but obviously be made of PVC. It will have a 1" pnuematic sprinkler for the exhaust valve on the piston. Should be saweeeeet.
I'm replacing all my over-under spud guns because they had DWV reducers among other DWV parts. I got through almost 2 years of using them up to 100psi with no incidents and I don't wanna test my luck any longer now that I'm more aware of the pressure ratings! All my parts are Lasco NSF-PW Sch 40.
A goal of almost all my PVC spud guns is to follow the K.I.S.S. method of engineering. Almost all the stuff on any of the guns is unmodified. I may have to sand the stops off of slipXslip bushings to accomadate for piston valves, but that is typically all I do. That is not to say I couldn't get much more extravagant, I certainly can, but I reserve that for more advanced machines. I could post up more projects of mine that I've drafted solid models of and I have definatly utilized the benefits of waterjetting, 3axis CNC, and welding in alot of designs, but I feel that with something like a spud gun, it should maintain the simplicity and be able to be duplicated time and time again from simple parts anyone can obtain. Just my outlook on the plastic launchers 8)
I want to reccoment Savko.com to anyone looking to order parts for their next PVC spud gun, they carry up to 6" in most parts, and up to 8" and 10" in the most common parts. All the parts are priced EXTREMELY fairly, and the shipping is CHEAP! not to mention fast, and the packaging was top notch. They are also all Lasco NSF-PW Sch 40 parts, and you can buy confidently! They are much cheaper than McMaster, and carry some Sch 80 as well, but not quite as extensive of a collection as their Sch 40.
I've tried... with no luck. It's not essential though.mobile chernobyl wrote:I would look for metric size now, but I imagine you've already been through that.
If I were going with two chambers, I might as well do two separate valves.
Or if I ever decide to build Project Leviathan, four valves...
I can weld, although I don't have any gear to do it with.Not sure if your capable of welding, but with a Tig outfit, you could weld up your own cross out of whatever size steel tubing
On that matter, your X piece looks suspiciously like an un-rated part to me, regardless of what you've been told.::UPDATE:: PARTS HAVE ARRIVED!!! GIGGIDY GIGGIDY
I'm replacing all my over-under spud guns because they had DWV reducers among other DWV parts.
Does that thing kinda look like a big cat to you?


-
ALIHISGREAT

- Staff Sergeant 3

- Posts: 1778
- Joined: Sat Aug 25, 2007 6:47 pm
- Location: UK
looks like your design has potential to be very cool 8)
and i like the mod on the talon paintball gun... i wouldn't have been able to do that when i was 14
oh and Rag, try bes.co.uk for copper crosses, i have a feeling i saw one on there....
and i like the mod on the talon paintball gun... i wouldn't have been able to do that when i was 14
oh and Rag, try bes.co.uk for copper crosses, i have a feeling i saw one on there....
<a href="http://www.bungie.net/stats/halo3/defau ... player=ALI H IS GREAT"><img src="http://www.bungie.net/card/halo3/ALI H IS GREAT.ashx"></a>

I've looked - although it is possible to get mini compression crosses for gas and LPG plumbing, they don't do them in full size capillary.ALIHISGREAT wrote:oh and Rag, try bes.co.uk for copper crosses, i have a feeling i saw one on there....
Does that thing kinda look like a big cat to you?


Don't want to rain on your parade, but that cross you have there doesn't look very pressure rated. It doesn't have the smooth look that pressure rated PVC does, and the walls look thin. Does the fitting say NSF-PW? Because if it only says NSF-DWV, you've been scammed.
Spudfiles' resident expert on all things that sail through the air at improbable speeds, trailing an incandescent wake of ionized air, dissociated polymers and metal oxides.
-
mobile chernobyl
- Corporal 3
- Posts: 760
- Joined: Sun Dec 03, 2006 11:53 am
- Been thanked: 8 times
Thanks for being concerned folks! It's nice to have a caring community looking out for others! 
It is in fact a NSF-PW part, and is thicker than it looks in that picture. I was pretty much sure of people commenting on it. I'm wondering how many people have seen a 4" pressure rated cross in real life? Most of the "Stock" images you have seen on the web are no larger than 2" crosses - whick do indeed look smooth. Once you get into 4" peices, the parts start to look a little different with peices like crosses.
Albiet being certain the part I have is certified Sch 40 NSF-PW, I will look into it some more before building, As I myself have never even seen a 4" cross in real life before, and I will admit I was expecting a completely smooth part.
Thanks folks :headbang:
-
mobile chernobyl
- Corporal 3
- Posts: 760
- Joined: Sun Dec 03, 2006 11:53 am
- Been thanked: 8 times
::UPDATE::
1.50 Caliber "Rifle" is done. Lookin good, but will get a coat of gray (I will be painting all my spud guns now after seeing how much cooler they look from other peoples projects 8) )
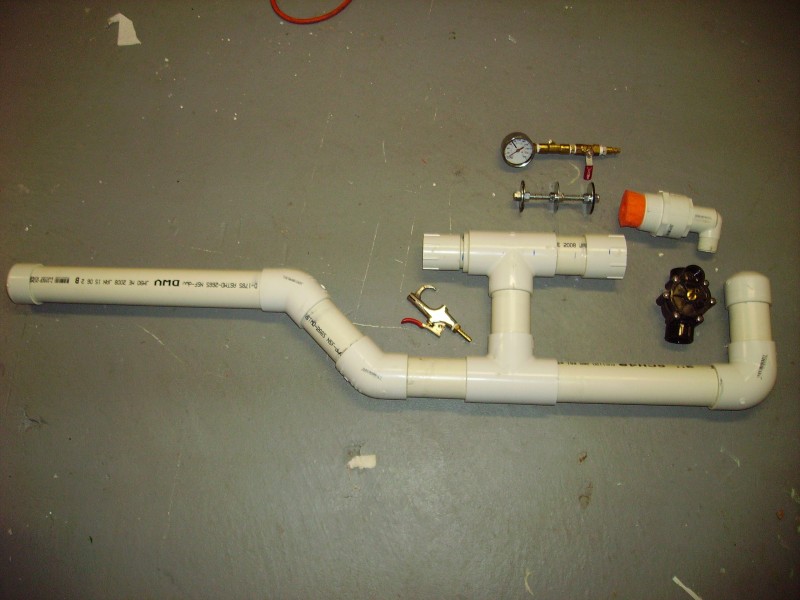
::EDIT:: I know the first thing you guys will comment about is the pipe saying DWV haha. Thanks for looking out if you thought this, but the pipe is dually rated both NSW-pw, and NSW-dwv. I dunno why they accentuated the DWV part. It is pressure rated to 280 PSI, even though I will not excede the value of the sprinkler valve - 120 PSI, EVER! I don't want to find out what PVC shrapnel feels like if it decides to blow up.
The stock consists of all 2" pipe to put it into perspective. The valve is 1.5" porting, and the exit pipe does not extend into the "T" restriciting flow - a feature of my "Palindrome" valve I'm testing on this gun (will be upsized for the 10 gallon).
The Palindrome valve is not an original idea, the purpose of it was just to prove a high performance design is totally possible with OTC materials and absolute minimal "machining". In fact the only machining was cutting the all thread to length, and dremeling out the slipXslip reducing bushing. The piston is pictured above the gun's rear section. The exit pipe (1.5") does NOT extend more than .25" past the bushing, and not into the "T" at all - allowing for an extremely high flow design made relatively easily! I love K.I.S.S. engineering my spud guns haha.
The orange thing is a pool noodle I just bought, they make AWESOME bumpers! They have a hole through the center - about 1" dia - so they allow: Effiecient exhausting through the hole, good absorbtion properties, space to be taken up all at the same time! Cool
I have two barrels for it, and the stock is low enough to clear 2" PVC for golf ball barrel clearance (Future addition).
Tonight I'll paint it and continue to let it cure, after work tomarrow I'll test her out. I like to let my stuff cure a full 24hours like reccomended to be safe. Perhaps this weekend I will embark on 10 gallon, I need to pick up a road sign from my buddy for "sheet metal" so I can make the Palindrome piston for 10 gallon. Things are goin smooth
1.50 Caliber "Rifle" is done. Lookin good, but will get a coat of gray (I will be painting all my spud guns now after seeing how much cooler they look from other peoples projects 8) )
::EDIT:: I know the first thing you guys will comment about is the pipe saying DWV haha. Thanks for looking out if you thought this, but the pipe is dually rated both NSW-pw, and NSW-dwv. I dunno why they accentuated the DWV part. It is pressure rated to 280 PSI, even though I will not excede the value of the sprinkler valve - 120 PSI, EVER! I don't want to find out what PVC shrapnel feels like if it decides to blow up.
The stock consists of all 2" pipe to put it into perspective. The valve is 1.5" porting, and the exit pipe does not extend into the "T" restriciting flow - a feature of my "Palindrome" valve I'm testing on this gun (will be upsized for the 10 gallon).
The Palindrome valve is not an original idea, the purpose of it was just to prove a high performance design is totally possible with OTC materials and absolute minimal "machining". In fact the only machining was cutting the all thread to length, and dremeling out the slipXslip reducing bushing. The piston is pictured above the gun's rear section. The exit pipe (1.5") does NOT extend more than .25" past the bushing, and not into the "T" at all - allowing for an extremely high flow design made relatively easily! I love K.I.S.S. engineering my spud guns haha.
The orange thing is a pool noodle I just bought, they make AWESOME bumpers! They have a hole through the center - about 1" dia - so they allow: Effiecient exhausting through the hole, good absorbtion properties, space to be taken up all at the same time! Cool
I have two barrels for it, and the stock is low enough to clear 2" PVC for golf ball barrel clearance (Future addition).
Tonight I'll paint it and continue to let it cure, after work tomarrow I'll test her out. I like to let my stuff cure a full 24hours like reccomended to be safe. Perhaps this weekend I will embark on 10 gallon, I need to pick up a road sign from my buddy for "sheet metal" so I can make the Palindrome piston for 10 gallon. Things are goin smooth
No, look closer - if you read it properly, it's clearly NMO pipe - you're reading it the wrong way up.mobile chernobyl wrote:::EDIT:: I know the first thing you guys will comment about is the pipe saying DWV haha.
Does that thing kinda look like a big cat to you?
-
mobile chernobyl
- Corporal 3
- Posts: 760
- Joined: Sun Dec 03, 2006 11:53 am
- Been thanked: 8 times
Yea your right... I did infact buy NMO pipe. NMO Stands for Nuggets, Mothballs, and Onions - 3 Things that can be shot out of it.
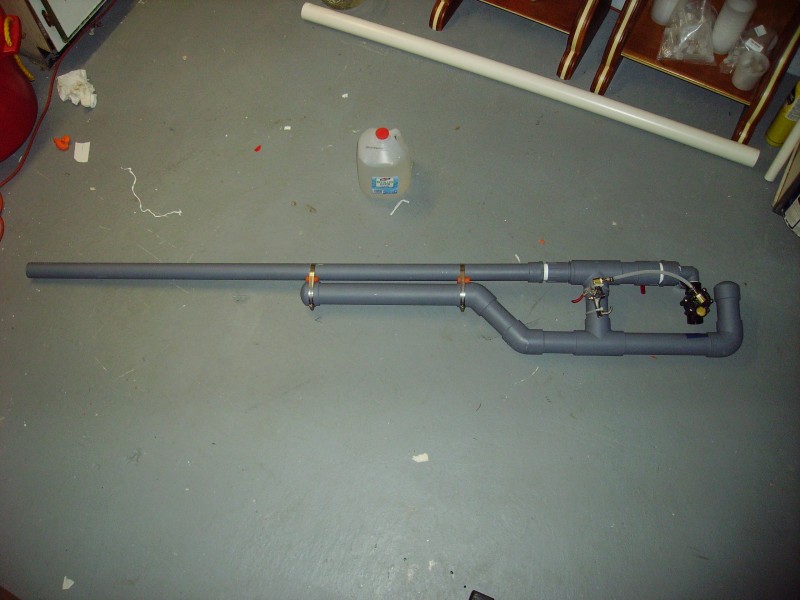
I got "1 gallon" painted tonight, looks really cool! Its alot nicer to see a cannon all the same color than to see it with glue, writing and different shades of white. I glued the holes on the top of the sprinkler valves so I could remove the bleeder screw and the solidnoid for a cleaner look. All in all, should be able to fire 1 gallon tomarrow night.
I was talking to my step dad tonight (hes owns a cabinet making business) and He's got some spare drawer slides - AKA essentially a linear bearing. I will be using 4 of these for my recoild absorbtion stand for 10 gallon. Hes also got a hell of a lot of lumber for scrap that most anyone would consider prestine - so we'll be constructing a stand for 10 gallon this weekend. All I need to do then is add springs and a dampner for the total package. Oh yea and wheels and a kickstand for elevation control.
I'll post pictures tomarrow of the finished "1 gallon".
Sweet
-
mobile chernobyl
- Corporal 3
- Posts: 760
- Joined: Sun Dec 03, 2006 11:53 am
- Been thanked: 8 times
::UPDATE::
1 Gallon is done and firing. the "glue" job on the solenoid valve leaks, so I only fill it up to about 40-50 since it leaks exponentially faster the higher the PSI. Tomarrow I will epoxy it (like I should have!) to stop the leak and continue testing up to 110 psi.
As you can tell, I don't go to extremes to make my pneumatic launchers look like real guns. To each their own, but I prefer to have my real guns look like real guns, and my spud guns look like artistic creations of my own. If I was going to make it look like a real gun, it would probably be a Steyr, but its not, and its muzzle loading so even more reason to not even bother making it look like a real gun, and scare people at the same time. Its bad enough I can harness PVC to create the kinetic energy of some commercial firearms, I don't need people to actually think I'm holding a gun when its really just a PVC air launcher, especially in this day and age.
Theres a 1 gallon jug of water in the photo for perspective.
Barrels 1.5" X 5'. Features the "Palinedrome" 100% OTC valve, and its scary powerful. Even at 50PSI, its shot black walnuts farther than any over/under I've had at 100 PSI, with the same size barrel (but to be fair , they had 1" sprinker main valves). I'm interested to see how 10 gallon will perform, or should I say... anxious haha. I just want to make sure I have a form to assemble it in because just assembling 1 gallon, I can already tell its going to be a wrestling match with all the 4" joints, and keeting it aligned so the barrel doesnt need viagra or to subside its boner - aka I want the barrel pretty close to perfectly horizontal.
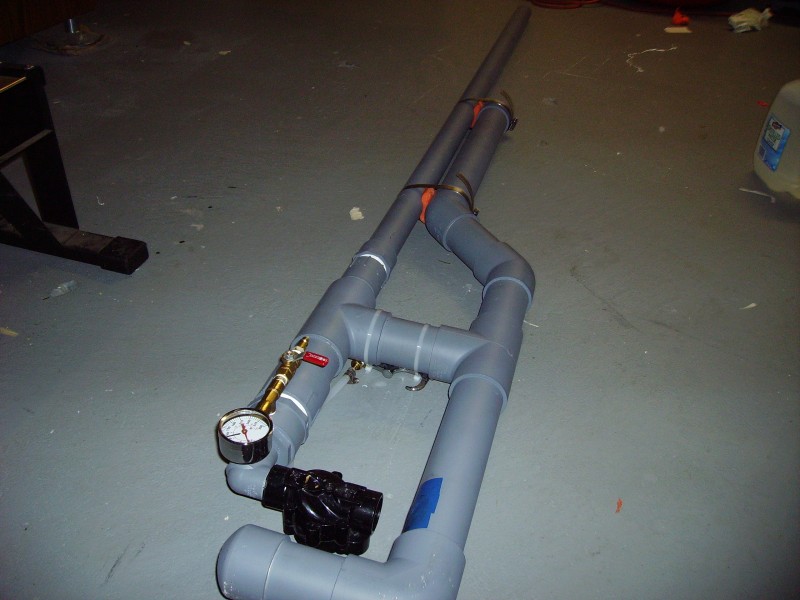
The blue tape directly beneath the valve is to catch left over residue in the spinkler valve when it shoots (so it doesnt get over my sweeeeet paintjob). The gun is big, yes, but its at just the largest extreme of being able to be held like a rifle. Any bigger and it would need to either be hip shot or shoulder mounted. So in that sense its pretty cool, and for just guestimating the cut chart of tubes for the stock, I'd say its pretty spot on!
I know I know, this thread is about 10 gallon, but I needed to test a valve like this small scale before I really went all out. Now I am pretty confident that my valve will work 100%, I just need to rebuild my sprinkler valves, or maybe look for some 3/4" QEV's on ebay... If only I had money lol, This project has sapped me for this paycheck.
1 Gallon is done and firing. the "glue" job on the solenoid valve leaks, so I only fill it up to about 40-50 since it leaks exponentially faster the higher the PSI. Tomarrow I will epoxy it (like I should have!) to stop the leak and continue testing up to 110 psi.
As you can tell, I don't go to extremes to make my pneumatic launchers look like real guns. To each their own, but I prefer to have my real guns look like real guns, and my spud guns look like artistic creations of my own. If I was going to make it look like a real gun, it would probably be a Steyr, but its not, and its muzzle loading so even more reason to not even bother making it look like a real gun, and scare people at the same time. Its bad enough I can harness PVC to create the kinetic energy of some commercial firearms, I don't need people to actually think I'm holding a gun when its really just a PVC air launcher, especially in this day and age.
Theres a 1 gallon jug of water in the photo for perspective.
Barrels 1.5" X 5'. Features the "Palinedrome" 100% OTC valve, and its scary powerful. Even at 50PSI, its shot black walnuts farther than any over/under I've had at 100 PSI, with the same size barrel (but to be fair , they had 1" sprinker main valves). I'm interested to see how 10 gallon will perform, or should I say... anxious haha. I just want to make sure I have a form to assemble it in because just assembling 1 gallon, I can already tell its going to be a wrestling match with all the 4" joints, and keeting it aligned so the barrel doesnt need viagra or to subside its boner - aka I want the barrel pretty close to perfectly horizontal.
The blue tape directly beneath the valve is to catch left over residue in the spinkler valve when it shoots (so it doesnt get over my sweeeeet paintjob). The gun is big, yes, but its at just the largest extreme of being able to be held like a rifle. Any bigger and it would need to either be hip shot or shoulder mounted. So in that sense its pretty cool, and for just guestimating the cut chart of tubes for the stock, I'd say its pretty spot on!
I know I know, this thread is about 10 gallon, but I needed to test a valve like this small scale before I really went all out. Now I am pretty confident that my valve will work 100%, I just need to rebuild my sprinkler valves, or maybe look for some 3/4" QEV's on ebay... If only I had money lol, This project has sapped me for this paycheck.
Well with dual valves of any type you'll get more dead space than with just one.mobile chernobyl wrote: Essentially a single 3" porting barrel sealing valve should be more powerful than dual 3" chamber sealing valves when your maximum barrel size is 3" and you will stick to this.
Please correct me if I'm totally out of line in thinking this, but with dual 3" chamber sealing valves, the only benefit is being able to only fire one chamber at a time. The downsides are you are left with alot more dead space, slower actuating (ok, only in the millisecond range) valves, and more resistance.
Resistance and dead space in a chamber sealer is all a bit irrelevant when built and lubricated properly, the force on it is colossal by comparison. Opening times are also a bit of a red herring, it depends on the design and it is entirely possible to have pilot volumes of barrel sealing valves.
In fact the only real downside to making chamber sealing valves is that they need to be made fairly accurately and need two sealing points instead of a barrel sealers one.
On another note the small cannon's looking good
How suitable is the 2" for using as a grip? I'm wondering about a grip design at the moment...
Create an account or sign in to join the discussion
You need to be a member in order to post a reply
Create an account
Not a member? register to join our community
Members can start their own topics & subscribe to topics
It’s free and only takes a minute
Sign in
-
- Similar Topics
- Replies
- Views
- Last post
-
- 7 Replies
- 2759 Views
-
Last post by subterranean
-
- 6 Replies
- 3502 Views
-
Last post by Fnord
-
- 52 Replies
- 12901 Views
-
Last post by Technician1002
-
- 19 Replies
- 8129 Views
-
Last post by MisterSteve124
-
- 61 Replies
- 35984 Views
-
Last post by Biggie


