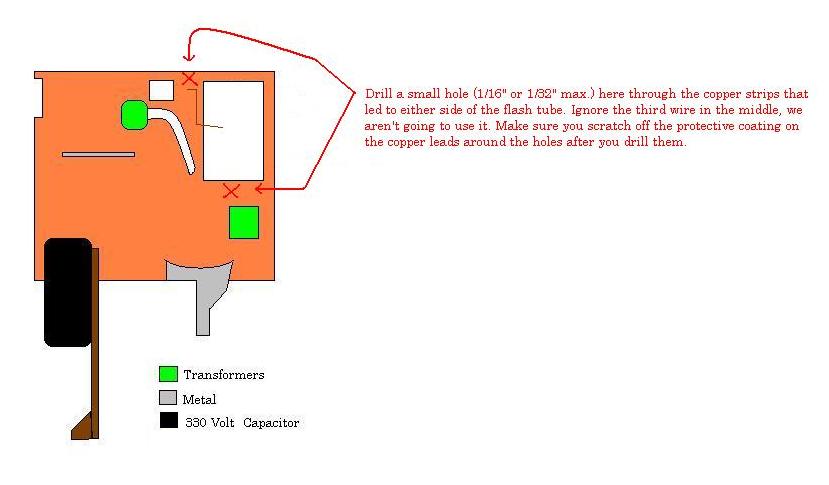
Difference between revisions of "Step 2 - Drilling the Holes for the Ignition Coil Wires"
(categorized) |
|||
| (2 intermediate revisions by 2 users not shown) | |||
| Line 1: | Line 1: | ||
<u><h3>Drilling the Holes For the Ignition Coil Wires</h3></u> | <u><h3>Drilling the Holes For the Ignition Coil Wires</h3></u> | ||
Note: You can also just wrap the wires around the leads of the capacitor and apply solder to keep them on. | Note: You can also just wrap the wires around the leads of the capacitor and apply solder to keep them on. | ||
| + | <br> | ||
| + | <br>[[Image:Camera_Flash_1.JPG]] | ||
| + | {{Navbox | ||
| + | | name = Step 1 - Removing the Flash Bulb | ||
| + | | title = Installing a Camera Flash ignition | ||
| + | | body = | ||
| + | [[Step 1 - Removing the Flash Bulb|Step 1]] · | ||
| + | [[Step 2 - Drilling the Holes for the Ignition Coil Wires|Step 2]] · | ||
| + | [[Step 3 - Before Adding the Relay |Step 3]] · | ||
| + | [[Step 4 - Adding the Relay |Step 4]] · | ||
| + | [[Step 5 - Adding the Ignition Coil and Spark Strip/Spark Gap|Step 5]] · | ||
| + | [[Step 6 - Providing Power to the Relay|Step 6]] · | ||
| + | [[Step 7 - Removing the Battery Contacts|Step 7]] · | ||
| + | [[Step 8 - Adding a Battery Holder and Kill Switch|Step 8]] · | ||
| + | [[Step 9 - Replacing the Charging Button|Step 9]] · | ||
| + | }} | ||
| + | |||
| + | |||
| + | {{stub}} | ||
| + | [[category:Ignition sources:Camera Flash]] | ||
Latest revision as of 12:29, 15 April 2007
Drilling the Holes For the Ignition Coil Wires
Note: You can also just wrap the wires around the leads of the capacitor and apply solder to keep them on.

Installing a Camera Flash ignition
This article is a stub. You can help by expanding it