
This is the Rain Bird CP-100 valve that I will be modding. It is commonly available at most Menards. You might find it other places as well.

Supplies I used include the valve:
#15 O-ring (can be found in the faucet repair section of any hardware store) and a 3/4 inch PVC plug for the solenoid chamber,
a 1/4 hose barb to 1/8 NPT (note the size is not what is pictured), 1/4 inch hose, blow gun and hose clamps, and 1/4 hose barb to 1/4 NPT for the blow gun.

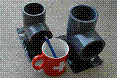
This pic shows the solenoid chamber and the manual bleed port opened to show where the work will be happening.

After taking off the lid, there is a spring in-between the lid and the diaphram that is kind of small and fits in a small recess under the manual bleed port. It is this spring that limits the size of brass fitting that can be used. The following picture shows the 1/8 NPT to 1/4 hose barb sitting in the spring to show that it will fit inside. This particular fitting is somewhat difficult to find in stock. I found them in stock at Menards. Note: I used to work at Lowes while going to college, and it is a stock item for them even though they do not usually stock it. You can order a whole box of them if you plan on doing very many mods and this particular fitting will work on an ORBIT Watermaster as well. The box could have 10 to 20ish of these in it depending on the distributor for your particular Lowes store. You can also find them at http://www.mcmaster.com/.


Using a 3/8 drill bit and drilling from the inside of the lid, drill through the manual bleed port. You want to drill from the inside of the top chamber because the little hole from the bleed port and the natural cross hairs will get you a perfectly centered hole through the manual port. Drilling from the top will be somewhat difficult to get a centered hole because the manual bleed screw/plug has a decent diameter to it and the drill bit needs something to guide it straight. turn in the fitting to thread the plastic and then thread it back in with teflon tape on it. This valve works well for this because ALL of the threads on the fitting or held in the plastic. This is much stronger than having only 1/3 or 1/2 of the threads holding.

The above picture shows the pvc plug in place. Taking off the solenoid and looking into the chamber you will see the port leading to the top chamber of the valve is down in the corner (you can see this in the pic earlier showing the ports opened up from the top). Sticking one #15 O-ring into the solenoid chamber will cover this hole. Screwing the pcv plug in will squish this O-ring and form a air tight seal on that one port. This is nice if you reuse your valves from time to time (which I do) and would like to option of ever returning the valve to electric operation. DO NOT glue the plug in, use teflon tape. It is a zero pressure chamber it will not leak.
This picture shows the inside of the lid after the fitting has been put in. Note that the hole drilled is smaller than the recess that the spring sat in so the spring still has a good seat all around the fitting. This is why drilling from the inside of the lid is important.

Once you have gotten the fitting in place, you can reattach the lid onto the body of the valve. Put the spring in and screw the lid back down. Rig up the blow gun as usual, using the 1/4 hose barb by 1/4 NPT fitting and teflon tape and use a hose clamp to clamp it down. The other end of the hose fits on the barb sticking out of the top of the valve, clamp this on and you have modded a very common and easy to find 1 inch sprinkler valve.

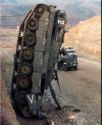
This last picture is of my first cannon using the first valve I converted. It is a 4 inch chamber and 2 1/2 inch tennis ball barrel. GGDT says this gun is capable of 300+yards with a heavy tennis ball although all I have shot so far is normal weight balls with lower pressure. To give a point of reference, I am 6 foot 2 and the end of the barrel is difficult to see but it is in the trees behind me. I fire it over the shoulder, bazooka style, the 3 inch wye that is part of the tank sits in front of my shoulder in firing position.

All of these pictures are available on this idex page as well here,
http://www.public.iastate.edu/~lnieman/