rainbird over-under question.
-
screamingflea
- Private 2

- Posts: 33
- Joined: Wed Mar 29, 2006 4:12 pm
I have built this cannon http://www.spudfiles.com/forums/viewtopic.php?t=124 using a 1" valve and have had it for a year or two. Anyways, I have upgraded it to a dual-tank design with 2 of the same over-under solenoids. One problem though, after about 50-55psi is a put in either chamber(it did this when it was a stock design to) it won't fire electrically. It will fire any pressure manualy but it is cumbersome. Is this a common problem with this valve, what exactly is happening and can it be fixed by blowgun mods. And how much different is modding this type of valve compared to inline, I have done some forum searching, and most say just drill into the side, can anyone offer any more details. Thank you. I can put pictures of the new cannon if you would like me to.
-
schmanman

- Staff Sergeant 2

- Posts: 1685
- Joined: Sat Mar 25, 2006 12:28 pm
- Location: Michigan,U.S.A
- Contact:
I had a simmilar problem.how many batteries are you using?are they old? and,is it a series or parallel circut.because all of the power may be going to one solonoid,and is used before going to the other.
-
screamingflea
- Private 2
- Posts: 33
- Joined: Wed Mar 29, 2006 4:12 pm
I am using the same project box w/ 3 9volts from it being a single chamber cannon, and I can here it firing both when nothing is in the chamber, and I think whis would classify as series. I have the same wire on each soleniod twisted together, then a wire from the box connecting to each twisted together solenoid wire. So power should be going to both at the same time. We tested the batteries and one proved just fine, once was a tiny hair under, and the other was used to power the mutlimeter. But keep in mind I had the same problem with the stock design, so I don't think it is power. I am thinking a blow gun bod for each valve wouls fix this, that is it does the same as manualy turning on the valves. I just am not clear on how to med these type of valves. And yes, the flow control is set to high.


Try wiring the 2 in parralell. That way equal power will get to both, in a circuit the power is all used up in the first solenoid. We are learning how to wire doorbell in different ways in Technology class. We wired them in circuit and only 1 worked.
"There isn't a problem in the world that can't be solved by the proper application of explosives"
-
screamingflea
- Private 2
- Posts: 33
- Joined: Wed Mar 29, 2006 4:12 pm
I don't think it is a wiring problem, when this was a one chamber cannon it still didn't, but I am willing to do some test soon to test the wiring idea. I have attached a diagram of my wiring now, it makes sense to me that both would get equal power, but if parallel would improve it, I will need some instruction how. (Havn't covered that in 4 years in school) Thanks for the help so far.
- Attachments
-
- solenoid.JPG (5.25 KiB) Viewed 4353 times


That IS parallel. Thw question remains: How are your batteries wired? They should be in series (someone correct me if I'm wrong), like this:
valves <---(+ -)---(+ -)---(+ -)---> valves
valves <---(+ -)---(+ -)---(+ -)---> valves
-
screamingflea
- Private 2
- Posts: 33
- Joined: Wed Mar 29, 2006 4:12 pm
I have switches in there, but yes, that is how the batteries are wired. I really don't feel like buying more solenoids, so would pneumatically modding these fix the problem? And how would I go about doing that on the type of valve? --edit. Alrighty, I was dismanteling the valves trying to think of a way of modding it, and my Dad had what seems like a good idea. Take off the solenoids, then find threaded elboes that can screw into where the solenoids come out, and then run what ever pipe fits to connect the elboes, and tap your blow gun into that pipe. I hope I made that clear. My only concern is all the air rushing out the blowgun. Any thoughts?
Last edited by screamingflea on Thu Mar 30, 2006 5:30 pm, edited 2 times in total.
-
Shrimphead
- Corporal

- Posts: 509
- Joined: Thu Nov 17, 2005 7:42 pm
To know where to mod a valve requires opening it to see if it had a guide rod or not and to see where the spring sits. Open it up and if you still don't know where to mod it, then post a pic of the opened valve.
-
screamingflea
- Private 2
- Posts: 33
- Joined: Wed Mar 29, 2006 4:12 pm
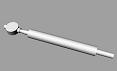
Hey, you posted as I edited. I did open up the valve, and have a picture of it if you'd like. It does have a guide rod and I see the spring, but I am not sure where on the side to put the tap. So here we go.
- Attachments
-
- valve.JPG (13.39 KiB) Viewed 4298 times
-
schmanman
- Staff Sergeant 2
- Posts: 1685
- Joined: Sat Mar 25, 2006 12:28 pm
- Location: Michigan,U.S.A
- Contact:
thats the same valve I bought orriginally.I couldent ever get it to work.I returned it and got a watermaster.those valves are alot more complicated than the watermaster,and there is a ton wore to go wrong
-
screamingflea
- Private 2
- Posts: 33
- Joined: Wed Mar 29, 2006 4:12 pm
I really don't to buy a new valve, so I am going to try to get these working, I think it can happen. Anywho, did you kepp yours electric or did you mod it?


-
screamingflea
- Private 2
- Posts: 33
- Joined: Wed Mar 29, 2006 4:12 pm
I looked all around on there, and still havn't found a similair valve set up to follow. Do you have a direct link?