
EDIT: I changed a lot of things on this gun. a list of changes:
1. Got Rid of the dead space.
2. redid the piston and trigger assembly so I can remove the piston if need be.
3. Sodered every single joint, no more epoxy joints (except for the barrel (cant soder the brass)
4. Added a homemade adjustable sight. I saw the idea somewhere on this sight but dont remember who posted it, wish I could give em credit, works great. I can hit a can pretty regularly up to about 30 feet.
So thanks everyone for the feedback, you all helped me improve it. I kept the original post below just so that others can see where I was coming from. to see the pics of the old gun, click the below links:
http://img.photobucket.com/albums/v13/j ... amer-1.jpg
http://img.photobucket.com/albums/v13/j ... zzzold.jpg
"OLD POST BELOW"
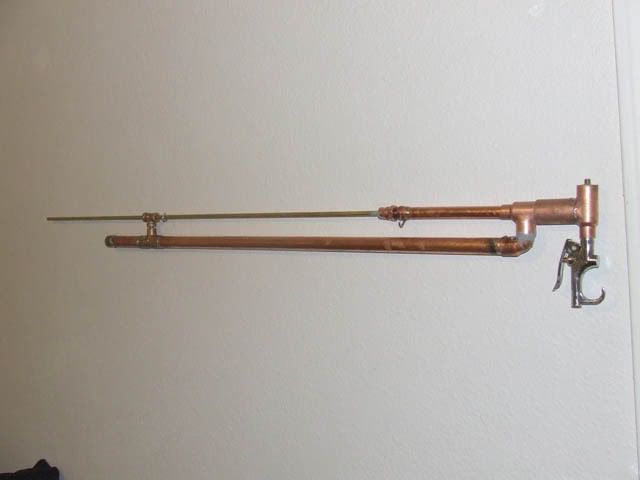
So wanting more power and accuracy, I decided to build a piston gun out of copper. I was able to find a brass tube that fits 1/4 inch ball bearings perfectly. This is my first "successful" piston gun (had 2 failures before this). Please everyone gather around me and cheer me for my victory
The piston is cast out of epoxy and has fruit loops in it to keep weight low (cereal is all I had! haha). I filled all possible extra pilot area space with either epoxy or the big rubber piston stop. it pilots just fine with the schrader valve, but of course it works better with the blow gun, and I wasnt willing to give up the trigger setup of a blowgun. The piston is set up to travel about 3/16 of an inch.
the barrel is 3 feet of brass. the steel balls fit so that they wont roll down the barrel unless you shake it. perfect fit!
The chamber is 3/4 inch by 3 feet. I know that it is pretty big compared to the barrel. I did setup the barrel to be removable so I am just waiting till I come across the right size tube in a 5 to six foot section.
I do have a few concerns though:
1. The blow gun says that it is rated to 100 psi I think. I opened it up and saw that it is all metal and rubber seals. I dont see any reason that it cant go to my 300-400 psi goal for the gun (when I get the means to fill it to that...)
2. the 1/2 pipe between the chamber and barrel is dead space. my theory is that it gives the pressure a split second to gain momentum before it gets to the ammo and barrel. was I way off base on this? I can cut it so that it is only about 1 inch long instead of around 7 inches. should I?
3. the barrel length. I have had the toughest time finding a barrel to hold 1/4 inch ball bearings. so when I came across this one, I snatched it up. I did set it up so I can change the barrell out when I find a longer one, so I may change it out if I find one.
So here are the pics of the gun, I will get damage pics soon (whatever damage a 1/4 ball can deal out).
joining the copper piston gun bandwagon (updated and upgrade
- Attachments
-
- NEW view of the valve and trigger area
-
- NEW. looking down the sight.
-
- NEW gun. updated and upgraded.
Last edited by jook13 on Thu Mar 20, 2008 11:57 pm, edited 2 times in total.
I like to play blackjack. I'm not addicted to gambling, I'm addicted to sitting in a semi-circle.
-
Gippeto

- First Sergeant 3


- Posts: 2504
- Joined: Sat Jan 19, 2008 10:14 am
- Location: Soon to be socialist shit hole.
- Has thanked: 2 times
- Been thanked: 17 times
Welcome to the wonderful world of working in copper.  Looks like your off to a decent start.
A few things;
Yes, your chamber is pretty big. I would get rid of as much of the 1/2" as you could, keep the fitting.
It looks like you soldered a couple of the joints. Yes? Then I noticed what seems like jb weld on other joints. Did they leak? You can re-solder them, no need for jb.
Please remember;
Done properly, soldered joints DO NOT leak.
Done poorly, you DO NOT want to use it.
If your going to work with copper, go to the bottom of the page, and download the copper handbook. Excellent reading.
http://www.copper.org/applications/plum ... h_main.htm
I,m not trying to be harsh. Learn how to do things properly and you will be safer when you do get to higher pressures.
"It could be that the purpose of your life is to serve as a warning to others" – unknown
Liberalism is a mental disorder, reality is it's cure.
Liberalism is a mental disorder, reality is it's cure.
-
nz_cannons
- Private 3

- Posts: 51
- Joined: Tue Sep 04, 2007 10:17 pm
Fuck bro....Just get a propane torch and solder/braze that shit. With the correct flux and filler (think silfos or some other brand name shit) it'll flow into those joints nice and cleanly. Just get both surfaces nice and hot, cant really overheat it with a propane torch. I think, from memory that you apply a flux to copper first than heat it to it "dries" off then put peices together and solder. (depends on what your using, should have instructions on it I guess.) Not difficult once you get the hang off it, just remember to get the heat in there, if it looks chunky and doesn't flow in then it's shit.
-
jackssmirkingrevenge

- Five Star General

- Posts: 26216
- Joined: Thu Mar 15, 2007 11:28 pm
- Has thanked: 576 times
- Been thanked: 347 times
The piston is cast out of epoxy and has fruit loops in it to keep weight low (cereal is all I had! haha).
Ten points for originality, brilliant
In a word, yes. Dead space = less performance.the 1/2 pipe between the chamber and barrel is dead space. my theory is that it gives the pressure a split second to gain momentum before it gets to the ammo and barrel. was I way off base on this?
The chamber is also far too big, even if you plan on a six foot barrel, if i were you I'd cut it down to half the size. Mind you, a bigger chamber always equals more performance, but in this case I think the increase of 3 feet over 1.5 feet will not be enough to justify the increased pumping effort and noise.
hectmarr wrote:You have to make many weapons, because this field is long and short life
Done properly, soldered joints DO NOT leak.
Done poorly, you DO NOT want to use it.
alright guys, every joint is soldered except for 2. I used epoxy for them because I was afraid of melting or warping any of the rubber sealing faces inside the gun. I also didnt wanna ruin any of the epoxy inside the pilot area.fork bro....Just get a propane torch and solder/braze that crap. With the correct flux and filler (think silfos or some other brand name crap) it'll flow into those joints nice and cleanly. Just get both surfaces nice and hot, cant really overheat it with a propane torch. I think, from memory that you apply a flux to copper first than heat it to it "dries" off then put peices together and solder. (depends on what your using, should have instructions on it I guess.) Not difficult once you get the hang off it, just remember to get the heat in there, if it looks chunky and doesn't flow in then it's crap.
thanks for the suggestion, I will get rid of the dead space. but as for the the chamber size, I will keep it overkill. I dont wanna get less power, even if a minute amount. I also wanna keep my options open for larger barrells down the road.In a word, yes. Dead space = less performance.
The chamber is also far too big, even if you plan on a six foot barrel, if i were you I'd cut it down to half the size. Mind you, a bigger chamber always equals more performance, but in this case I think the increase of 3 feet over 1.5 feet will not be enough to justify the increased pumping effort and noise.
I like to play blackjack. I'm not addicted to gambling, I'm addicted to sitting in a semi-circle.
That is why it is vital to have a large threaded fitting on the back to put the piston in. Very good job but you should have worked that in.
Notice how all the other copper guns on here have that type of piston access fitting.
I'm pretty sure you could get the few extra pieces.
Notice how all the other copper guns on here have that type of piston access fitting.
I'm pretty sure you could get the few extra pieces.


I wish we had fruit loops in this god forsaken country. 
Allthough we may be the most intelligent creature on this planet, we are also the most inconsistent.
To find peace within our existence we often create a logic that endangers our lives.
To find peace within our existence we often create a logic that endangers our lives.
-
SpudFarm
- First Sergeant 3
- Posts: 2571
- Joined: Sat Nov 04, 2006 9:39 am
- Location: Norway Trondheim area
looks good but you should clean it...
then like hawkeye said you should have made a cap to get to the piston if/when it brakes...
but i am not going to say anymore when i think about my first piston gun
then like hawkeye said you should have made a cap to get to the piston if/when it brakes...
but i am not going to say anymore when i think about my first piston gun


Necrosis wrote:I wish we had fruit loops in this god forsaken country.
First of all, what does that have to do with copper pneumatics?
and second, where do you live that doesn't have fruit loops?
Forum Rules - follow them or else!
“Happiness is the meaning and the purpose of life, the whole aim and end of human existence”
“Happiness is the meaning and the purpose of life, the whole aim and end of human existence”
-
Counterstriker

- Specialist 4

- Posts: 426
- Joined: Tue May 29, 2007 2:06 pm
Nice! How much money it cost to make?
sthorne wrote:Necrosis wrote:I wish we had fruit loops in this god forsaken country.
First of all, what does that have to do with copper pneumatics?
If you read the original post you would realize that he used fruit lops the same way Jack uses foam in his pistons to lighten them.
-
SpudBlaster15
- First Sergeant 3

- Posts: 2400
- Joined: Wed Oct 18, 2006 11:12 pm
- Has thanked: 2 times
- Been thanked: 10 times
Lorem ipsum dolor sit amet, consectetur adipiscing elit. Cras nec placerat erat. Vivamus dapibus egestas nunc, at eleifend neque. Suspendisse potenti. Sed dictum lacus eu nisl pretium vehicula. Ut faucibus hendrerit nisi. Integer ultricies orci eu ultrices malesuada. Fusce id mauris risus. Suspendisse finibus ligula et nisl rutrum efficitur. Vestibulum posuere erat pellentesque ornare venenatis. Integer commodo fermentum tortor in pharetra. Proin scelerisque consectetur posuere. Vestibulum molestie augue ac nibh feugiat scelerisque. Sed aliquet a nunc in mattis.
Last edited by SpudBlaster15 on Wed Jul 14, 2021 6:37 pm, edited 1 time in total.
ha, hey man, I had no foam. I even spacifically picked out clear epoxy for the piston, just to see the cereal floating in its eternal fate.
I just skimmed over a few things and already learned a few usefull things (will read it all when I get a chance). I like the charts at the bottom that list the exact dimensions of each type and size of pipe. good to look at when choosing ammo or a barrell.Gippeto: If your going to work with copper, go to the bottom of the page, and download the copper handbook. Excellent reading.
ehhhh..... I'd guess around 60 bucks. factoring in all the little things like extra flux and grease for the piston.counterstriker: Nice! How much money it cost to make?
spudfarm: looks good but you should clean it...
then like hawkeye said you should have made a cap to get to the piston if/when it brakes...
but i am not going to say anymore when i think about my first piston gun
yeah, I dont know why that didnt even cross my mind. it was kinda stressfull waiting for the epoxy to set and crossing my fingers thinking "god it better work, no going back"hawkeye:That is why it is vital to have a large threaded fitting on the back to put the piston in. Very good job but you should have worked that in.
I like to play blackjack. I'm not addicted to gambling, I'm addicted to sitting in a semi-circle.
-
OuchProgramme
- Specialist 3

- Posts: 371
- Joined: Sat Jan 12, 2008 7:30 pm
Just wondering, would JB Weld/Epoxy be OK to use for a copper gun?
I understand soldering is the best choice, but could the bonds also substitute just as well as soldering?
I understand soldering is the best choice, but could the bonds also substitute just as well as soldering?