Building or modifying BB, Airsoft, and Pellet type of guns. Show off your custom designs, find tips and other discussion. Target practice only!
-
knappengineering
- Specialist

- Posts: 137
- Joined: Sun Jun 24, 2007 1:01 pm
-
Contact:
Wed Aug 20, 2008 10:48 pm
Here are the drawings for my new Semi-Auto BB gun prototype:

The yellow lines are threaded rods to attach the two rubber stoppers shown with blue fill lines. Green is a spring and red is a aluminum tubing. Air source comes in from the right side through blow gun. The workings should be self explanatory from there. Let me know what u guys think.
-
jackssmirkingrevenge
- Five Star General

- Posts: 26216
- Joined: Thu Mar 15, 2007 11:28 pm
- Has thanked: 576 times
- Been thanked: 347 times
Wed Aug 20, 2008 11:11 pm

Looks like everyone's favourite blow-forward design

presumably there are holes in the yellow pipe to let the air flow through?
hectmarr wrote:You have to make many weapons, because this field is long and short life
-
jackssmirkingrevenge
- Five Star General
- Posts: 26216
- Joined: Thu Mar 15, 2007 11:28 pm
- Has thanked: 576 times
- Been thanked: 347 times
Wed Aug 20, 2008 11:15 pm
knappengineering wrote:it says in my first post the yellow lines represent 2 threaded rods.
Right you are

six in the morning here, sorry


hectmarr wrote:You have to make many weapons, because this field is long and short life
-
hi
- Staff Sergeant 2

- Posts: 1619
- Joined: Thu Feb 01, 2007 9:28 pm
Wed Aug 20, 2008 11:24 pm
It looks good to me. i've been meaning to get around to building one, but i havent yet.
Last edited by
hi on Wed Aug 20, 2008 11:26 pm, edited 1 time in total.
"physics, gravity, and law enforcement are the only things that prevent me from operating at my full potential" - not sure, but i like the quote
you know you are not an engineer if you have to remind yourself "left loosy righty tighty"
-
psycix
- Sergeant Major 4

- Posts: 3684
- Joined: Mon Jun 25, 2007 7:12 am
- Location: The Netherlands
Thu Aug 21, 2008 9:54 am
The hardest part of building such a design is to find pipes which fit in eachother.
On top of that O-rings may be applied.
If you can machine stuff, it all gets easier.
-
SEAKING9006
- Corporal 3

- Posts: 734
- Joined: Mon Jun 23, 2008 3:20 pm
- Location: Texas
Thu Aug 21, 2008 11:36 am
It seems as if designing a blow forward automatic is a right of passage here. Everyone and their grandma has done it. But, almost no-one has actually built their design, and I can't blame them.... Their hard as hell to build, and we would probably give a Nobel prize to the first guy to design one that's easy for anyone to build and make work well, which is unlikely, since the thing has moving parts and sealing faces. I feel that my own design has come closest to that benchmark, with the face of the piston simply being a piece of pipe with one end epoxied shut, and the sealing surface is the SIDE of the piston. Also, if it's out of sync, a roller switch can be adjusted either back or forward to adjust the opening and closing position of the pilot and filling valves, and is the first one I know of to use electronics to interrupt the flow of air.
-
knappengineering
- Specialist
- Posts: 137
- Joined: Sun Jun 24, 2007 1:01 pm
-
Contact:
Thu Aug 21, 2008 12:04 pm
Yeah I think that might be the only difficult part, it might take some trial and error and fine tuning but once i get the right spring tension it should work perfectly.
-
jimmy101
- Sergeant Major 2


- Posts: 3209
- Joined: Wed Mar 28, 2007 9:48 am
- Location: Greenwood, Indiana
- Has thanked: 6 times
- Been thanked: 18 times
-
Contact:
Thu Aug 21, 2008 1:43 pm
Below is the design I fiddle with, made from a 1/4" brass compression T. I never could get the spring tension quite right and it generally fired two BBs/trigger pull. There are two designs in the image below, the one on the left is the one I made. All the parts (except the spring) for the selector are from the compression fitting. The piston/selector itself is just the tube insert, that came with the fitting, installed backwards. The magnet is to keep the copper/steel 0.177" BBs from rolling out of the barrel. The tube insert is copper so it isn't affected by the magnet. For a valve I used a ~3/8" water control solenoid valve from a washing machine. The barrel was 3' of 1/4" brakeline.
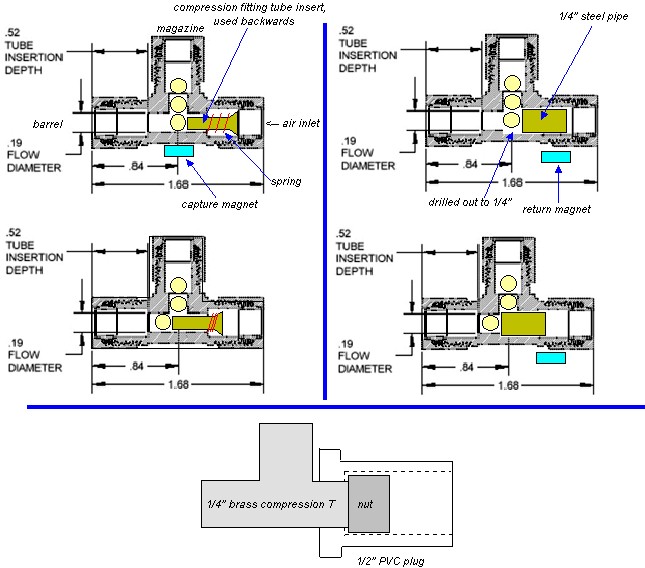
More info
here.
-
knappengineering
- Specialist
- Posts: 137
- Joined: Sun Jun 24, 2007 1:01 pm
-
Contact:
Thu Aug 21, 2008 1:52 pm
Those are both good designs, and using a brass compression T is a good idea, very compact and helps to use off the shelf parts. Have you ever made a prototype of the design on the right? I'm curious to how well the return magnet idea works. It sounds like an interesting concept and I happen to have some powerful magnets so i might give that design a try, thanks.
-
jimmy101
- Sergeant Major 2
- Posts: 3209
- Joined: Wed Mar 28, 2007 9:48 am
- Location: Greenwood, Indiana
- Has thanked: 6 times
- Been thanked: 18 times
-
Contact:
Thu Aug 21, 2008 2:23 pm
knappengineering wrote:Those are both good designs, and using a brass compression T is a good idea, very compact and helps to use off the shelf parts. Have you ever made a prototype of the design on the right? I'm curious to how well the return magnet idea works. It sounds like an interesting concept and I happen to have some powerful magnets so i might give that design a try, thanks.
Nope, never made the design on the right. I would think there might be a somewhat tricky balance between the ID and the OD of the tube. If the wall of the tube is too thin there might not be enough force from the air flow to overcome the magnet and the mass of the tube. Too thick of a wall will unnecisarily restrict flow.
You also have to drill out the T to get the metal tube to fit.