This dart shoots well at 450 psi.
The secret was to add 1" of foam beyond the 3" nail head.
IOW Pierce a .33" thick foam disk with the 3" 10d nail and hot glue it to the head from below.
Add 3 more foam disks onto the head and the first disk.
It shoots very fast and straight at 450 psi.
My goal is to shoot them at 550 psi.
I am fairly certain that this design will take it.
Thicker foam would be nice.
I can make a new dart in the time it takes the compressor to reach 450 psi.
YMMV
BoyntonStu
New Nail Dart Design & Testing
-
boyntonstu

- Sergeant

- Posts: 1039
- Joined: Sun Jun 28, 2009 8:59 am
- Attachments
-
- Closed Cell Foam Tail

-
boyntonstu
- Sergeant
- Posts: 1039
- Joined: Sun Jun 28, 2009 8:59 am
Thanks, and I agree.qwerty wrote:looks good, you could try sanding them down to male it more aerodynamic.
First function, next form.
I had a heck of a time stabilizing a nail dart above 200 psi.
A rocket shaped tail will be my next project.
However, even though the darts look ugly, they fly surprisingly straight.
Sanding is a problem. I chucked the nail in a drill press and it was a no go.
I am thinking of using heat and melting/cutting a shape.
Hints would be appreciated.
-
FighterAce
- Specialist 2


- Posts: 295
- Joined: Fri Oct 23, 2009 1:28 pm
- Location: Croatia/Zagreb
- Has thanked: 1 time
- Been thanked: 4 times
- Contact:
I was thinking of using a soldering iron and a bad tip for it. My guess is that the foam will start to melt and shrink as soon as you come close to it with the hot soldering iron.boyntonstu wrote: I am thinking of using heat and melting/cutting a shape.
-
boyntonstu
- Sergeant
- Posts: 1039
- Joined: Sun Jun 28, 2009 8:59 am

I cut a piece of barrel material and drilled a hole for the soldering iron.
Notice how a cone shape is automatically produced.
I tried a few boat tailed shapes.
I also tried using a foam nose and a closed cell polyethylene pusher/sealer, not attached to the dart.
Just like using a wad. It produced the damage shown below at 200 psi.
The 10d nail penetrated 2 sheets of 5/8" plywood and the point sticking out was embedded in the third sheet.

-
boyntonstu
- Sergeant
- Posts: 1039
- Joined: Sun Jun 28, 2009 8:59 am
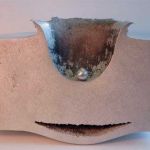
A few photos of my new Nail Dart.
Corks are free or very cheap.
Easy to size with a drill press and a belt sander.
Grease them up an they slide easily.
This shot was at 250 psi driving a 3" 10d nail.
Finished Nail Dart

Front side of carpet.

Back side of carpet. (notice the hot glue)

Nail head into 5/8" plywood.

Out the back of the plywood.

Corks are free or very cheap.
Easy to size with a drill press and a belt sander.
Grease them up an they slide easily.
This shot was at 250 psi driving a 3" 10d nail.
Finished Nail Dart
Front side of carpet.
Back side of carpet. (notice the hot glue)
Nail head into 5/8" plywood.
Out the back of the plywood.


Not bad. Cork seems a nice material for ammo.
-
boyntonstu
- Sergeant
- Posts: 1039
- Joined: Sun Jun 28, 2009 8:59 am
Thanks!psycix wrote:Not bad. Cork seems a nice material for ammo.
Like a greased piston in a pump cylinder.
One advantage over using a cone is that the cylindrical cork drives the nail straight down the center of the barrel.
-
paaiyan
- First Sergeant

- Posts: 2140
- Joined: Wed Dec 27, 2006 10:03 pm
- Location: Central Oklahoma
- Been thanked: 1 time
I'd make a little effort to make the front of the cork a little more aerodynamic myself. Seems to work OK for you and it's a good idea, I just think you could round off the front a little and still retain the cylindrical shape towards the back for stability within the barrel.
"Who ever said the pen was mightier than the sword, obviously, never encountered automatic weapons."
-General Douglass MacArthur
Read my dog's blog - Life of Kilo
-General Douglass MacArthur
Read my dog's blog - Life of Kilo
-
boyntonstu
- Sergeant
- Posts: 1039
- Joined: Sun Jun 28, 2009 8:59 am
Another way to get aero is to add a small paper nose cone transitioning the nail to the cork.paaiyan wrote:I'd make a little effort to make the front of the cork a little more aerodynamic myself. Seems to work OK for you and it's a good idea, I just think you could round off the front a little and still retain the cylindrical shape towards the back for stability within the barrel.
Boat tailing the rear of the cork may also help.
Would the piece of paper hold all that force?
-
boyntonstu
- Sergeant
- Posts: 1039
- Joined: Sun Jun 28, 2009 8:59 am
A conical nose cone ahead of the cork has very little force applied to it.psycix wrote:Would the piece of paper hold all that force?
Think of model airplane wings covered with tissue paper.
I intend to fabricate a vertical lathe jig out of a drill press.
It will allow me to size the cork to the barrel and to taper both ends to the diameter of the nail head.
The remaining flat surface is the difference in diameter between the nail shaft and the nail head.
Not much of a transition.
A conical dab of hot glue should be fine, if needed.
-
boyntonstu
- Sergeant
- Posts: 1039
- Joined: Sun Jun 28, 2009 8:59 am
Cork Cutting Tool

I got a better idea than sanding/lathing the cork to fit the barrel.
The 3/4" cap is not soldered to the piece of barrel.
It was forced in using a vise.
I cut a composite champagne cork in a few seconds.
At 300 psi a 10d nail head went completely though 2 layers of carpeting, completely through the first 5/8" plywood, through the second 5/8" plywood, and it stuck out 1" beyond that.
This is not a cork gun with a string.
It appears that the cork may be reused at least few times.
The copper cutting tube was not sharpened and it did not burn the cork or get hot.
The hardest part was centering the hole for the 5/16" screw in the cap.
-
deathbyDWV

- Corporal

- Posts: 576
- Joined: Sat May 16, 2009 4:02 pm
- Location: Owasso, OK
Great idea.
One way to figure out the center of a cap is to take a washer that's about half the size of the cap and set it inside the cap. Then push it up against the inside edge of the cap and use something like a super fine tip sharpie and draw an arc along the edge of the washer. Then just continue to do this several times going around the inside of the cap and you'll have the middle found.
If you don't understand I might be able to put up a picture...
Life's too short to mark off the items on your wish list...