Machined pengun - Dimply

Miniature guns are novelty custom, unique, and sometime downright crude! Common construction materials often include pill bottles or pens. Show us your work!
User avatar
LeMaudit
Corporal 2
Corporal 2
Posts: 665
Joined: Thu Apr 16, 2009 2:48 pm

Donating Members

Fri Jun 24, 2011 5:42 pm

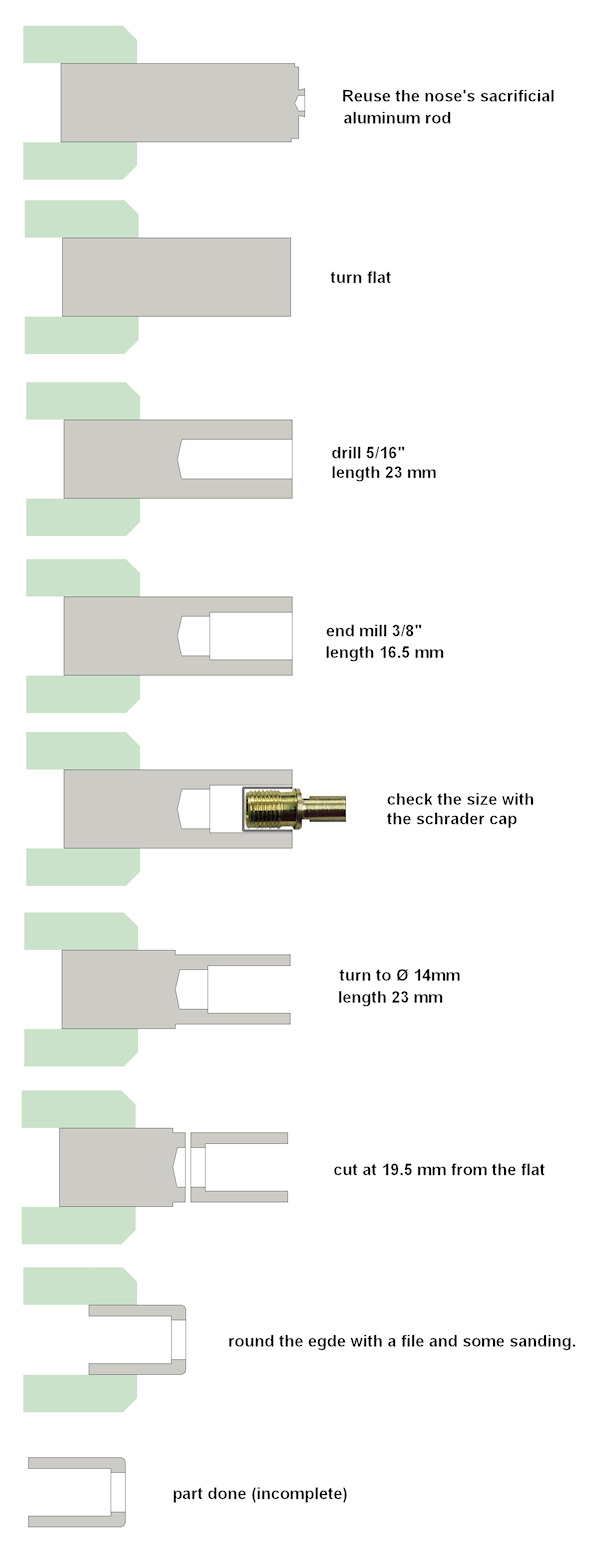
Step 6. The last big chunk of metal. After that it's only small items.

[youtube][/youtube]

Image

Image
I HAZ A BANG!
User avatar
inonickname
First Sergeant 4
First Sergeant 4
Posts: 2606
Joined: Sun Dec 07, 2008 3:27 am

Fri Jun 24, 2011 6:43 pm

LeMaudit wrote:
but I guess whatever works
Well, the first cutting plan did use a threaded rod... but I didn't have any at hand with this particular thread. I could have cut one.. but needed to describe it on the video. So... well... laziness win!

A threaded brass rod would have been less hard than the tap though, and also not as well centered I guess. Also note that the cut was very light as I already turned to almost size all the pieces. The cut was less than 0.5mm (0.02")

Well, that's all the bad reasons I could think about :D
Nah, those are perfectly good reasons :P
PimpAssasinG wrote:no im strong but you are a fat gay mother sucker that gets raped by black man for fun
warhead052
Staff Sergeant 3
Staff Sergeant 3
Posts: 1769
Joined: Mon Mar 21, 2011 5:41 pm

Fri Jun 24, 2011 8:36 pm

Ahhh, hurry and post the final stages!!! I can't wait any longer! Its like a tv show that you can't wait to see the next episode of!
User avatar
jackssmirkingrevenge
Five Star General
Five Star General
Posts: 26216
Joined: Thu Mar 15, 2007 11:28 pm
Has thanked: 576 times
Been thanked: 347 times

Donating Members

Fri Jun 24, 2011 9:36 pm

Some general questons while I compile a detailed graphical list:

- do you play with the speed control at all or tend to run at constant speed?

edit: you do, sometimes :)

- is zeroing the wheel simply a matter of holding the silver wheel and turning the red one?

General note: Watching the tutorial with the 300 soundtrack in the background is AWESOME!!!
hectmarr wrote:You have to make many weapons, because this field is long and short life
User avatar
LeMaudit
Corporal 2
Corporal 2
Posts: 665
Joined: Thu Apr 16, 2009 2:48 pm

Donating Members

Fri Jun 24, 2011 10:30 pm

do you play with the speed control
Yes. And because I didn't machine since a very long time before this pengun project, I'm afraid I've lost a bit of feeling about the speed and rate of feed to use. Some chattering was fortunately left on the cutting floor ;)

The old Machinist saying is:
"If the tool chatters, decrease speed and increase feed."

Here's from the horse's mouth (Sherline Marketing Director)
[youtube][/youtube]

I definitely can learn from that ;-)
But I prefer reduce speed most of the time instead of increasing feed... maybe I'm chicken... maybe I prefer not to have a tool or a piece stuck into the skull.

is zeroing the wheel simply a matter of holding the silver wheel and turning the red one?
Yes. It's even better if you manage to zero the wheel, then set the tool to a reference point. That way, you are sure that you will not move just a little the wheel. But it is not always possible. I do both in the videos.

Watching the tutorial with the 300 soundtrack in the background is AWESOME!!
Maybe I'll create later a DJ chattering sound remix :D
I HAZ A BANG!
User avatar
jackssmirkingrevenge
Five Star General
Five Star General
Posts: 26216
Joined: Thu Mar 15, 2007 11:28 pm
Has thanked: 576 times
Been thanked: 347 times

Donating Members

Fri Jun 24, 2011 10:39 pm

Noted. I'm thinking of questions while watching only to have them answered a few seconds later, a testament to the pedagogical qualities of your videos, great job :)

One thing occured to me, I'm going to have to rethink hole diameters and thread sizes to adjust for metric...

I had a brief play with some acrylic rod earlier, was surprised how intuitive the dials are - I was able to move the tool in the correct direction without thinking which way to turn, I expected it to be much more confusing.
hectmarr wrote:You have to make many weapons, because this field is long and short life
User avatar
LeMaudit
Corporal 2
Corporal 2
Posts: 665
Joined: Thu Apr 16, 2009 2:48 pm

Donating Members

Fri Jun 24, 2011 10:48 pm

great job
Muchas gracias.
One thing occured to me, I'm going to have to rething hole diameters and thread sizes to adjust for metric...
Absolutely. That's the final test for your apprenticeship. :D

And remember, you also have end mills in inches.
Surely you'll be just as confused as I was... in the beginning. Then you'll learn to like inches too. Take some time, it needs to grow on your metric parts... like a weird mushroom :lol:
I HAZ A BANG!
User avatar
velocity3x
Corporal 4
Corporal 4
Posts: 828
Joined: Fri Jun 05, 2009 3:09 pm
Location: Yuma, Arizona
Contact:

Fri Jun 24, 2011 10:55 pm

jackssmirkingrevenge wrote:One thing occured to me, I'm going to have to rethink hole diameters and thread sizes to adjust for metric.
Good grief Jack.....you're a man of science! You can do it! :P
User avatar
jackssmirkingrevenge
Five Star General
Five Star General
Posts: 26216
Joined: Thu Mar 15, 2007 11:28 pm
Has thanked: 576 times
Been thanked: 347 times

Donating Members

Fri Jun 24, 2011 10:56 pm

LeMaudit wrote:And remember, you also have end mills in inches.
Yup... and I don't have a 1/2" one! There's the six piece set that goes up to 3/8" and a separate 3/8" one - need to check the part number to see if they sent it by mistake or I put the wrong part number in...
velocity3x wrote:Good grief Jack.....you're a man of science! You can do it! :P
I said I have to do it, not that it was an unsurmountable task ;)
Surely you'll be just as confused as I was... in the beginning. Then you'll learn to like inches too. Take some time, it needs to grow on your metric parts... like a weird mushroom :lol:
I had no idea machining would be so... fungal!

I'm beginning to appreciate what you said about enjoying machining... seeing the thing work makes me all tingly! Hope it doesn't wear off :)

LeMaudit, thank you again for everything. I haven't been this happy in months!

Some more stupid questions, that'll be all for now :)
Attachments
stupidquestions1.PNG
hectmarr wrote:You have to make many weapons, because this field is long and short life
User avatar
jor2daje
Specialist 4
Specialist 4
Posts: 418
Joined: Sun Oct 05, 2008 9:41 pm
Location: Southern California

Sat Jun 25, 2011 1:43 am

Quick thing on zeroing the wheels jack incase you didn't figure it out, you can tighten or loosen the small black knurled nut inside the silver hand wheels and that loosens the red ring to make zeroing easier and decreasing the chance of it sliding with relation to the hand wheel when turning them.

Edit: I'll try to answer a couple of your not very stupid questions,

1: Looks like a normal 1/4" brazed carbide cutting bit but without the red shank, can't tell for sure though.

2: can't tell im sure LeMaudit will let us know.

3: Thats a rear mounted cutoff tool, it's designed so you can have both it and a normal cutting tool mounted at the same time and you don't need to change tools to switch from cutting to parting a part off. It's mounted upside down because it is cutting on the other side of the part, ie the sharp part points down and cuts the material that is coming up to it. A normal cutoff tool would work also but that's probably what he had set up already.

4: it's a hand wheel that attaches to the back of the spindle, I believe sherline advertises it as something smooth you can hold onto to stop the lathe from spinning when you shut the motor off. A cool thing to have but at $45ish bucks might be unnecessary.
Patience is a virtue, get it if you can, seldom in a women, never in a man.
User avatar
inonickname
First Sergeant 4
First Sergeant 4
Posts: 2606
Joined: Sun Dec 07, 2008 3:27 am

Sat Jun 25, 2011 3:01 am

Yeah, 1 is just a turning tool. Brazed carbide. 2 Shouldn't be a problem, I tap like that on my lathe fairly often, granted it's a much larger lathe, but those are small threads. Jor is right on #3. #4 reminds me of a handwheel for tightening a collet drawbar. Could just be what Jor said though.
PimpAssasinG wrote:no im strong but you are a fat gay mother sucker that gets raped by black man for fun
User avatar
jackssmirkingrevenge
Five Star General
Five Star General
Posts: 26216
Joined: Thu Mar 15, 2007 11:28 pm
Has thanked: 576 times
Been thanked: 347 times

Donating Members

Sat Jun 25, 2011 5:34 am

jor2daje wrote:Quick thing on zeroing the wheels jack incase you didn't figure it out, you can tighten or loosen the small black knurled nut inside the silver hand wheels and that loosens the red ring to make zeroing easier and decreasing the chance of it sliding with relation to the hand wheel when turning them.
Noted already :) I think I've fiddled with all the knobs now :D
3: Thats a rear mounted cutoff tool, it's designed so you can have both it and a normal cutting tool mounted at the same time and you don't need to change tools to switch from cutting to parting a part off. It's mounted upside down because it is cutting on the other side of the part, ie the sharp part points down and cuts the material that is coming up to it. A normal cutoff tool would work also but that's probably what he had set up already.
Right... so it doesn't matter which way you go into the cut, from left or right? Aside from it being better visible on the side closest to you.
4: it's a hand wheel that attaches to the back of the spindle, I believe sherline advertises it as something smooth you can hold onto to stop the lathe from spinning when you shut the motor off. A cool thing to have but at $45ish bucks might be unnecessary.
Ah, I see. Well, I'm not too keen on putting my hand anywhere near that thing.

edit: going to start with the threaded tool part step one thing, appendages crossed :) going for the 12 x 1.75mm thread as it seems to be the closest equivalent.
hectmarr wrote:You have to make many weapons, because this field is long and short life
User avatar
LeMaudit
Corporal 2
Corporal 2
Posts: 665
Joined: Thu Apr 16, 2009 2:48 pm

Donating Members

Sat Jun 25, 2011 7:29 am

I'm going to have to rethink hole diameters and thread sizes to adjust for metric...
Remember you can do things a little different ways. For example, you don't have a 1/2" end mill. But you have a boring bar that can easily enlarge a 3/8" hole. You don't have a 25/64" drill... but you could drill a little smaller and just enlarge to 25/64" the hole, again with the boring bar. In fact, trying to keep exactly the sizes (except the threads ;-) ) would also be a good exercise in precision cutting.

seeing the thing work makes me all tingly! Hope it doesn't wear off
Should last at least a few years! If it does not, Sherline equipment resell very well. :D

questions,
1) A good one ;-) Seriously, it's a tool intended to cut 90° shoulders. I use it for many things, just varying the angle a bit. The 3 carbide tools you have should cover all your needs.

2) Yes. The risk to dent it. The first couple of dents on the aluminum table will be devastating for you. Then you'll get use to it. If you want to be extra careful, cover the handle or put a piece of wood on the table. I've past this state a long time ago ;-)

3) Already explained. Just convenience to have both a cutting tool and a parting tool at the same time. You have this attachment too. What matter is the cutting angle. If you put your lathe upside down it will still cut the same ;-) This toll keep the same correct angle, but mirrored on the other side of the bar. Note that mine is made in two parts because I can choose to mount the parting blade both sides. You cannot (saved a few bucks here) but in my experience I NEVER mounted the parting blade in the front. Just no needs if you can mount it on the back.

4) An almost useless big thing. I'm still stopping the chuck with my hand on it. But I very recently bought it, and for the video purpose I didn't used it to stop the motor because it was off camera (and you don't have it). I may develop the habit. It is a good beginner project too ;-)
I HAZ A BANG!
User avatar
jackssmirkingrevenge
Five Star General
Five Star General
Posts: 26216
Joined: Thu Mar 15, 2007 11:28 pm
Has thanked: 576 times
Been thanked: 347 times

Donating Members

Sat Jun 25, 2011 9:00 am

Well, it's not much, but it's a start :)

Dimensions aren't terribly precise, overall length is 28.55mm, diameter forward of the shoulder 12.75mm and diameter behind the shoulder is 13.10mm.... but yay, one small step for JSR... and I still have all my fingers :D

Also, I love this thing!

:D :D :D

Special thanks to LeMaudit for his idiot proof tutorials :)
Attachments
part1-2.JPG
part1-1.JPG
hectmarr wrote:You have to make many weapons, because this field is long and short life
User avatar
LeMaudit
Corporal 2
Corporal 2
Posts: 665
Joined: Thu Apr 16, 2009 2:48 pm

Donating Members

Sat Jun 25, 2011 9:04 am

:toothy4: hoooooooo!

So fast, I'm most impressed! Kudos to you!!!!!


[edit] I'll sound again like an old fart but... don't be overconfident. This will keep all the fingers attached.
I HAZ A BANG!
Post Reply