Boom! The classic potato gun harnesses the combustion of flammable vapor. Show us your combustion spud gun and discuss fuels, ratios, safety, ignition systems, tools, and more.
-
Thursto
- Specialist 3

- Posts: 389
- Joined: Fri Mar 02, 2007 5:11 am
- Location: Australia, SA, Adeliade, Para Hills
Thu Oct 11, 2007 6:54 am
Can you help me with this. I brougt this from a second hand store, and it said parts only, which is ok, thats all i want, i got the circut out of it, and compared to other ones on the internet and its different. I have a few pics below, can someone please point out which wires i solder to where, and what i attach to them (switch, momentary switch, battery etc)
PICS:
Cheers
~ AUSSIE LAND ~

-
Thursto
- Specialist 3

- Posts: 389
- Joined: Fri Mar 02, 2007 5:11 am
- Location: Australia, SA, Adeliade, Para Hills
Thu Oct 11, 2007 7:41 am
Yeah it was all in a cam case, i removed the wires etc.
~ AUSSIE LAND ~

-
jimmy101
- Sergeant Major 2


- Posts: 3206
- Joined: Wed Mar 28, 2007 9:48 am
- Location: Greenwood, Indiana
- Has thanked: 6 times
- Been thanked: 18 times
-
Contact:
Thu Oct 11, 2007 12:03 pm
You should have noted where the various wires were connected when it was still in the camera case.
You need to know where;
1. The battery + and - was connected
2. The power switch was connected
3. The shutter release (trigger) was connected.
Usually, the battery minus terminal is connected to the cap's plus terminal. Try to figure out the battery connections from the camera. Hook up a battery then use a piece of wire to short across the two big shiny pads and see if the board starts to charge, it'll make a whining sound. If it doesn't start to charge try shorting the two small pads as well. If the pads are the on/off switch then you can just solder a piece of wire accross the pads so the board is always on. Then wire a toggle switch in series with the battery as your main power switch.
The blob of solder near the cap looks like it was holding a piece of sheet metal. If that is the case, then it was probably one of the trigger contacts. You need to find where the other thin piece of metal was connected that made up the other half of the trigger switch. Wire a pushbutton switch between those two points as your fire button.
The two small wires at the top of the board (opposite the cap) are probably where the ready light was attached. Sometime the ready light is an LED, other times it is a neon bulb. Looking at the traces I would guess it was a neon bulb since I don't see a current limiting resistor. Neon bulbs require ~70V to light up and are non-polarized. If you still have the neon bulb try hooking it back up so you know when the board is charged.
-
Attachments
-

-
Thursto
- Specialist 3

- Posts: 389
- Joined: Fri Mar 02, 2007 5:11 am
- Location: Australia, SA, Adeliade, Para Hills
Thu Oct 11, 2007 8:58 pm
Allrigh cheers, thanks for that, except i have allready seen that, and that is one of those ones which do not match up to mine, does anyone else know where the wires go on mine?? or have a general idea??
thanks thursto.
~ AUSSIE LAND ~

-
noname
- First Sergeant 4

- Posts: 2698
- Joined: Mon Apr 10, 2006 9:19 pm
- Location: Bay Area, CA
Thu Oct 11, 2007 10:41 pm
I found it easiest to get to work when it was still in the camera case. All IU had to do was cut open the plastic cover of the flash tube, bust out the bulb, and attach two wires to the leads. I extended the two wires, and now, I just charge the flash like on a normal camera, and hit to button that takes a picture. Anything touching the two wires gets a bad zap and two tiny tiny blisters where the wires were touching.
-
Novacastrian
- Staff Sergeant 2

- Posts: 1603
- Joined: Sat Aug 11, 2007 6:59 pm
- Been thanked: 1 time
Sun Oct 14, 2007 7:28 pm
noname wrote:I found it easiest to get to work when it was still in the camera case. All IU had to do was cut open the plastic cover of the flash tube, bust out the bulb, and attach two wires to the leads. I extended the two wires, and now, I just charge the flash like on a normal camera, and hit to button that takes a picture. Anything touching the two wires gets a bad zap and two tiny tiny blisters where the wires were touching.
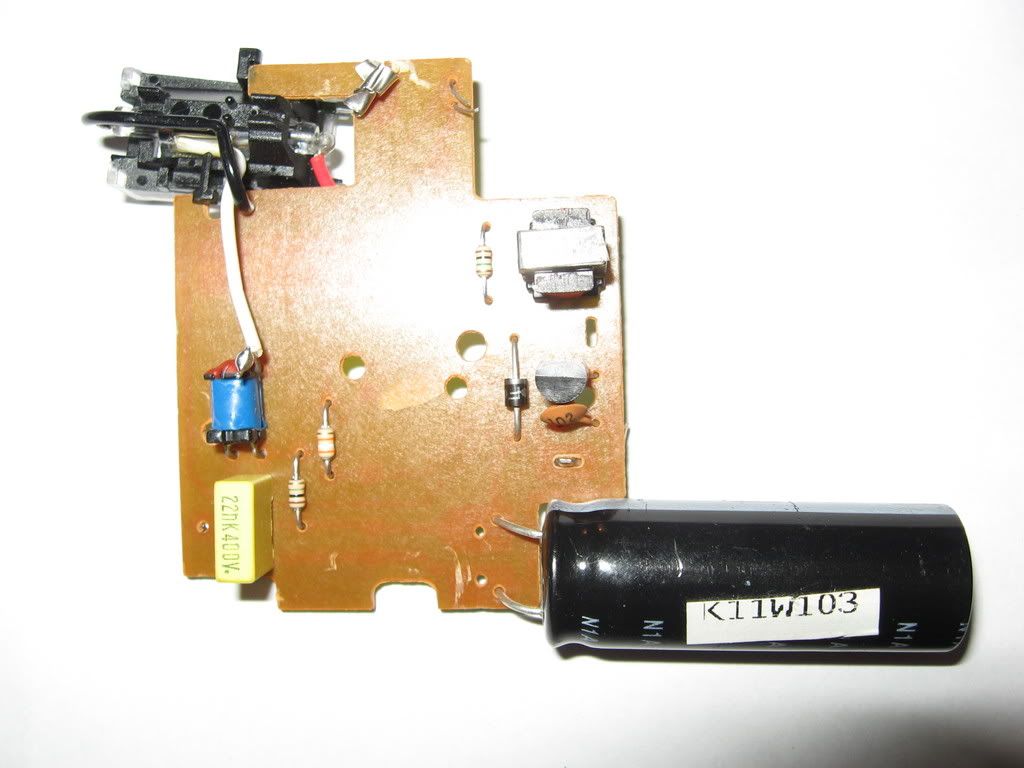
That HAS to be the easiet way i have ever heard it explained

America, the greatest gangster of all time. With 200 million odd foot soldiers at it's whim and call.
When you fill your car with refined oil remember that it has been paid for with blood and guts, some from your own countrymen, most not.
-
TwitchTheAussie
- Corporal 5

- Posts: 980
- Joined: Tue Feb 06, 2007 3:23 am
Sun Oct 14, 2007 7:55 pm
I made mine different. I just soldered a wire to the capacitor and another to the battery holder, charged it up and touched the two wires. Not good for a cannon but perfect to zap someone

Raise your horns if you love metal.
spudgunning is like sex, once you've tasted, you can't wait til next time.
-
CpTn_lAw