APG-2 (Air Propelled Grenade, version 2)

Show us your pneumatic spud gun! Discuss pneumatic (compressed gas) powered potato guns and related accessories. Valve types, actuation, pipe, materials, fittings, compressors, safety, gas choices, and more.
User avatar
Secret Squirrel
Private 3
Private 3
Posts: 54
Joined: Sun Aug 08, 2010 12:24 pm

Sat Feb 26, 2011 9:11 pm

For the entirety of my short spudding career, my main project has been developing a shoulder fired launcher for airsoft use. My first cannon ever, the APG-1, was a 1.5" barrel, mostly dwv coaxial, that I never really felt was worth posting. It was loud, inefficient, and most likely dangerous to be shot with.

So with the APG-2 I've sort of taken a step backwards. The main valve is a 3/4" sprinkler valve (the APG-1's pilot valve...) with 2" by 18" barrel and chamber. Sure performance isn't great with a valve so much smaller than the barrel, but tests from a few minutes ago indicate that it is more than sufficient for it's intended purpose, so I'm happy with it.

Image

Yes that is DWV you see, but all of it is purely cosmetic. Any parts containing compressed air are NSF-pw. The bell reducers just hide the sprinkler and quick disconnect.

Updates forthcoming with the addition of paint, grips, and other accessories.

-UPDATE-

I actually painted it a few weeks ago, just never got around to taking pics. Anyway, here's the APG-2 with Olive Drab and Flat Black paint.

The whole launcher
Image

The valve and shroud
Image

The fill valve (female QD)
Image

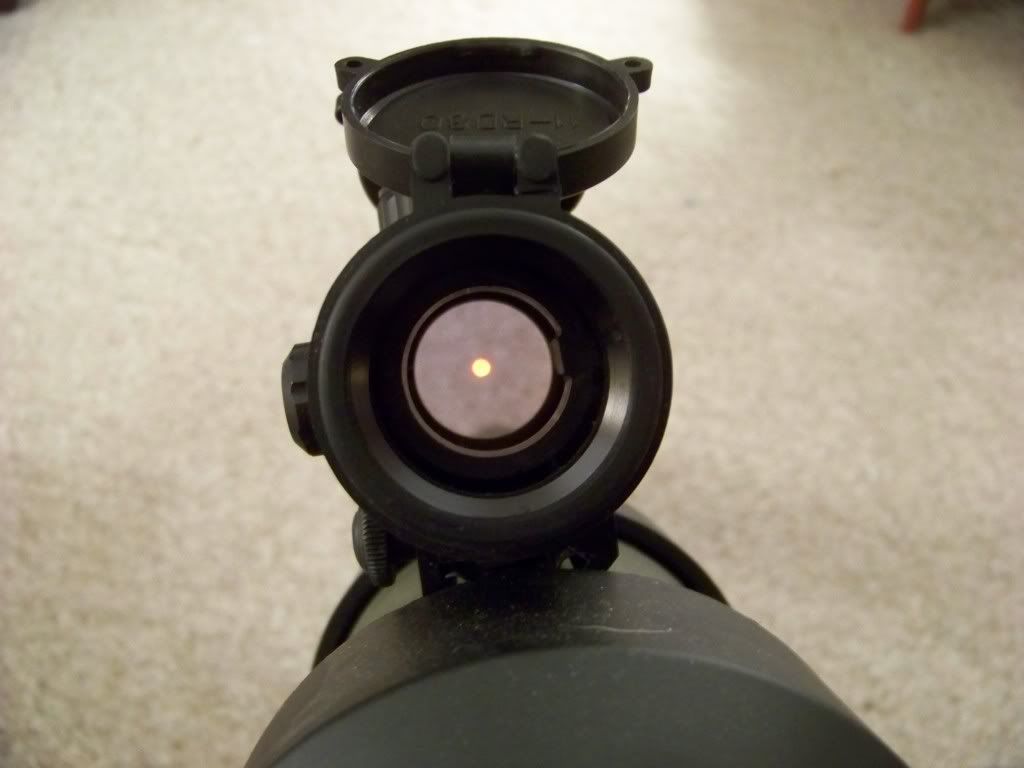
And the view down the sights (at the floor)
Image

Well I might eventually add a more comfortable pistol grip than the blowgun, but that's sort of doubtful, as the APG-3 is already in the planning stages.

-UPDATE AGAIN-
Ok, everyone;s comments inspired me to finally finish this thing. I added a sling made from a couple of belts, a pistol grip made from a chunk of blue foam covered in bondo, and stenciled "APG-2" on both sides of the chamber.

The finished launcher
Image

Closeup of the chamber stencil
Image
Last edited by Secret Squirrel on Fri Apr 15, 2011 6:39 pm, edited 2 times in total.
User avatar
Lockednloaded
Staff Sergeant
Staff Sergeant
United States of America
Posts: 1566
Joined: Thu Sep 03, 2009 9:38 pm
Location: Texas, USA
Been thanked: 7 times

Sat Feb 26, 2011 9:28 pm

That looks amazing, it clean, ergonomic, and functional. All you need is a nice paint job, maybe another bell reducer on the barrel, and a pistol grip to make it look perfect
User avatar
clemsonguy1125
Sergeant 5
Sergeant 5
Posts: 1485
Joined: Tue Jul 21, 2009 4:00 pm
Location: East Coast

Sat Feb 26, 2011 9:31 pm

That looks awesome, its sleek and effective. Ive got an old sprinkler valve laying around and you just gave me a few ideas.
User avatar
Gun Freak
Lieutenant 5
Lieutenant 5
Posts: 4971
Joined: Mon Jan 25, 2010 4:38 pm
Location: Florida
Been thanked: 8 times

Sat Feb 26, 2011 10:04 pm

Really nice... I like the way you covered up the valve.
OG Anti-Hybrid
One man's trash is a true Spudder's treasure!
Golf Ball Cannon "Superna"M16 BBMGPengunHammer Valve Airsoft SniperHigh Pressure .22 Coax
Holy Shat!
User avatar
mark.f
Sergeant Major 4
Sergeant Major 4
Eritrea
Posts: 3638
Joined: Sat May 06, 2006 11:18 am
Location: The Big Steezy
Has thanked: 58 times
Been thanked: 61 times
Contact:

Donating Members

Sat Feb 26, 2011 10:26 pm

Very nice. I always like to see people dress up their cannons with DWV because eventually somebody comes along and throws a fit. :)
User avatar
Gaderelguitarist
Corporal
Corporal
Posts: 580
Joined: Sat Aug 16, 2008 9:56 pm
Location: Columbia, MD
Contact:

Sat Feb 26, 2011 10:28 pm

That looks fantastic. I'll bet it packs a punch on the field. Only question is why did you mount the sight on the top? I would hate to try to look down the sight and fire this from my shoulder at the same time.

Plans for paint?
so many muchness
User avatar
Secret Squirrel
Private 3
Private 3
Posts: 54
Joined: Sun Aug 08, 2010 12:24 pm

Sat Feb 26, 2011 11:11 pm

Where else would I mount the sight?

With the sight where it is now I can see through it just fine with the chamber over my shoulder.

Paint is probably going to be olive drab on the pipe, and flat black on the fittings and grips. And as with real shoulder fired launchers it will need a set of obvious instruction printed on the side. "1. Aim at enemy..."
User avatar
jackssmirkingrevenge
Five Star General
Five Star General
Posts: 26216
Joined: Thu Mar 15, 2007 11:28 pm
Has thanked: 576 times
Been thanked: 347 times

Donating Members

Sun Feb 27, 2011 3:46 am

Gaderelguitarist wrote:That looks fantastic. I'll bet it packs a punch on the field. Only question is why did you mount the sight on the top? I would hate to try to look down the sight and fire this from my shoulder at the same time.
Dimensions are similar to the LAW, it makes sense to have the sight on top.

Image

Good job, in spite of the "inadequate" valve I'm sure performance is more than suitable for the purpose.

One thing I would probably have changed is the C:B ratio, smaller changer and longer barrel.
hectmarr wrote:You have to make many weapons, because this field is long and short life
User avatar
Secret Squirrel
Private 3
Private 3
Posts: 54
Joined: Sun Aug 08, 2010 12:24 pm

Sun Feb 27, 2011 11:37 am

jackssmirkingrevenge wrote:One thing I would probably have changed is the C:B ratio, smaller changer and longer barrel.
I put the design through GGDT before building it. With the flow restriction of the valve the 1:1 C:B ratio turns out to be a near optimum ratio for the around 70psi pressures I'll usually run it at.
Attachments
GGDT file for the APG-2.
User avatar
jackssmirkingrevenge
Five Star General
Five Star General
Posts: 26216
Joined: Thu Mar 15, 2007 11:28 pm
Has thanked: 576 times
Been thanked: 347 times

Donating Members

Sun Feb 27, 2011 3:30 pm

Secret Squirrel wrote:I put the design through GGDT before building it. With the flow restriction of the valve the 1:1 C:B ratio turns out to be a near optimum ratio for the around 70psi pressures I'll usually run it at.
Fair enough, probably as you're using such a low density projectile.
hectmarr wrote:You have to make many weapons, because this field is long and short life
User avatar
Secret Squirrel
Private 3
Private 3
Posts: 54
Joined: Sun Aug 08, 2010 12:24 pm

Fri Apr 15, 2011 12:15 am

Updated with pics of the now painted launcher.
User avatar
jackssmirkingrevenge
Five Star General
Five Star General
Posts: 26216
Joined: Thu Mar 15, 2007 11:28 pm
Has thanked: 576 times
Been thanked: 347 times

Donating Members

Fri Apr 15, 2011 1:29 am

Very nice, just needs some stencilling ;)

Image
hectmarr wrote:You have to make many weapons, because this field is long and short life
User avatar
Gaderelguitarist
Corporal
Corporal
Posts: 580
Joined: Sat Aug 16, 2008 9:56 pm
Location: Columbia, MD
Contact:

Fri Apr 15, 2011 9:51 am

Have you thought of taking any steps to covering the blowgun? You shrouded the sprinkler valve very successfully. Now that blowgun seems like a sore thumb.
so many muchness
User avatar
jackssmirkingrevenge
Five Star General
Five Star General
Posts: 26216
Joined: Thu Mar 15, 2007 11:28 pm
Has thanked: 576 times
Been thanked: 347 times

Donating Members

Fri Apr 15, 2011 9:54 am

Gaderelguitarist wrote:Have you thought of taking any steps to covering the blowgun?
Yes... with his trigger hand :D
hectmarr wrote:You have to make many weapons, because this field is long and short life
User avatar
LeMaudit
Corporal 2
Corporal 2
Posts: 665
Joined: Thu Apr 16, 2009 2:48 pm

Donating Members

Fri Apr 15, 2011 11:31 am

Really impressive work! So clean, love it!
A bit of FIMO or thermoplastic on the handle and trigger would even more improve the look.

Or you could cover it with some shaped pieces of wood, and use some shrinking tubing to make an even and smooth plastic like surface to cover it.

Any chance for a shooting video?
Post Reply