Hiya folks,
I'm using the last few weeks of the summer vacation to build myself some guns.
You might have seen my previous 'sniper rifle' thread, this is the follow-up to that.
I've had the concept/idea in my mind for a long time, but this morning it finally came through.
Since I don't have access to advanced machinery, improvisation is key.
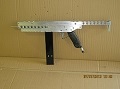
I just sketched this in the early morning, but I'm quite sure it will work. I had to downscale the picture a lot,
because of the 1 MiB limit (not even sure what a MiB is). If there are any unclarities, be sure to ask.
I'll start working on it tomorrow morning with a pal.
Upcoming 'flintlock' style pistol


-
mrfoo

- Specialist 2


- Posts: 278
- Joined: Wed Apr 29, 2015 11:05 am
- Has thanked: 88 times
- Been thanked: 91 times
You might want to take a closer look at your trigger mechanism. The trigger / sear doesn't appear to be holding the hammer in any way.
The least painful way to put images up (without having to bother with resizing etc) is to use a host like tinypic.com, and put the image url inside [img] tags. Hell, tinypic even gives you pre-prepared bbcode for forums on uploading...
The least painful way to put images up (without having to bother with resizing etc) is to use a host like tinypic.com, and put the image url inside [img] tags. Hell, tinypic even gives you pre-prepared bbcode for forums on uploading...
Don't mind the details, it's a quick overview of how it should be build. I'm working on a more precise drawing, but since I don't have all the parts yet, I can't progress much yet.You might want to take a closer look at your trigger mechanism. The trigger / sear doesn't appear to be holding the hammer in any way.
I'll try that next time, thanks. I took the picture straight from the scanner but 1) the file was too big 2) the dimensions were not accepted (7000 x 5000 pixels)The least painful way to put images up (without having to bother with resizing etc) is to use a host like tinypic.com, and put the image url inside [img] tags. Hell, tinypic even gives you pre-prepared bbcode for forums on uploading...
Update:
Today, we've done the shopping and we only need 1 more connector, which the very kind shopowner will specially order for us. Wednesday we'll get it (hopefully).
Got some hydraulic tubing for the barrel, a piece of 20cm and one of 40cm, with thread ends so it can be screwed directly into the QEV. This is to save space and money.
The stock/handle will be made out of oak or maple, probably oak. Picked up a nice piece of oak in the form of firewood at my grandpa's, see the picture. I'm going to saw it all square and plane it a bit, then glue a scrap piece onto the bottom, since the block isn't high/broad enough to make the whole handle out of (if that makes sense).
Tomorrow I'll show the pilot valve, still in the making, and I'll probably keep working on the stock. Will post more pictures later, but at the moment there isn't much to show yet.
- Attachments
-
- Rough block of oak (don't have a proper workbench yet, that's why I use the clamp)
-
- Some of the parts we've already got, piled up
-
- Threaded barrel and pilot
-
Brian the brain

- Moderator


- Posts: 3497
- Joined: Mon Dec 05, 2005 2:06 am
- Location: Holland
- Been thanked: 7 times
Depending on the pressure you intend to use...you could replace the elbows leading up to the qev with a hose.
That would allow you to make it break-barrel, with the barrel and reservoir hinging down to breechload while the valve stays fixed in position.
I've ordered a ballvalve wich I intend to convert to a high pressure ball-joint.
This would give me the same thing, but suitable for higher pressures.
Hopefully I can show you what I mean in a short while.
Gun Freak wrote:
Oh my friggin god stop being so awesome, that thing is pure kick ass. Most innovative and creative pneumatic that the files have ever come by!
Can't ask for a better compliment!!
Oh my friggin god stop being so awesome, that thing is pure kick ass. Most innovative and creative pneumatic that the files have ever come by!
Can't ask for a better compliment!!
-
mrfoo
- Specialist 2
- Posts: 278
- Joined: Wed Apr 29, 2015 11:05 am
- Has thanked: 88 times
- Been thanked: 91 times
I suspect he's talking about using a modified ballvalve, presumably with an external pivot, as the break barrel mechanism.
Rather than doing that, I'd personally drill into the ballvalve at 90° and use the ball itself as the loading port.
Rather than doing that, I'd personally drill into the ballvalve at 90° and use the ball itself as the loading port.
Update:
We've had a lot of issues so far.
1. The presta valve is not suitable as a pilot valve, since it's flow is too limited.
We had to use one of those ebay blue slider valves instead.
2. The QEV we intended to use didn't work. The piston didn't move very smoothly, and was a lot bigger than the piston in the generic black box qev. The springs I normally use didn't work for this type of QEV, because they're too weak.
Does anyone know where to find suitable springs? Can I make them myself?
3. We failed at soldering, so we filled some holes with glue.
The thing we have now is not nearly as compact as originally planned, so we might just turn it into a light weight rifle.
-
air_dannon

- Private 3

- Posts: 58
- Joined: Thu Dec 06, 2012 12:04 pm
- Location: Wisconsin
cool. can't wait to see it done.
Create an account or sign in to join the discussion
You need to be a member in order to post a reply
Create an account
Not a member? register to join our community
Members can start their own topics & subscribe to topics
It’s free and only takes a minute
Sign in
-
- Similar Topics
- Replies
- Views
- Last post
-
- 22 Replies
- 9831 Views
-
Last post by jackssmirkingrevenge
-
- 0 Replies
- 50685 Views
-
Last post by farcticox1
-
- 10 Replies
- 4891 Views
-
Last post by Brian the brain
-
- 4 Replies
- 3991 Views
-
Last post by VH_man
-
- 7 Replies
- 84207 Views
-
Last post by quinn whitsitt